


这一节主要跟大家讲解下Photoshop中自由变换和锁定透明像素相结合的应用实例。
小编在这里以制作太极图这个实例,来给大家详细解说下,希望对大家认识与学习自由变换和锁定透明像素有所帮助。

工具/原料
电脑 ps软件
说明:小编的ps软件是CS6,不管你下载的是什么类型的ps,基本上都是大同小异的,所以均可以制作太极图。
制作太极图步奏:
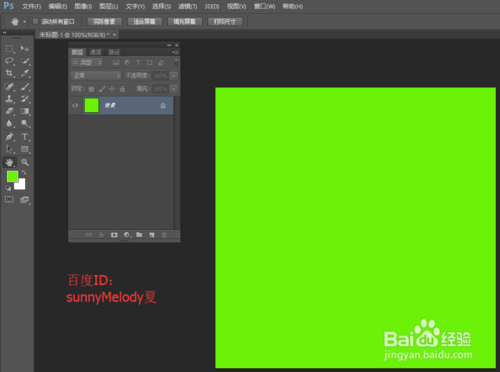
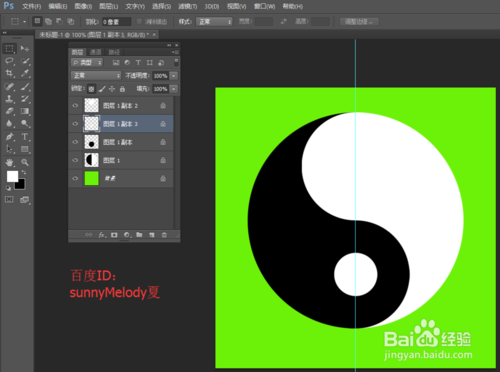
1、打开ps的软件,新建一个500*500的画布。点击前景色,将前景色设置为绿色,按Alt+Delete键,前景色填充,这时候就得到一个绿色的画布。(说明:按F7打开图层面板,这里为了展示方便,小编就将面板移到左边位置,方便大家观看。)
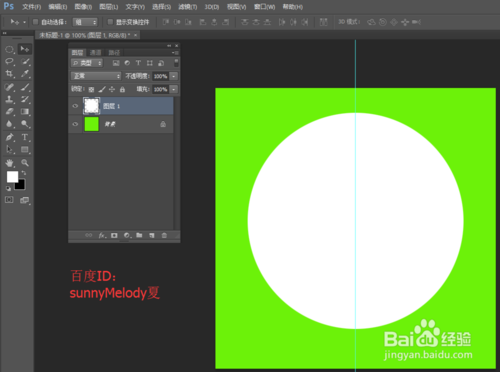
2、新建一个图层1,选择椭圆选框工具,画一个正圆。点击前景色,将前景色设置为白色,按Alt+Delete键,前景色填充,这时候得到一个白色的正圆。选择属性栏中的视图—新建参考性,新建一个垂直的参考线,选择移动工具,鼠标移动参考线,使其到正圆的中心,这里参考线会自动捕捉正圆的中心位置哦。(注意:这里一定要选择移动工具,否则不能移动参考线哦。)
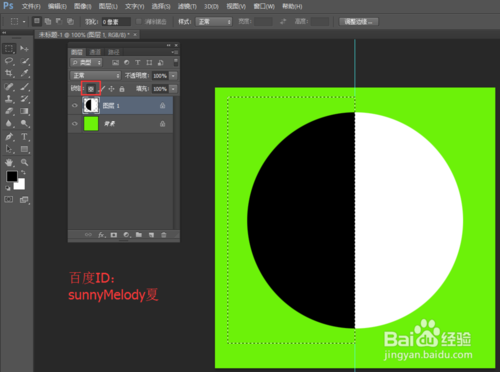
3、选择矩形选框工具,将左边的半个圆框起来;再点击锁定透明像素,图层后面会出现一个锁的小图标,将前景色设置为黑色,按按Alt+Delete键,前景色填充。(注意:这里一定要先按锁定透明像素,再填充黑色。)
4、将图层1向下拖动到新建图层处,复制两个图层,分别是图层1副本和图层1副本2。选中图层1副本,按Ctrl+T变换,将变换中心点选择为中下方,点击保持长宽比的链接,将比例设置为50,按Alt+Delete键,前景色填充为黑色;再选中图层1副本2,按Ctrl+T变换,将变换中心点选择为中上方,点击保持长宽比的链接,将比例设置为50,按shift+Delete键,前景色填充为白色。
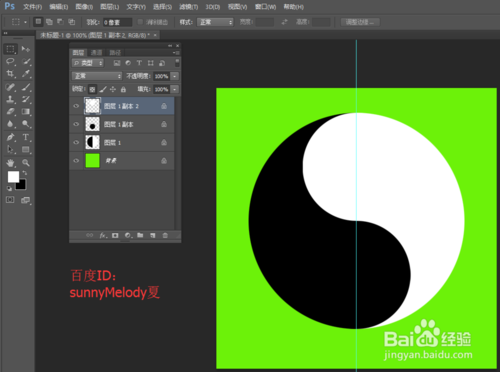
5、再拖动图层1副本到新建图层处,新建一个图层1副本3,按Ctrl+T变换,这里缩放中心点位置不变保持在正中心,还是点击保持长宽比的链接,将比例设置为40,变换好后填充为白色。
6、同样的方法,再拖动图层1副本2到新建图层处,新建一个图层1副本4,按Ctrl+T变换,这里缩放中心点位置不变,保持在正中心,还是点击保持长宽比的链接,将比例设置为40,变换好后填充为黑色。
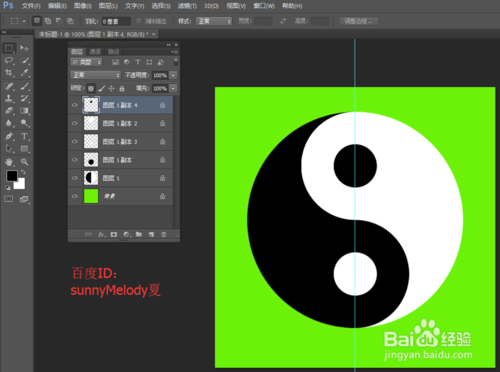
7、最后,再点击视图,选择清除参考线,参考线就没有了,让我们看下最终的效果图。

8、这里有几个重要的知识点,小编为大家总结一下。
1.新建参考线
在Photoshop中,新建参考线是很重要的。我们在移动参考线时,一定要先选择移动工具,才能移动参考线,否则,你将不能移动参考线。
2.锁定透明像素
在Photoshop中,锁定透明像素的应用也很总要。这里我为什么可以直接填充颜色,就是因为我锁定了透明像素,保护了无颜色即透明像素的部分。
3.自由变换:中心点+保持长宽比
在Photoshop中,自由变换应用的很多。我们在变换时,要注意选择中心点以及是否保持长宽比,中心点不同,变换的位置就不同;点击保持长宽比,它就是等比例缩放,否则,它将不是等比例缩放。
以上就是这篇经验的全部内容,希望对大家有所帮助。如果您有任何的疑问,欢迎给小编评论留言,小编都会一一解答的;如果您有其他好的建议,也请评论留言小编,让大家相互学习,共同进步。
最后,感谢您的阅读,祝您生活愉快!

 Beyond Editing: Photoshop's Creative CapabilitiesMay 03, 2025 am 12:12 AM
Adobe Photoshop goes beyond simple editing and becomes a creative tool for artists and designers. 1) It provides a wealth of tools such as brushes, stamp tools, blend modes and layer styles, supporting adjustments from basic images to complex digital paintings and 3D designs. 2) These tools implement functions through pixel-level operations, allowing users to create unique visual effects.
 Photoshop: Exploring Pricing Models and OptionsMay 02, 2025 am 12:12 AM
Photoshop offers two pricing models: single purchase and subscription service. 1. Single purchase: Pay $699 in one lump sum, permanent use, but no updates and cloud services. 2. Subscription service: $20.99 per month or $239.88 per year, and the latest version and cloud services are available. 3. Enterprise plan: $33.99 per user per month, including team management and additional cloud storage. 4. Educational Offer: Students and teachers are $19.99 per month, including multiple CreativeCloud applications.
 Photoshop: Mastering Layers and CompositionMay 01, 2025 am 12:05 AM
The method to create a new layer in Photoshop is: 1. Click the "New Layer" button at the bottom of the layer panel; 2. Use the shortcut keys Ctrl Shift N (Windows) or Command Shift N (Mac). The layers are like transparent sheets on canvas, allowing design elements to be managed separately, non-destructive editing and experimenting, and improving design levels.
 Photoshop Applications: From Photo Editing to Digital ArtApr 30, 2025 am 12:10 AM
Photoshop is widely used in the fields of image processing and digital art, and is suitable for photo editing and digital art creation. 1. Photo editing: Adjust brightness and contrast Use the "Brightness/Contrast" tool. 2. Digital art: Use brush tools to create paintings. 3. Basic usage: Use the "Red Eye Tool" to remove red eyes. 4. Advanced usage: Use layers and masks for image synthesis. 5. Debug: Recover the lost layers by checking the layer panel. 6. Performance optimization: Adjust memory usage to improve running speed.
 Photoshop's Core Function: Image Editing and ManipulationApr 29, 2025 am 12:17 AM
Photoshop's core functions are image editing and operation, including adjusting the color, brightness, contrast of images, applying filter effects, cropping and adjusting image size, performing image synthesis, etc. 1. Adjust brightness and contrast: Open the image, select the "Adjust" option in the "Image" menu, select "Brightness/Contrast", and adjust the slider. 2. Use the color level adjustment layer and layer mask: Click the "Create a new fill or adjust layer" button, select "Scale", adjust the color level, add a layer mask, and use the brush tool to control the adjustment effect.
 Photoshop: The Power of Raster Graphics EditingApr 28, 2025 am 12:13 AM
Photoshop is a powerful tool for handling raster graphics, and its core functions include layers and masks, filters and adjustments. 1. Layers and masks allow independent editing and non-destructive modifications. 2. Filters and adjustments can quickly change the appearance of the image, but they should be used with caution to avoid affecting the image quality. By mastering these functions and advanced skills, you can greatly improve your image editing and creative abilities.
 Photoshop: A Versatile Tool for Image ManipulationApr 27, 2025 am 12:13 AM
Photoshop is so powerful in the field of image processing because of its versatility and intuitive operating interface. 1) It can handle various tasks from basic adjustment to complex synthesis, such as adjusting brightness and contrast. 2) Working based on layers and masks allows non-destructive editing. 3) Examples of usage include adjusting color balance and creating layer masks. 4) Common errors such as excessive editing can be avoided through the History panel. 5) Performance optimization suggestions include the use of smart objects and shortcut keys.
 Photoshop Trials and Alternatives: Exploring Free AccessApr 26, 2025 am 12:23 AM
Photoshop offers a free 7-day trial period. To maximize the use of the trial period, 1) sign up for multiple Adobe accounts, 2) use the student or education version, and 3) subscribe to Adobe CreativeCloud. Free alternatives include: 1) GIMP, 2) Photopea, 3) Krita, these software can meet daily image editing needs.


Hot AI Tools

Undresser.AI Undress
AI-powered app for creating realistic nude photos

AI Clothes Remover
Online AI tool for removing clothes from photos.

Undress AI Tool
Undress images for free

Clothoff.io
AI clothes remover

Video Face Swap
Swap faces in any video effortlessly with our completely free AI face swap tool!

Hot Article
Hot Tools

SAP NetWeaver Server Adapter for Eclipse
Integrate Eclipse with SAP NetWeaver application server.

VSCode Windows 64-bit Download
A free and powerful IDE editor launched by Microsoft

SublimeText3 Linux new version
SublimeText3 Linux latest version

mPDF
mPDF is a PHP library that can generate PDF files from UTF-8 encoded HTML. The original author, Ian Back, wrote mPDF to output PDF files "on the fly" from his website and handle different languages. It is slower than original scripts like HTML2FPDF and produces larger files when using Unicode fonts, but supports CSS styles etc. and has a lot of enhancements. Supports almost all languages, including RTL (Arabic and Hebrew) and CJK (Chinese, Japanese and Korean). Supports nested block-level elements (such as P, DIV),

Dreamweaver CS6
Visual web development tools

