这篇教程就为大家介绍ps动态图片简单制作方法,教程很不错,推荐到PHP中文网,喜欢的朋友一起来学习吧!
关键有几点
1) 活动要重复、循环、轻微
2) 静止留白的空间要占大比例 (最好有人做衬托)
3) 色调要有电影感 / 怀旧感 (黑白亦可)
(一) 拍摄工作U
1) 用脚架加上一部可以录像的相机,然后拍摄一段短片。
2) 拍摄前先要构思好什么地方静止,什么地方活动,而活动最好是可以循环而自然接驳。
3) 拍摄时使用M档,包括白平衡与对焦也要使用手动,减少无谓变化。
先来看两个简单的例子

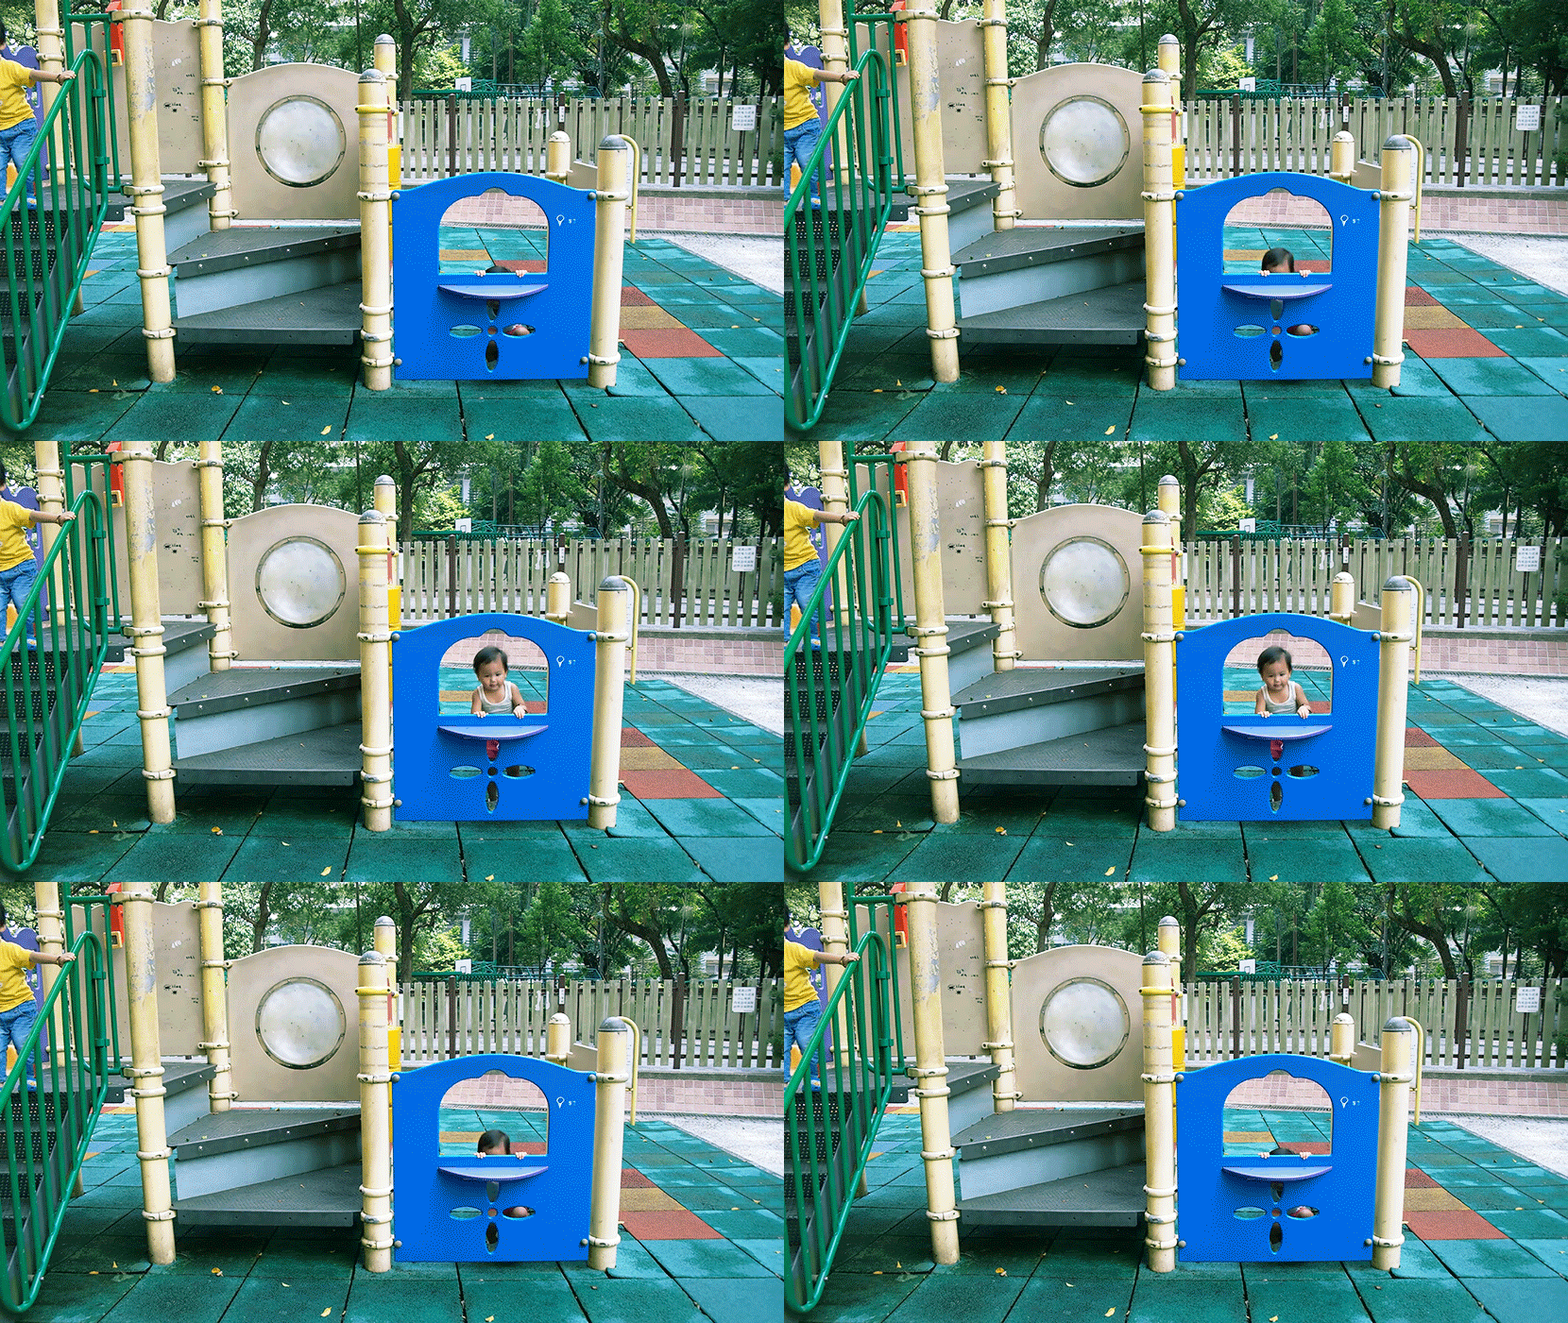
(二) 后期工作U
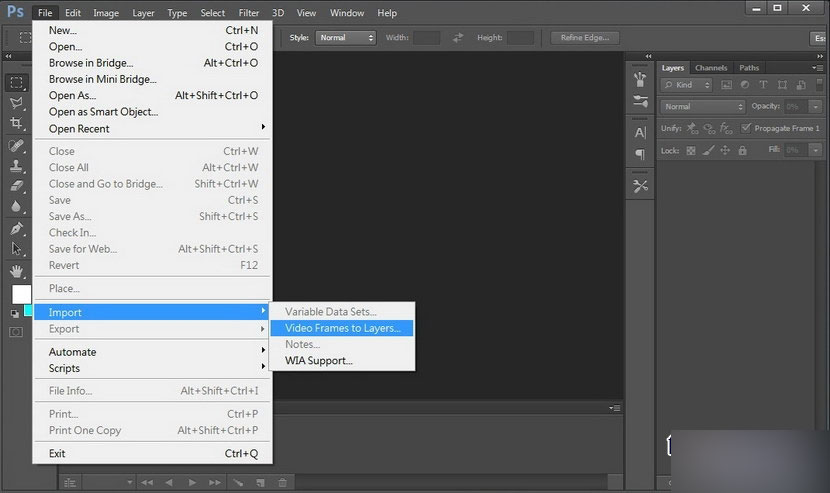
当你拍摄完成后,就可以用 Photoshop 编辑了 (示范图中是CS6),首先输入影片,到File Import Video Frames to Layers
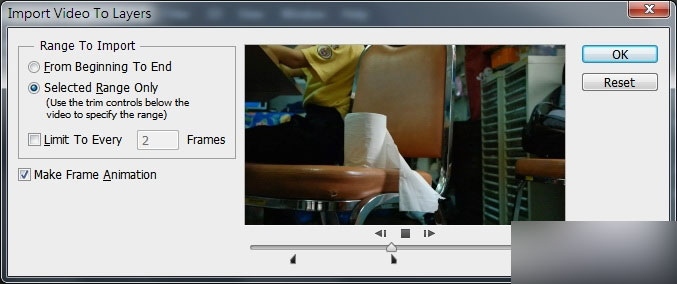
选择你需要的影片段落,但这个不太好用,如果你有其他影片制作软件,先用它们来剪裁会比方便。
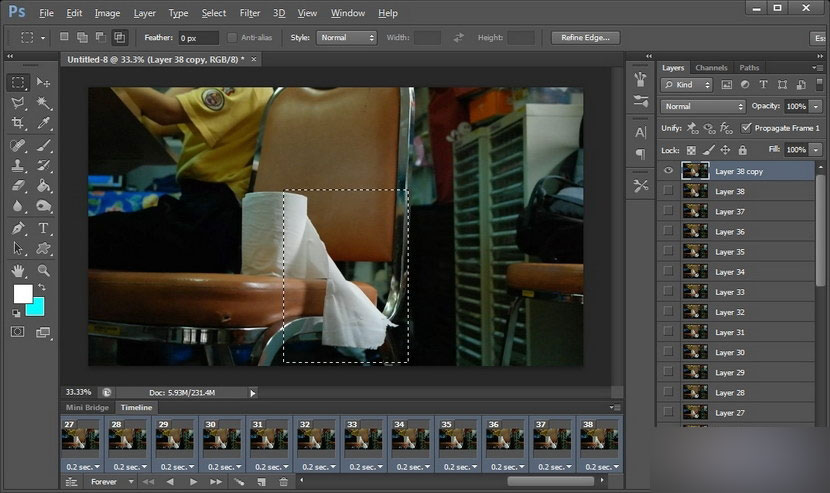
PS 会将影片的每一格变成图层,并且透过视窗「Timeline」显示,如果找不到的话,到 menu 找 Window Timeline,如下图。
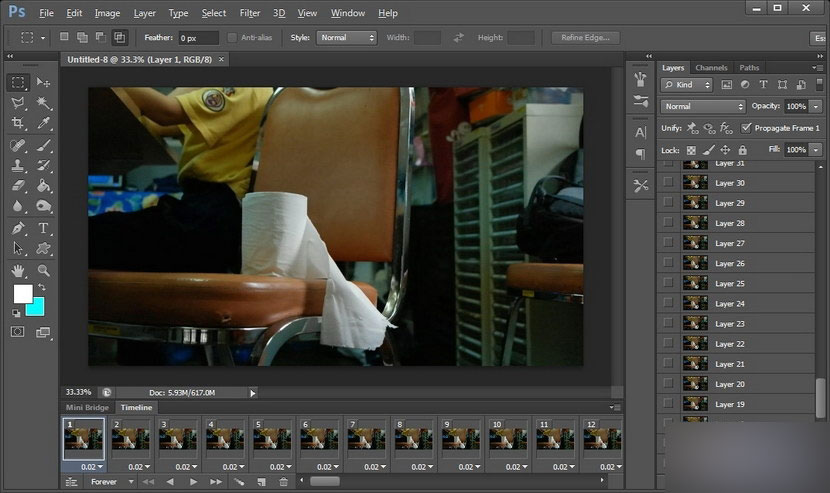
复制一张你认为适合做静止画面底图的layer,放到最顶。用选取工具,将你希望动起来的部份选取出来,然后删除,选取时要预留一点空间,尤其是遇上阴影 / 倒影部份。删除后你要选取全部的timeline,再到置顶图层点开「眼睛」(visible),这样才会成为所有影格的「背景图」。还有你选取全 timeline 后,可自行设定各影格的速度,例如这里设定是0.2 秒,稍慢的话会更有电影感。
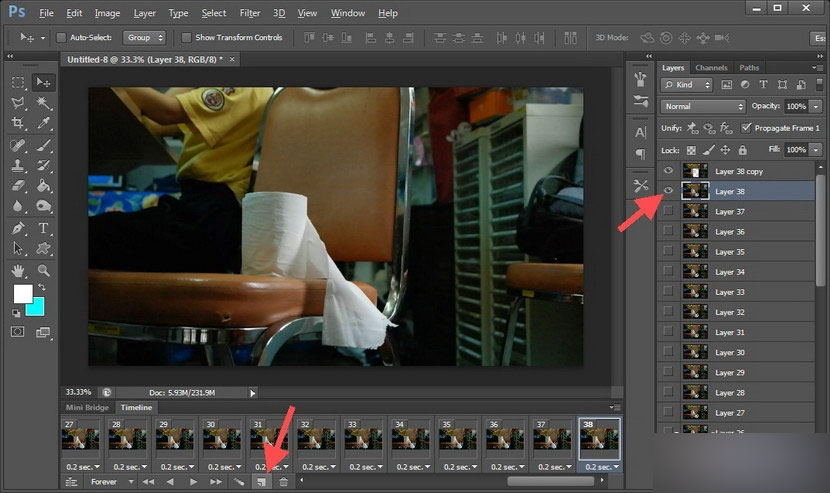
理论上如果你的影片本身是完美地循环接驳的话,当你按左下角的 play 时,它就会不断播放然后变成一个原始的动态照片。但如果不行的话,你可以自行增加影格,方法就是按 timeline 下方的按钮增加一格,然后自行 visible 该影格的图层,如下图。
秘诀是将原本的影片,从最尾倒带再增加一次,这样就会很流畅。例如原本是 A B C,现在你变成 A B C B A 这样循环的话就自然会较流畅,当然也视乎你的影片而定。(例如单向行车的话,就不用这样做)
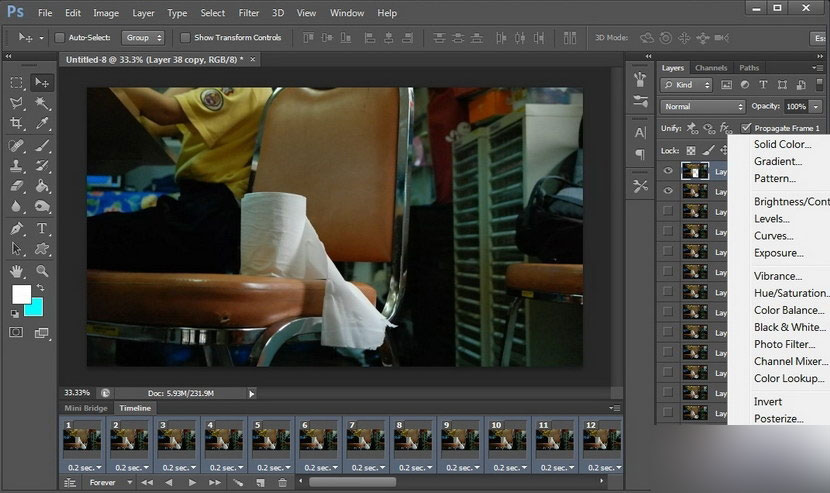
当影片循环流畅后,你就要替照片调色。首先谨记要先选取 timeline 所有影格,然后到右下角增加 adjustment layer,例如这里就用了 Curves 来调节亮度对比,也可以用Gradient Map 调出电影色调,记得每次都要选取所有影格。
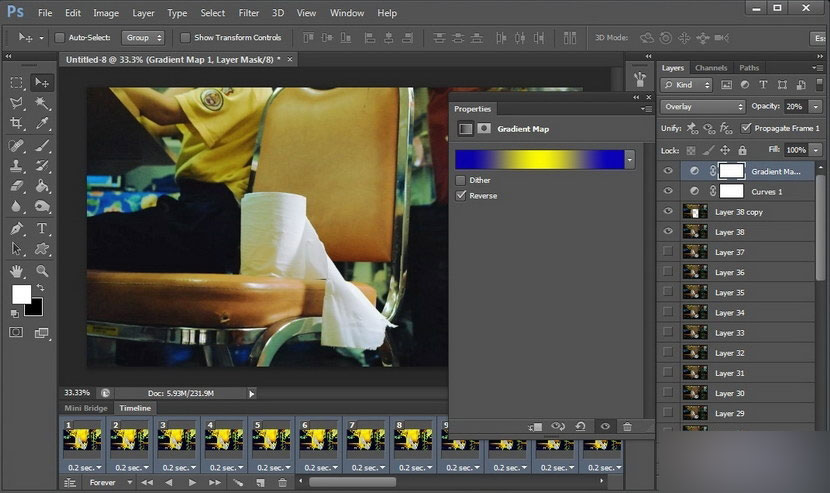
先选了蓝黄蓝 (reverse),再用 overlay 覆盖模式,及 opacity 只剩 20%,效果如下图。
如果对效果满意的话,就可以到 Image Image size 调整动态照片的大小。
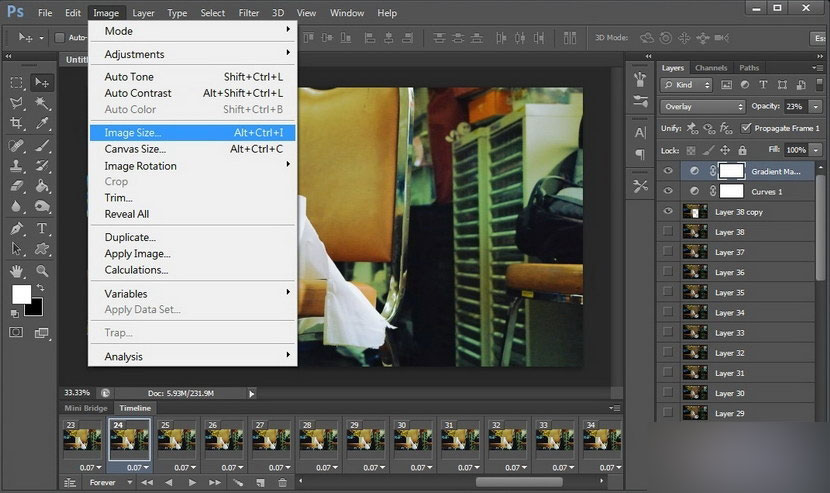
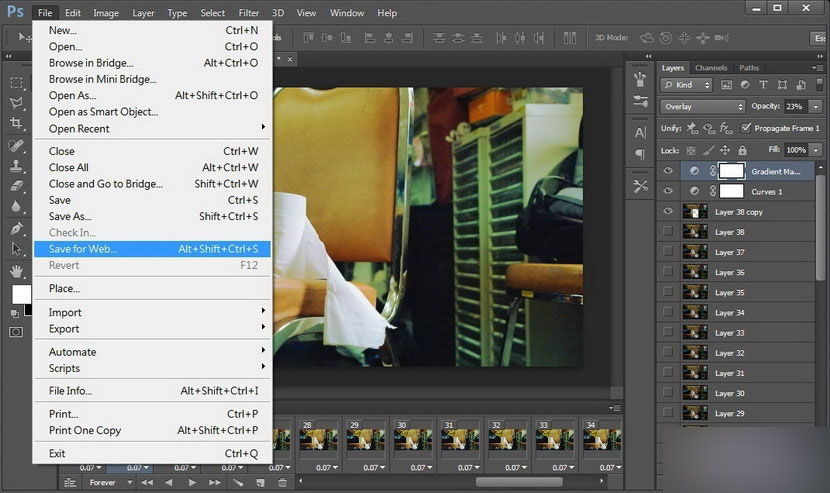
完成后就到 file save for web 输出动态照片为 GIF 档
(不是 save as)。
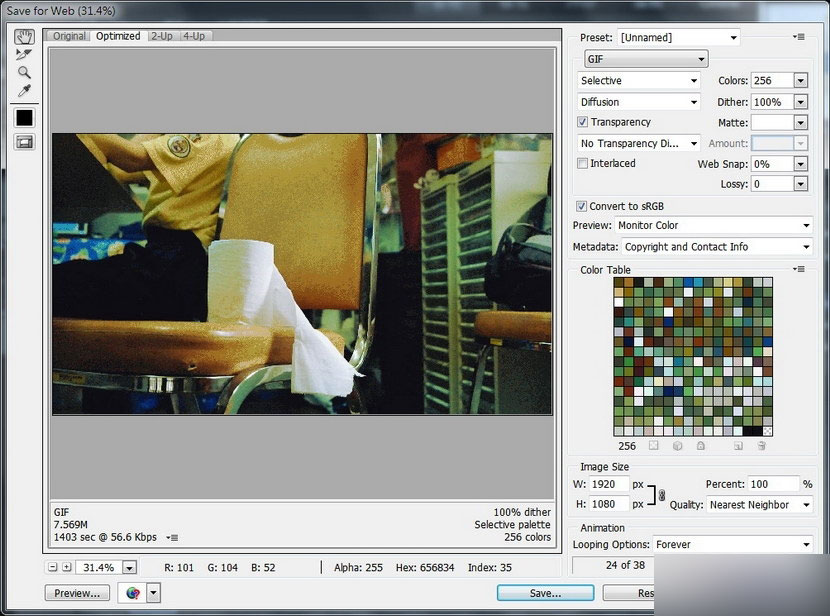
然后会弹出这个视窗,基本上都没太大问题,留意右下角,你还可以在这里缩小照片的,不过这里的压缩质量较差,但好处是文件小省空间;另外要留意一下 looping options 是不是 forever,没有问题就 save。
最后,如果要上传跟别人分享,要找一个能支持GIF 档的空间或页面
以上就是ps动态图片简单制作教程,希望能对大家有所帮助!
 Photoshop: Investigating Free Trials and Discount OptionsApr 14, 2025 am 12:06 AM
You can get the access to Photoshop in the most economical way: 1. Experience the software features with a 7-day free trial; 2. Find student or teacher discounts, as well as seasonal promotions; 3. Use coupons on third-party websites; 4. Subscribe to Adobe CreativeCloud's monthly or annual plan.
 Photoshop for Designers: Creating Visual ConceptsApr 13, 2025 am 12:09 AM
Creating visual concepts in Photoshop can be achieved through the following steps: 1. Create a new document, 2. Add a background layer, 3. Use the brush tool to draw basic shapes, 4. Adjust colors and brightness, 5. Add text and graphics, 6. Use masks for local editing, 7. Apply filter effects, these steps help designers build a complete visual work from scratch.
 Is Photoshop Free? Understanding Subscription PlansApr 12, 2025 am 12:11 AM
Photoshop is not free, but there are several ways to use it at low cost or free: 1. The free trial period is 7 days, and you can experience all functions during this period; 2. Student and teacher discounts can cut costs by half, and school proof is required; 3. The CreativeCloud package is suitable for professional users and includes a variety of Adobe tools; 4. PhotoshopElements and Lightroom are low-cost alternatives, with fewer functions but lower prices.
 Photoshop's Value: Weighing the Cost Against Its FeaturesApr 11, 2025 am 12:02 AM
Photoshop is worth the investment because it provides powerful features and a wide range of application scenarios. 1) Core functions include image editing, layer management, special effects production and color adjustment. 2) Suitable for professional designers and photographers, but amateurs may consider alternatives such as GIMP. 3) Subscribe to AdobeCreativeCloud can be used as needed to avoid high one-time spending.
 The Core Purpose of Photoshop: Creative Image DesignApr 10, 2025 am 09:29 AM
Photoshop’s core use in creative image design is its powerful functionality and flexibility. 1) It allows designers to transform creativity into visual reality through layers, masks and filters. 2) Basic usages include cropping, resizing and color correction. 3) Advanced usages such as layer styles, blend modes and smart objects can create complex effects. 4) Common mistakes include improper layer management and excessive use of filters, which can be solved by organizing layers and using filters reasonably. 5) Performance optimization and best practices include rational use of layers, regular saving of files, and using shortcut keys.
 Photoshop for Web Design: Advanced Techniques for UI/UXApr 08, 2025 am 12:19 AM
Photoshop can be used in web design to create high-fidelity prototypes, design UI elements, and simulate user interactions. 1. Use layers, masks and smart objects for basic design. 2. Simulate user interaction through animation and timeline functions. 3. Use scripts to automate the design process and improve efficiency.
 Newbie's article: Use the ps brush to add crack effects to the font (share)Apr 07, 2025 am 06:21 AM
In the previous article "Teaching you step by step to add printing effects to plate images using ps (Favorites)", I introduced a small trick to use ps to add printing effects to plate images using ps. The following article will introduce to you how to use the ps brush to add crack effects to the font. Let’s take a look at how to do it.
 Photoshop Advanced Typography: Creating Stunning Text EffectsApr 07, 2025 am 12:15 AM
In Photoshop, you can create text effects through layer styles and filters. 1. Create a new document and add text. 2. Apply layer styles such as shadows and outer glow. 3. Use filters such as wave effects and add bevel and relief effects. 4. Use masks to adjust the effect range and intensity to optimize the visual impact of the text effect.


Hot AI Tools

Undresser.AI Undress
AI-powered app for creating realistic nude photos

AI Clothes Remover
Online AI tool for removing clothes from photos.

Undress AI Tool
Undress images for free

Clothoff.io
AI clothes remover

AI Hentai Generator
Generate AI Hentai for free.

Hot Article

Hot Tools

Safe Exam Browser
Safe Exam Browser is a secure browser environment for taking online exams securely. This software turns any computer into a secure workstation. It controls access to any utility and prevents students from using unauthorized resources.

MinGW - Minimalist GNU for Windows
This project is in the process of being migrated to osdn.net/projects/mingw, you can continue to follow us there. MinGW: A native Windows port of the GNU Compiler Collection (GCC), freely distributable import libraries and header files for building native Windows applications; includes extensions to the MSVC runtime to support C99 functionality. All MinGW software can run on 64-bit Windows platforms.

SecLists
SecLists is the ultimate security tester's companion. It is a collection of various types of lists that are frequently used during security assessments, all in one place. SecLists helps make security testing more efficient and productive by conveniently providing all the lists a security tester might need. List types include usernames, passwords, URLs, fuzzing payloads, sensitive data patterns, web shells, and more. The tester can simply pull this repository onto a new test machine and he will have access to every type of list he needs.

WebStorm Mac version
Useful JavaScript development tools

Dreamweaver CS6
Visual web development tools


