


PHP中文网的PS学习者们,大家好。这篇教程是向PHP中文网的朋友介绍PS打造时尚炫彩艺术海报方法,感觉制作出来的效果和制作手法都挺好的,所以也给大家推荐过来,喜欢的记得给我好评哦!我们先来看看效果图:
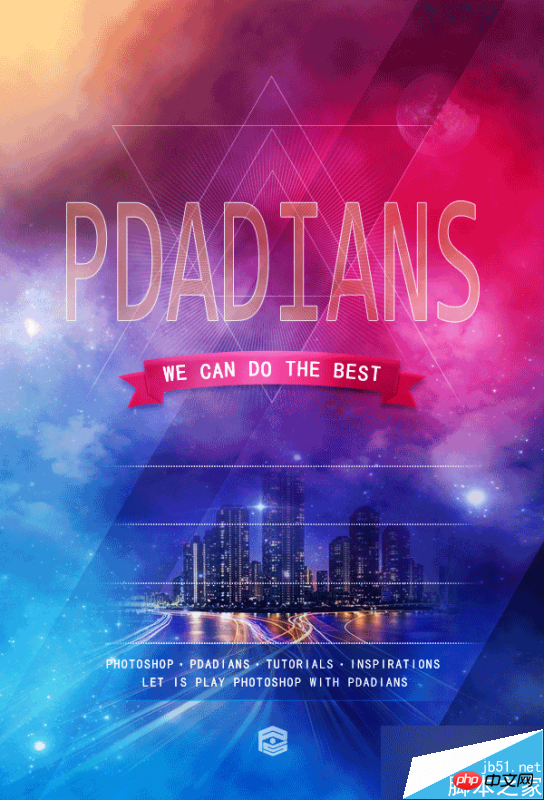
具体的制作步骤如下:
请原谅我比较懒,相比原来的海报,我只打了一行字,我想,也不影响大家观看,这点,请不要学习我们。
下面,看看我们的对比图,左边为原图,右边为我们的临摹效果。
")
首先,我建了一个和原图一样大小的文档,600X882像素,添加了一个#163362到#6b1b3d的90度的线性渐变。
")
我添加了第二个"渐变"调整层,并使用了蒙版,来伪造原图的颜色分布。其实分几个图层,用画笔来做也OK。
")
设置前景色为#c01632,用圆角柔边画笔画出下图中的红色部分,并更改图层混合模式为"柔光"。
")
同样的操作,设置前景色为# c51531,用圆角柔边画笔再画出一个红色,更改混合模式为"变亮"。
")
在我们提供的素材包里,分别放入城市,天空以及月亮,按你的想法,调整大小和位置,并分别添加蒙版,使各个元素融合,这里没有什么好说的,蒙版而已。
")
同样的,放入素材中我们所提供的两个星云素材,同样的调整大小和位置,添加蒙版,唯一不同的是,这两个星云图层,图层混合模式我使用了"滤色"。
")
设置前景色为#fbf60c,还是使用圆角柔边画笔,我为图片的左上角位置添加了一些黄色,并将图层混合模式更改为"线性减淡(添加)",图层不透明度调整为44%,到这里,我们的背景搭建就算完成了,建议大家合理的进行图层编组,这样我们的操作将会更富直观性,更有效率。
")
接下来,我们画出右下角的三角形状,我画了一个#010101颜色的三角形,并将图层不透明度调整为33%
")
同样的方法,我们画一个黑色矩形,旋转,将图层不透明度修改为13%,下方的位置添加个蒙版,画笔擦一擦。
")
接下来,我们设置前景色为#013d6f,画一个矩形,将图层不透明度调整为56%,我们来做那个文字上面的条状。
")
我们从原图中,可以看到,这个条状的两边是渐隐的,所以我添加了一个蒙版,擦掉了两边,原图有一个类似光线的效果,我偷懒了一把,直接做了个内发光。这一点,不要学我们。
")
接下来就是添加那些点,文字和LOGO了,也没什么好说的,我只说一点,这个密密麻麻的点,我直接用的文字工具,输入一些句点,直接用黑体,它们看起来就像方形了,因为这么小,谁也看不出来。同样的点的渐隐,蒙版搞定。
")
接下来,我们开始添加那些三角形线条,用多边形工具画个三角形,颜色无所谓,设置形状的填充颜色为"无",描边为白色,大小1点,将图层不透明度设置为30%
")
其他的三角形直接复制就OK了,不显示的线蒙版擦掉。
")
接下来,我们来做那个放射线,建议新建个文件做,直接画条细线,CTRL+T设置画布的中心点为变换的中心点,旋转2度,然后就是疯狂的CTRL+ALT+SHIFT+T了。
")
把这个放射的形状图层复制到我们的海报文档中,调整大小及位置,添加蒙版,颜色白色,不透明度20%
")
接下来,我们制作飘带,我把飘带分成了三部分来画,一个主体,一个阴影,一个两翼。主体我设置了一个#ed5a78—#af223f 的对称渐变,阴影#af2340,两翼#c22848。
")
主体和两翼我各设置了一个内阴影,参数如下。
")
打上文字,我这里用的是P大点S的全拼,颜色设置为#d6a56c,更改填充为45%,添加一个1像素的白色描边,描边的不透明度为71%。
")
在这里,我新建了一层,填充黑色,执行了"滤镜—渲染—云彩",并将图层混合模式修改为"柔光",原图目测没有这一层,只是我自己想让云多一些。
")
我不大喜欢这个颜色,我添加了一个"色彩平衡"。
")
最后,我添加了一个"曲线"强化一下对比。
")
到这里,教程就结束了,你也来一下吧!
以上就是PS打造时尚炫彩艺术海报教程,是不是很酷啊,喜欢的朋友可以跟着教程一起来学习吧!

 Comparing Photoshop Pricing: Options and BenefitsMay 12, 2025 am 12:17 AM
Adobe Photoshop offers three packages: 1) a single application plan, suitable for users who only need Photoshop, with a low cost, including 20GB of cloud storage; 2) a full set of CreativeCloud plans, suitable for users who need multiple Adobe applications, with a high cost, including 100GB of cloud storage; 3) a preferential plan for students and teachers, suitable for academic users with limited budget, with a low cost, including 20GB of cloud storage.
 What Makes Photoshop Special? Its Primary FunctionMay 11, 2025 am 12:16 AM
Photoshop'sprimaryfunctionistoenableuserstomanipulate,enhance,andcreatedigitalimageswithprecisionandcontrol.Itsspecialfeaturesinclude:1)alayer-basededitingsystemforindependentelementmanipulation,2)anextensivelibraryoftoolsandfiltersforvarioustasks,an
 Photoshop: The Cost of Professional Image EditingMay 10, 2025 am 12:19 AM
Photoshop's cost includes direct costs, time and learning curve, resources and hardware investment. 1. Direct cost: Subscription system $20 to $50 per month, purchase hundreds of dollars at one time. 2. Time and Learning: It requires a lot of time and practice, and it is recommended to learn through online courses and tutorials. 3. Resources and hardware: High-performance computers and sufficient storage space are required to ensure hardware configuration to improve efficiency.
 Image Editing Essentials: Key Features of PhotoshopMay 09, 2025 am 12:05 AM
Photoshop's core features include layers, selection tools, and adjustment tools. 1. The layer allows independent editing of image parts and supports layer style. 2. Selection tools such as lasso, magic wand and quick selection tools provide precise editing. 3. Adjustment tools such as color level, curve and hue/saturation can adjust images non-destructively.
 My Purpose: Assisting with Photoshop-Related TasksMay 08, 2025 am 12:18 AM
In Photoshop, the role of layer masks is to allow hidden or displayed portions of layers in a non-destructive manner. 1. The working principle of layer mask is to control the visibility of the layer through black, white and grayscale. 2. The basic usage includes image synthesis, such as synthesising the character image into a new background. 3. Advanced usage can be achieved by using gradient masks to achieve smooth image transition.
 Photoshop and Free Alternatives: A Comparative LookMay 06, 2025 am 12:12 AM
Photoshop's powerful features include smart objects and neural filters, while free alternatives such as GIMP, Krita and Photopea do well in specific fields such as GIMP's layer functionality, Krita's digital paintings and online editing of Photopea.
 Photoshop Color Grading: Elevate Your Images with Pro TechniquesMay 05, 2025 am 12:07 AM
Color adjustment in Photoshop can be achieved through adjustment layers to make the image more professional. 1. Use color level, curve, hue/saturation and other tools to adjust the hue, saturation and brightness. 2. Apply LUT to create unique color effects. 3. Use adjustment layers to avoid image distortion and use the History panel to track adjustment steps.
 Photoshop in the Real World: Examples of Its Diverse UsesMay 04, 2025 am 12:15 AM
Photoshop's applications in the real world include artistic creation, scientific research and commercial marketing. 1) In artistic creation, it is used for digital painting and illustration. 2) In scientific research, it is used for image processing and data visualization. 3) In commercial marketing, it is used for advertising design and brand image shaping. The versatility of this software makes it widely used in various fields.


Hot AI Tools

Undresser.AI Undress
AI-powered app for creating realistic nude photos

AI Clothes Remover
Online AI tool for removing clothes from photos.

Undress AI Tool
Undress images for free

Clothoff.io
AI clothes remover

Video Face Swap
Swap faces in any video effortlessly with our completely free AI face swap tool!

Hot Article
Hot Tools

SublimeText3 Linux new version
SublimeText3 Linux latest version

Safe Exam Browser
Safe Exam Browser is a secure browser environment for taking online exams securely. This software turns any computer into a secure workstation. It controls access to any utility and prevents students from using unauthorized resources.

VSCode Windows 64-bit Download
A free and powerful IDE editor launched by Microsoft

PhpStorm Mac version
The latest (2018.2.1) professional PHP integrated development tool

MantisBT
Mantis is an easy-to-deploy web-based defect tracking tool designed to aid in product defect tracking. It requires PHP, MySQL and a web server. Check out our demo and hosting services.

