


这篇教程是向PHP中文网的朋友分享ps制作可口的心形巧克力方法,教程制作出来的巧克力非常可口,难度也不是很大,推荐到PHP中文网,喜欢的朋友快快来学习吧
方法/步骤
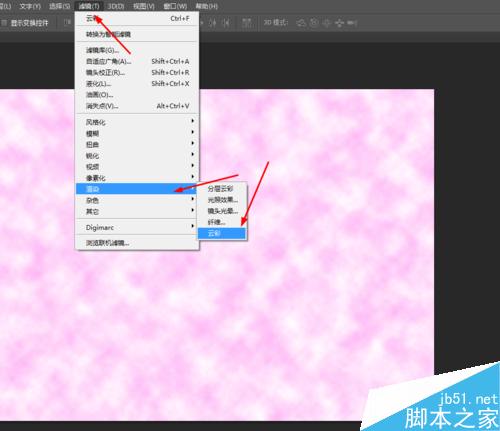
1、在ps软件中,新建一个3500*2500的文档,前背景色粉色和白色,然后在滤镜中添加云彩,如图所示
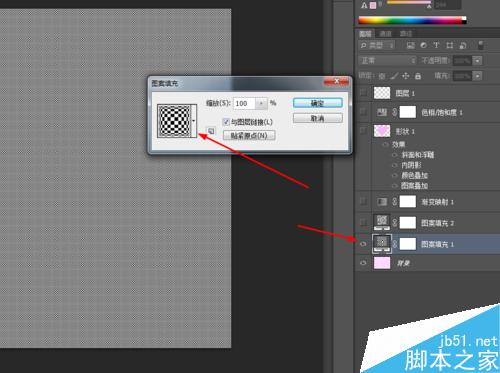
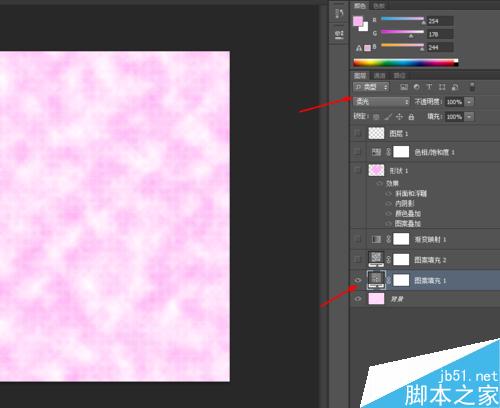
2、然后创建图案调整图层,再把图案图层的混合模式改为柔光,如图所示
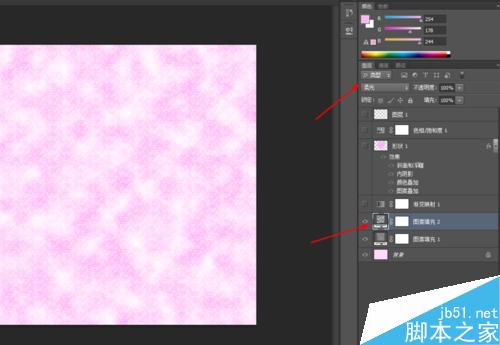
3、再创建图案调整图层,再把图案图层的混合模式改为柔光,如图所示

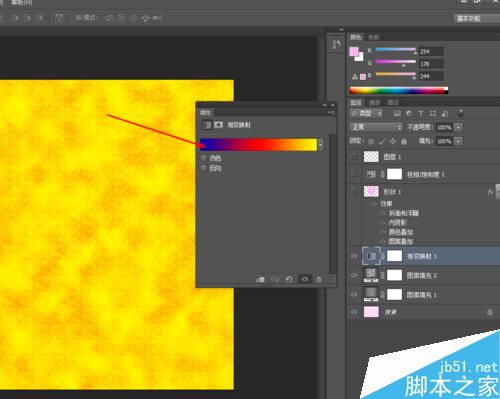
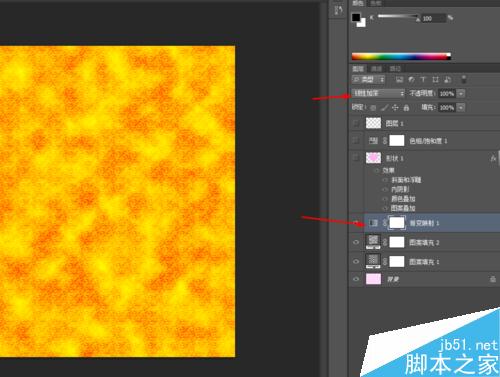
4、接着创建渐变映射调整图层,再把渐变映射的图层的混合模式改为线性加深,如图所示
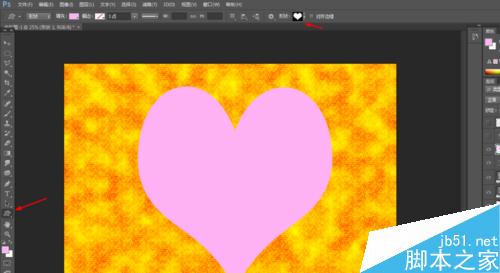
5、接下来选择自定形状工具,画一个心形的形状图层,点击右键栅格化图层,如图所示
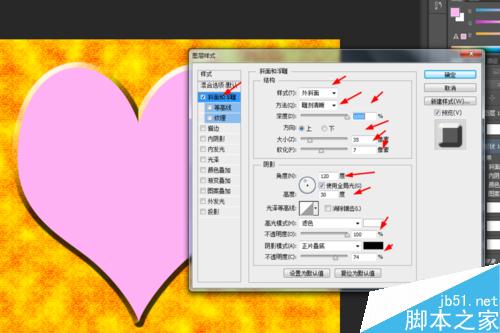
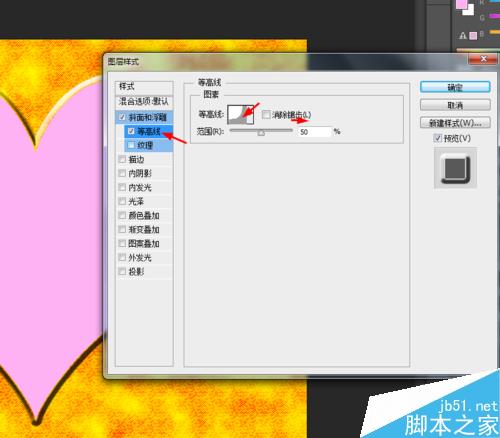
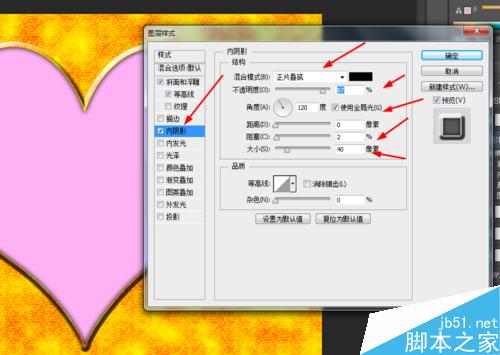
6、双击心形的图层添加图层样式,调整一下斜面和浮雕,等高线,内阴影,如图所示
7、再调整一下图案叠加和颜色叠加,如图所示
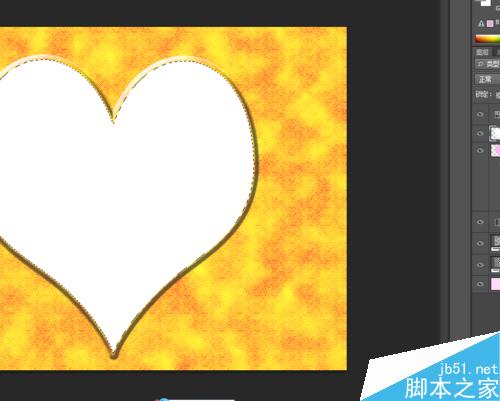
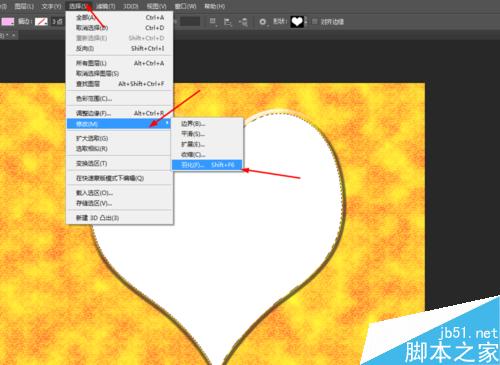
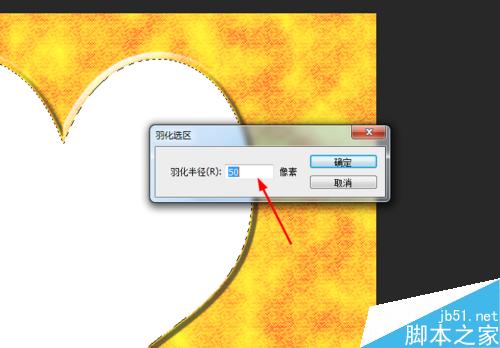
8、按ctrl点击心形的图层生成选区,新建一个图层,填充为白色,再到菜单栏上选择修改羽化50px,按delete删除键,如图所示
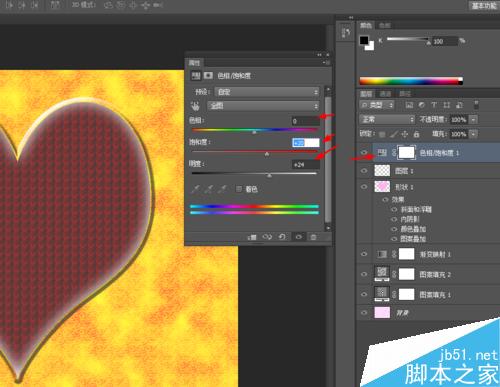
9、最后创建色相饱和度的调整图层,如图所示
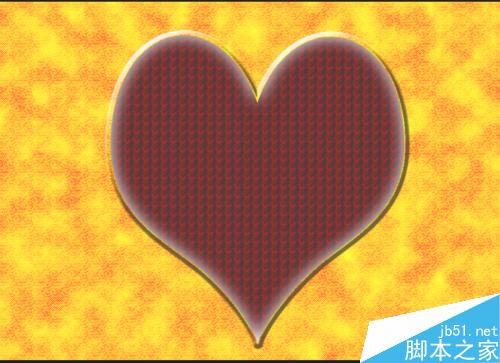
10、效果如下图所示
教程结束,以上就是ps制作可口的心形巧克力教程,大家学会了吗?希望大家喜欢!

 How to copy and paste layer styles in PS?May 16, 2025 am 06:00 AM
Copying and pasting layer styles in Photoshop is a key trick to improve productivity. Let's dive into how to do it, and the various details and techniques you may encounter in the process. When we talk about copying and pasting layer styles in Photoshop, the first thing we need to understand is that layer styles refer to effects applied to layers, such as shadows, glows, bevels, and reliefs. Mastering this feature not only saves time, but also ensures consistent design. To copy the style of a layer, right-click the layer you want to copy and select Copy Layer Style. This will copy all the styles of the layer into the clipboard. Next, select the target layer you want to apply these styles, right-click it, and select Paste
 How to use PS to synthesize two pictures seamlessly?May 15, 2025 pm 11:57 PM
The steps to synthesize two pictures and achieve seamless connection in Photoshop include: 1. Adjust the brightness and contrast to make the tones of the two pictures consistent; 2. Use masks and blending mode to erase the edges to achieve a natural transition. This method requires repeated adjustments and trial and error, paying attention to detail processing and color consistency to achieve the best results.
 How to use PS to adjust the insufficient exposure of photos?May 15, 2025 pm 11:54 PM
Adjusting photos with underexposed photos in Photoshop can use the "Exposure", "Brightness/Contrast" and "Curve" adjustment tools: 1. The "Exposure" adjustment is used to initially improve the overall exposure; 2. The "Brightness/Contrast" adjustment can improve the brightness and contrast at the same time; 3. The "Curve" adjustment allows precise control of different brightness ranges, which is suitable for refinement adjustments.
 How to color black and white photos on PS?May 15, 2025 pm 11:51 PM
Coloring black and white photos in Adobe Photoshop can use layer masks, color tuning tools, and brush tools. The specific steps include: 1. Open a black and white photo and create a new layer; 2. Use "Hue/Saturation" to adjust the layer to add colors, and accurately control the application area of the color through the layer mask; 3. Use the brush tool to draw on the layer mask to further adjust the color; 4. Keep the original image details and add new colors by setting the layer's blending mode to "Color".
 How to design a simple style poster with PS?May 15, 2025 pm 11:48 PM
The key to designing a minimalist style poster is to convey the message through simple elements and tones. The steps are as follows: 1. Select the A3 size (297x420mm), and the resolution is 300dpi. 2. Use monochromatic or complementary tones, cool tones such as blue and white. 3. Add simple sans serif fonts and geometric figures, pay attention to white space and golden point typesetting. 4. Optimize details, such as text size, spacing and layer style effects.
 How to use PS to create Glitch Effect?May 15, 2025 pm 11:45 PM
Making GlitchEffect in Photoshop can be achieved through the following steps: 1. Open and copy the picture. 2. Use the channel mixer to disrupt color balance. 3. Add perturbation filters to increase randomness, adjust transparency or use masks to control the effect. 4. Create a digital stripe effect through the threshold adjustment layer and overlay multiple threshold layers to adjust transparency. 5. Use color balance to adjust the overall tone and add personalized colors. The art of making failures is full of experimental and randomness, and moderate and orderly management of layers is key.
 How to create a double exposure effect on PS?May 15, 2025 pm 11:42 PM
Making a double exposure effect is a very cool trick in Photoshop. Let's explore how to achieve this effect, as well as the problems and solutions you may encounter in the process. To create a double exposure effect in Photoshop, you first need to select two or more images, and the elements of these images will be fused together in the final effect. When selecting pictures, it is recommended to choose pictures with high contrast and rich details, so that the effect after fusion will be more obvious and attractive. Let's start with a simple example, suppose we have two pictures: one is a portrait and the other is a night view of the city. Our goal is to blend the night view of the city with portraits to create a dreamy double exposure effect. First, we need to import both images
 How to create 3D three-dimensional text effects on PS?May 15, 2025 pm 11:39 PM
There are three main ways to create 3D three-dimensional text effects in Photoshop: 1) Use 3D tools, 2) Layer styles, and 3) Manual drawing. First, when using the 3D tool, create a new document and enter text, select the text layer and select "New 3D Highlight Effect from Selection", and then adjust the rotation, zoom, and position. Secondly, adjust the Depth, Size, and Softening parameters through the Bevel and Emboss options in the layer style to simulate the 3D effect. Finally, manual drawing methods require more skill and time, but with complete control over the effects.


Hot AI Tools

Undresser.AI Undress
AI-powered app for creating realistic nude photos

AI Clothes Remover
Online AI tool for removing clothes from photos.

Undress AI Tool
Undress images for free

Clothoff.io
AI clothes remover

Video Face Swap
Swap faces in any video effortlessly with our completely free AI face swap tool!

Hot Article
Hot Tools

Atom editor mac version download
The most popular open source editor

Dreamweaver Mac version
Visual web development tools

SublimeText3 Chinese version
Chinese version, very easy to use

Safe Exam Browser
Safe Exam Browser is a secure browser environment for taking online exams securely. This software turns any computer into a secure workstation. It controls access to any utility and prevents students from using unauthorized resources.

SublimeText3 English version
Recommended: Win version, supports code prompts!

