Home >Software Tutorial >Computer Software >How to operate mini coordinate system drawing on Geometric Sketchpad
How to operate mini coordinate system drawing on Geometric Sketchpad
- PHPzforward
- 2024-04-17 12:52:10898browse
Select mini coordinate system. Open the geometric sketchpad and select the custom tool on the left sidebar. In the shortcut tool that pops up, there are many mini coordinate systems to choose from. Here is an example of choosing the mini coordinate system - Shi Yan | Plane Cartesian Coordinate System No Parameter Version.

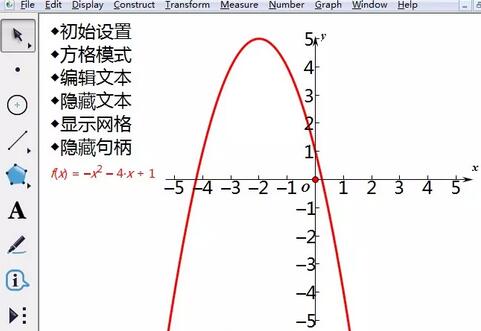
After selecting the coordinate system tool, click once in the blank area of the drawing board to establish the coordinate system. Pull the four control points up, down, left, and right of the coordinate axis to increase the length and scale of the axis. Then click the [Hide Handle] text button to hide the control point.

Draw function graph. Click the [Draw] menu in the upper menu bar, select the [Draw New Function] command from the pop-up drop-down option, enter the function expression in the pop-up dialog box (here, for example, draw the image of a quadratic function), and finally click OK. Draw the graph.

The thickness and color of the curve can be set and changed through the display menu. Select the function image, click the [Display] menu in the upper menu bar, and select [Line Style]-[Medium] from the drop-down option to make the function image thicker; select [Color]-[Red] from the drop-down option. , you can make the function image change color.

By adjusting the two handles at the bottom of the coordinate system, the image can be made wider or narrower. In this way, a function graph suitable for the requirements is drawn.

The above is the detailed content of How to operate mini coordinate system drawing on Geometric Sketchpad. For more information, please follow other related articles on the PHP Chinese website!

