


How to partition the hard disk in Windows 11: Open Disk Management: right-click the Start button in the taskbar and select "Disk Management". Locate the hard drive: Find the hard drive you want to partition, usually shown as "Disk X". Create a partition: Right-click the hard disk and select "New Simple Volume". Specify partition size: Enter the size of the new partition in megabytes. Assign drive letter and file system: Select an available drive letter and file system (such as NTFS). Format partition (optional): After backing up important data, you can choose to format the partition. Complete the partition: Click the "Finish" button to create the new partition.

Windows 11 Guide to Partitioning a Hard Drive
How to partition a hard drive?
To partition the hard drive in Windows 11, you can use the built-in disk management tool. The specific steps are as follows:
Step 1: Open Disk Management
- Right-click the Start button in the taskbar and select "Disk Management".
Step 2: Select the hard drive to be partitioned
- In the disk management window, find the hard drive you want to partition.
Step 3: Create a new partition
- Right-click the hard drive to be partitioned and select "New Simple Volume".
Step 4: Specify the partition size
- In the Create Simple Volume Wizard, enter the dimensions of the new partition.
Step 5: Assign a drive letter and file system
- Assign the new partition a drive letter and file system (such as NTFS).
Step 6: Format the partition (optional)
- If desired, you can choose to format the partition to make it available for storing data.
Step 7: Complete the partition
- Click the "Finish" button to create the new partition.
Detailed steps:
-
Open Disk Management:
- Right click Click the Start button in the taskbar.
- Select "Disk Management".
-
Locate the hard drive:
- In the disk management window, find the hard drive you want to partition.
- Normally, the hard drive will be displayed as "Disk X", where X is the serial number of the hard drive.
-
Create a partition:
- Right-click the hard drive you want to partition.
- Select "New Simple Volume".
-
Specify the partition size:
- In the "Create Simple Volume Wizard" you will see "Volume size (MB)" field.
- Enter the size of the new partition in megabytes.
-
Assign a drive letter and file system:
- In the Assign Drive Letter and Path page, select a Available drive letters.
- In the File System drop-down menu, select a file system (usually NTFS).
-
Format partition (optional):
- In the "Format Partition" page, you can choose Format the partition.
- Formatting will delete all data on the partition, so make sure you back up important data.
-
Complete partitioning:
- Click the "Finish" button to create a new partition.
The above is the detailed content of How to partition the hard disk in win11. For more information, please follow other related articles on the PHP Chinese website!

 win11激活密钥永久2023Oct 18, 2023 pm 02:55 PM
win11激活密钥永久2023有:1、Windows 11 家庭版,3KHY7-WNT83-DGQKR-F7HPR-844BM、7HNRX-D7KGG-3K4RQ-4WPJ4-YTDFH、TX9XD-98N7V-6WMQ6-BX7FG-H8Q99、PVMJN-6DFY6-9CCP6-7BKTT-D3WVR等等。
 解决win11无法安装打印机驱动的方法Jan 30, 2024 pm 03:57 PM
打印机是我们日常生活中都会使用到的,如果我们的电脑没有打印机驱动就不能直接诶的使用打印机,也有很多的win11用户们找不到打印机驱动程序怎么办?
 如何解决Win11 23H2更新速度慢的问题?如何解决Win11 23H2更新卡顿的问题?Jan 30, 2024 pm 04:54 PM
近期很多的用户们都想给自己的电脑升级到Win1123H2版本,可也有不少的用户们在升级的过程中发现速度很慢,甚至是卡死的情况,那么这要怎么办?下面就让本站来为用户们来仔细的介绍一些Win1123H2更新卡死的解决方法吧。Win1123H2更新卡死解决方法由于版本升级较大,升级文件较大。建议在网络较好的环境下进行在线检查和下载,以确保升级速度更快。如果你想要快一点升级到Win1123H2,小编建议你可以直接下载系统升级,速度相对来说快很多。推荐系统1、Windows1123H220in1镜像纯净版
 Win11 HEVC扩展安装指南:如何正确安装HEVC视频扩展Jan 30, 2024 pm 02:12 PM
HEVC视频扩展是专业的视频网页浏览插件,能够帮助用户将高清的视频压缩并提升到高质量画质。那就有用户问了Win11系统怎么安装HEVC视频扩展?下面就和小编一起来看看详细教程。1、从MicrosoftStore购买并安装HEVC扩展按Windows+S启动搜索菜单,在顶部的文本字段中输入MicrosoftStore,然后单击出现的相关搜索结果。单击HEVCVideoExtension的搜索结果。完成付款以在Windows11中下载HEVC扩展程序。获得VLC媒体播放器后,无需在Windows11
 如何关闭win11自带杀毒软件Nov 28, 2023 pm 02:04 PM
关闭win11自带杀毒软件步骤如下:1、点击任务栏上的开始图标,在显示的应用中,点击打开设置;2、左侧点击隐私和安全性,右侧点击Windows安全中心;3、点击打开Windows安全中心;4、病毒和威胁防护设置下,将实时保护、云提供的保护和自动提交样本等选项关闭即可。
 寻找win11壁纸的默认文件夹路径及分享详情Jan 30, 2024 pm 03:15 PM
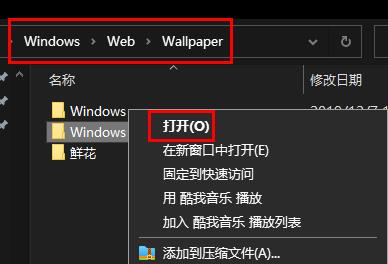
很多的用户们在使用电脑的时候都会更换壁纸,相信也有不少的用户们在询问win11壁纸在哪个文件夹?系统自带的壁纸在C盘下的Wallpaper,用户们自己存的壁纸在c盘的Themes文件夹,下面就让本站来为用户们来仔细的介绍一下win11默认壁纸路径分享吧。win11默认壁纸路径分享一、系统自带壁纸:1、首先进入我的电脑,然后依次打开路径:C:WindowsWebWallpaper。二、用户自存壁纸:1、用户自己安装的壁纸都会保存在:C:Users(用户)xx(当前用户名)AppDataLocalM
 Win11系统如何禁用通知Jan 30, 2024 pm 04:54 PM
Win11系统如何关闭消息提醒在使用Win11系统时,我们经常会收到各种消息提醒,比如系统更新、软件安装、邮件通知等。虽然这些消息提醒对于我们及时了解信息很有帮助,但有时候也会给我们带来一些干扰。如果你希望在特定情况下关闭Win11系统的消息提醒,下面是一些方法供你参考。方法一:使用系统设置关闭消息提醒1.点击Win11系统的“开始”按钮,然后点击“设置”图标。2.在设置窗口中,点击“系统”选项。3.在系统设置页面中,点击“通知和动作”选项。4.在通知和动作页面中,你可以看到各种消息提醒的开关。
 win11家庭版和专业版的区别是什么May 16, 2023 pm 03:36 PM
win11家庭版和专业版的区别是:1、win11家庭版适合普通家庭使用,win11专业版适合企业用户、专业开发者用户使用;2、家庭版的win11会内置很多实用的软件,而win11专业版有着大量的专业功能软件;3、win11家庭版没有复杂和进阶的操作,都是可以轻松上手学习的,win11专业版都是需要根据工作操作的功能性软件,有一定的操作和规范。


Hot AI Tools

Undresser.AI Undress
AI-powered app for creating realistic nude photos

AI Clothes Remover
Online AI tool for removing clothes from photos.

Undress AI Tool
Undress images for free

Clothoff.io
AI clothes remover

AI Hentai Generator
Generate AI Hentai for free.

Hot Article
Hot Tools

Atom editor mac version download
The most popular open source editor

DVWA
Damn Vulnerable Web App (DVWA) is a PHP/MySQL web application that is very vulnerable. Its main goals are to be an aid for security professionals to test their skills and tools in a legal environment, to help web developers better understand the process of securing web applications, and to help teachers/students teach/learn in a classroom environment Web application security. The goal of DVWA is to practice some of the most common web vulnerabilities through a simple and straightforward interface, with varying degrees of difficulty. Please note that this software

VSCode Windows 64-bit Download
A free and powerful IDE editor launched by Microsoft

SecLists
SecLists is the ultimate security tester's companion. It is a collection of various types of lists that are frequently used during security assessments, all in one place. SecLists helps make security testing more efficient and productive by conveniently providing all the lists a security tester might need. List types include usernames, passwords, URLs, fuzzing payloads, sensitive data patterns, web shells, and more. The tester can simply pull this repository onto a new test machine and he will have access to every type of list he needs.

SAP NetWeaver Server Adapter for Eclipse
Integrate Eclipse with SAP NetWeaver application server.

