Steps to add data to a table in Navicat: 1. Connect to the database; 2. Locate the target table; 3. Open the data editor; 4. Add new rows; 5. Enter data; 6. Submit changes ( Save or press F2 key).

Add data to the table in Navicat
How to add data to the table in Navicat?
The method to add data to a table in Navicat is very simple:
- Connect to the database: Open Navicat and connect to the target database.
- Locate the target table: Expand the database in the navigation tree and locate the table to which you want to add data.
- Open the data editor: Right-click the table and select "Data Editor".
-
Add new row: In the data editor, click the Insert button or press the
F6key to add a new row. - Enter data: Enter the corresponding value of the new data in the cell.
-
Commit changes: Click the Save button or press the
F2key to save changes.
Detailed steps
1. Enter the data value
- For text fields, enter the text directly.
- For numeric fields, enter a number or date format.
- For Boolean fields, enter
TrueorFalse. - For datetime fields, use
YYYY-MM-DDorYYYY-MM-DD HH:MM:SSformat.
2. Submit changes
- Click the Save button in the data editor.
- Press the
F2key. - Click the File menu and select Save.
3. Confirm that the data has been added
- Refresh the table data to see the added rows.
- Execute
SELECT * FROM table_namequery to verify the added data.
The above is the detailed content of How to add data to the table in navicat. For more information, please follow other related articles on the PHP Chinese website!
 Navicat连接MySQL提示1045错误怎么解决Jun 02, 2023 pm 11:13 PM
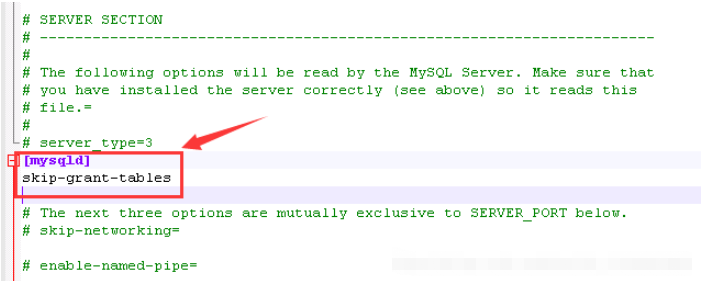
错误提示:1045-Accessdeniedforuser'root''localhost'(usingpassword:YES)navicat连接MySQL数据时遇到1045错误,一般是因为输入的用户名或者密码错误被拒绝访问,此时可以重置MySQL数据库的密码解决。在windows的操作步骤如下:1、找到mysql的my.ini文件,在mysqld关键字下面添加skip-grant-tables,如下图所示:该命令作用是跳过授权表
 浅析Navicat如何修改语言(中文or英文)?Jul 05, 2022 am 10:19 AM
Navicat如何修改语言?下面本篇文章给大家介绍一下将Navicat Premium 的语言改成中文/英文的方法,希望对大家有所帮助!
 Navicat for MySQL如何连接本地MySQL数据库-Navicat for MySQL连接本地MySQL数据库的方法Mar 04, 2024 pm 07:30 PM
本章节为你们带来的文章是关于NavicatforMySQL软件的,你们晓得NavicatforMySQL如何连接本地MySQL数据库吗?接着,小编就为各位带来了NavicatforMySQL连接本地MySQL数据库的方法,感兴趣的用户一同来下文看看吧。进行打开电脑Navicatformysql已经安装好的,然后进行点击右上角的“连接”选项在弹出的新建连接窗口中,您可以输入连接名称,并将主机名设置为本地数据库,因此只需使用“localhost”,密码留空即可。然后方便连接的数据库是否连接成功的话,
 navicat premium怎么连接数据库备份还原Apr 06, 2024 am 06:48 AM
在 Navicat Premium 中连接数据库备份并还原数据:连接备份:在“连接”对话框中输入服务器信息、登录凭据,并在“数据库”字段选择备份文件。还原数据:右键单击目标数据库,选择“还原”,选择“从备份还原”并浏览备份文件。配置选项:指定覆盖数据、还原表结构等选项。开始还原:单击“开始”执行还原过程。更新连接:还原后,更新连接信息指向还原后的数据库。
 navicat premium怎么导入数据库文件Apr 06, 2024 am 06:57 AM
使用 Navicat Premium 导入数据库文件的步骤如下:连接到目标数据库。导航到“导入向导”。选择要导入的文件。配置导入设置。开始导入。验证导入结果。
 navicat怎么在表中添加数据Apr 06, 2024 am 07:36 AM
Navicat中向表中添加数据的步骤:1. 连接数据库;2. 定位目标表;3. 打开数据编辑器;4. 添加新行;5. 输入数据;6. 提交更改(保存或按F2键)。
 navicat premium怎么连接mongodbApr 06, 2024 am 06:51 AM
本文介绍了如何使用 Navicat Premium 连接 MongoDB,具体步骤如下:建立连接:在 Navicat Premium 中,选择连接选项卡,并在数据库类型中选择 MongoDB。配置连接设置:输入连接名称、主机地址、端口号、用户名、密码和数据库名称。设置高级选项(可选):配置重连次数、重连间隔、SSL 加密和认证数据库。保存连接:单击保存按钮即可创建连接。
 navicat premium怎么运行不了Apr 06, 2024 am 07:33 AM
解决 Navicat Premium 无法运行问题的方法:确保系统符合要求,安装 Microsoft Visual C++ 可再发行组件。以管理员身份运行 Navicat Premium,禁用防病毒软件,检查防火墙设置。如果以上步骤无效,请重新安装 Navicat Premium。寻求 Navicat 支持团队的帮助。


Hot AI Tools

Undresser.AI Undress
AI-powered app for creating realistic nude photos

AI Clothes Remover
Online AI tool for removing clothes from photos.

Undress AI Tool
Undress images for free

Clothoff.io
AI clothes remover

AI Hentai Generator
Generate AI Hentai for free.

Hot Article

Hot Tools

Zend Studio 13.0.1
Powerful PHP integrated development environment

Notepad++7.3.1
Easy-to-use and free code editor

SecLists
SecLists is the ultimate security tester's companion. It is a collection of various types of lists that are frequently used during security assessments, all in one place. SecLists helps make security testing more efficient and productive by conveniently providing all the lists a security tester might need. List types include usernames, passwords, URLs, fuzzing payloads, sensitive data patterns, web shells, and more. The tester can simply pull this repository onto a new test machine and he will have access to every type of list he needs.

ZendStudio 13.5.1 Mac
Powerful PHP integrated development environment

EditPlus Chinese cracked version
Small size, syntax highlighting, does not support code prompt function


