Photoshop is a popular image processing software with numerous tools and functions that can be used for various image processing needs. In the process of using Photoshop to create design works, it is inevitable to add small icons or graphic elements. PHP editor Xinyi has compiled the steps for downloading small icons in Photoshop, so that everyone can easily realize this requirement. This tutorial will introduce in detail how to download small icons and create graphic elements that meet your needs in Photoshop.
1. Start the photoshop software and create a new file. Create New in the File menu bar, then enter the desired file size
2 and draw a rectangle. Select the rectangle tool in the toolbar and drag it on the canvas to draw a rectangle.

3. Path selection tool and copy. Select the path selection tool in the toolbar to select the object, hold down the ATL key and drag downwards to copy a rectangle.

4. Copy and adjust again. Do the same thing and copy a rectangle downward again, then perform a Free Transform to pull the rectangle a little higher.

5. Polygon tool. Press and hold the rectangle tool in the toolbar, and a set of tool groups will pop up. Select the polygon tool among them.

6. Set the number of sides to 3. Set the number of sides of the polygon to 3 in the property bar, and then drag to draw a triangle.

7. Free transformation and size adjustment. Select this triangle and perform free transformation. You can rotate, scale, make the bottom edge upward, and widen it to fit the rectangle.

8. Draw two rectangles and perform trimming. Draw two rectangles below, and then subtract the top layer to get a bracket-like figure below. Adjust the position, align it vertically and center, and complete the production.


The above is the detailed content of How to create and download small icons in photoshop. For more information, please follow other related articles on the PHP Chinese website!
 html网页制作图片怎么居中Apr 05, 2024 pm 12:18 PM
在 HTML 中,将图片居中对齐有两种方法:使用 CSS:margin: 0 auto; 将图片水平居中,display: block; 使其占据整个宽度。使用 HTML:<center> 元素将图片水平居中,但灵活性较低,不符合最新 Web 标准。
 dreamweaver怎么调整文字位置Apr 09, 2024 am 02:24 AM
Dreamweaver 中调整文本位置可以通过以下步骤完成:选择文本,使用文本位置调整器进行水平调整:左对齐、右对齐、居中对齐;2. 进行垂直调整:上对齐、下对齐、垂直居中;3. 按 Shift 键并使用方向键微调位置;4. 使用快捷键快速对齐:左对齐(Ctrl/Cmd + L)、右对齐(Ctrl/Cmd + R)、居中对齐(Ctrl/Cmd + C)。
 html如何让文本框居中Apr 22, 2024 am 10:33 AM
HTML 文本框居中有多种方式:文本输入框:使用 CSS 代码 input[type="text"] { text-align: center; }文本区域:使用 CSS 代码 textarea { text-align: center; }水平居中:在文本框父元素上使用 text-align: center 样式垂直居中:使用 vertical-align 属性 input[type="text"] { vertical-align: middle; }Flexbox:使用 display:
 WordPress错位排版原因分析及解决方法Mar 05, 2024 am 11:45 AM
WordPress错位排版原因分析及解决方法在使用WordPress搭建网站过程中,可能会遇到排版错位的情况,这会影响网站的整体美观和用户体验。排版错位的原因有很多种,可能是由于主题兼容性问题、插件冲突、CSS样式冲突等引起的。本文将分析WordPress错位排版的常见原因,并提供一些解决方法,包括具体的代码示例。一、原因分析主题兼容性问题:有些WordPr
 WordPress网页错位现象解决攻略Mar 05, 2024 pm 01:12 PM
WordPress网页错位现象解决攻略在WordPress网站开发中,有时候我们会遇到网页元素错位的情况,这可能是由于不同设备上的屏幕尺寸、浏览器兼容性或者CSS样式设置不当所致。要解决这种错位现象,我们需要仔细分析问题、查找可能的原因,并逐步进行调试和修复。本文将分享一些常见的WordPress网页错位问题以及相应的解决攻略,同时提供具体的代码示例,帮助开
 sublime怎么把字体居中Apr 03, 2024 am 10:21 AM
在 Sublime Text 中对齐文本的方法包括:使用快捷键(段落:Ctrl + Alt + C,单个行:Ctrl + Alt + E),使用菜单栏的“对齐”选项,安装对齐插件(如 AlignTab、Alignment Plugin),或手动对齐(居中:填充空格,两端对齐:创建边界)。
 html怎么把框架居中Apr 22, 2024 am 10:45 AM
有四种方法可将 HTML 框架居中:margin: 0 auto;:使框架水平居中。text-align: center;:使框架内容水平居中。display: flex; align-items: center;:使框架垂直居中。position: absolute; top: 50%; left: 50%; transform: translate(-50%, -50%);:使用 CSS 转换在固定尺寸框架的容器中心放置框架。
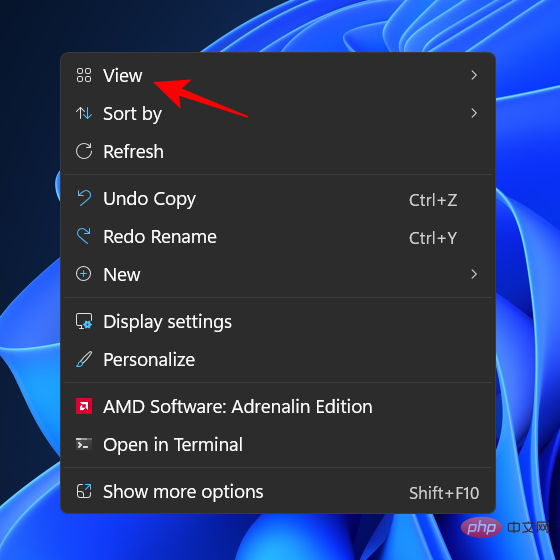 如何在 Windows 11 上缩小图标May 15, 2023 pm 03:46 PM
WindowsPC的最大吸引力之一是其可定制性。随着每次通过的Windows交互,这些个性化选项的数量只会增加(除了少数例外)。但也许您所做的最重要的自定义是Windows11上图标的大小。Windows11上的图标在您的脸上看起来有点小,可能是为了更好的可访问性而首选的设计功能。但如果你想改变它,有几种方法。在本教程中,我们将了解如何在Windows11上缩小图标,无论是在桌面、Windows资源管理器还是其他任何地方。所以让我们开始吧。如何在Windows11上缩小图标首先,让我们看看如何通


Hot AI Tools

Undresser.AI Undress
AI-powered app for creating realistic nude photos

AI Clothes Remover
Online AI tool for removing clothes from photos.

Undress AI Tool
Undress images for free

Clothoff.io
AI clothes remover

AI Hentai Generator
Generate AI Hentai for free.

Hot Article

Hot Tools

mPDF
mPDF is a PHP library that can generate PDF files from UTF-8 encoded HTML. The original author, Ian Back, wrote mPDF to output PDF files "on the fly" from his website and handle different languages. It is slower than original scripts like HTML2FPDF and produces larger files when using Unicode fonts, but supports CSS styles etc. and has a lot of enhancements. Supports almost all languages, including RTL (Arabic and Hebrew) and CJK (Chinese, Japanese and Korean). Supports nested block-level elements (such as P, DIV),

SublimeText3 English version
Recommended: Win version, supports code prompts!

Dreamweaver Mac version
Visual web development tools

Atom editor mac version download
The most popular open source editor

Zend Studio 13.0.1
Powerful PHP integrated development environment


