Home >System Tutorial >Windows Series >How to set up the game DVR function in WIN10 system_How to set up the game DVR function in WIN10 system
How to set up the game DVR function in WIN10 system_How to set up the game DVR function in WIN10 system
- WBOYWBOYWBOYWBOYWBOYWBOYWBOYWBOYWBOYWBOYWBOYWBOYWBforward
- 2024-03-28 09:36:08556browse
php editor Banana brings a detailed tutorial on how to set up the game DVR function in WIN10 system. By setting up the game DVR function, you can easily record game highlights or live broadcast the game process to share the fun of the game with friends. This article will introduce you in detail the steps and operation methods of setting up the game DVR function in WIN10 system, so that you can easily master this practical function.
1. Since the win10 Creators Update, the game settings module has been integrated into Windows settings.
Game Bar - You can modify the shortcut keys here and turn on or off game functions.
Game DVR - Capture screenshots and record game clips. Parameters such as frame number, recording and microphone can be set. (The screenshots and recording folders are in the video folder by default. If you want to change the location, just cut and move the folder.)
Broadcast——Set the microphone audio volume during broadcast (live broadcast) or Camera parameters can be enabled by default.
Game Mode - Born for optimization, providing Windows 10 PC gamers with a better and more stable gaming experience.
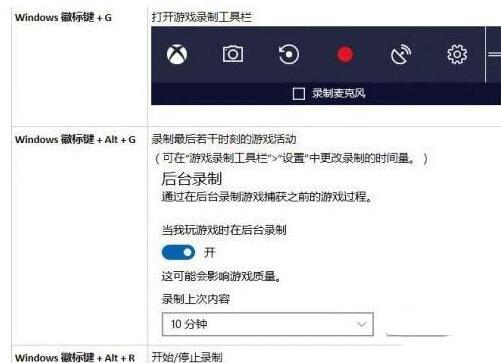
2. Default keyboard shortcuts for game DVR (recording games):

Note: Windows Alt G, you need to change the background in the game DVR section before use The record button is activated (refer to the table in the picture above). This function will occupy a certain amount of resources. When turned on, it will record the final process until this shortcut key is pressed.
Method 2:
Open the [Start] menu, find the [Xbox] tile and click to open it. If you run it for the first time, you will be automatically registered with an Xbox account and logged in.
The game video recording function (game DVR) that comes with the Win10 system is also integrated here. Open the settings of the Xbox app to find the detailed settings of the game DVR.
In the game DVR settings, you can choose whether to turn on this function. You can also change the game recording time, the folder where the recorded video is saved, and the video encoding. Among them, the video is saved in the [Captures] folder in the picture column of the C drive by default. Be sure to make sure there is enough space on drive C when recording. Or you can cut the [Capture] folder and paste it to another hard drive that is large enough. Videos recorded through Game DVR will only be saved in the [Capture] folder, no matter which hard drive it is on.
After the settings are complete, we can start game video recording. Including but not limited to Xbox games, just tap the WIN ALT R shortcut at the beginning, the recording toolbar will appear in the upper right corner of the screen and start recording, and WIN ALT M will simultaneously turn on the microphone recording.

The above is the detailed content of How to set up the game DVR function in WIN10 system_How to set up the game DVR function in WIN10 system. For more information, please follow other related articles on the PHP Chinese website!

