php editor Xigua introduces to you how to operate printer icons in PPT design. Inserting printer icons into PPT can make presentations more vivid and intuitive. First, open the PPT document and select the page where you want to insert the icon. Next, click the "Picture" option in the "Insert" menu bar. In the pop-up dialog box, select "Icon" and enter "printer" in the search box. After selecting the appropriate printer icon, click "Insert" to complete the insertion operation. With these simple steps, you can embed printer icons in your PPT design to make your presentation more vivid and visually impactful.
1. Insert a rounded rectangle.

2. Adjust the arc of the rounded rectangle.

3. Insert a rectangle.

4. Copy another rectangle.

5. Adjust the relationship between upper and lower levels.

6. Adjust the format: white fill, black border.

7. Add a black circle in the upper right corner.

The above is the detailed content of How to design printer icons using PPT. For more information, please follow other related articles on the PHP Chinese website!
 3种解决Windows 11添加打印机时错误740的方法Apr 22, 2023 pm 12:04 PM
无法在Windows11上添加打印机?如果您在将打印机添加到Windows11PC时遇到错误740,那么您并不孤单。它经常让您想知道,打印机可以与Windows11一起使用吗?这是一个常见错误,消息显示为–这不起作用。我们现在无法安装这台打印机。请稍后再试或联系您的网络管理员寻求帮助。错误:#740。但是,让您松了一口气,这仅意味着您需要具有所需的管理员权限才能添加打印机。此外,您可能还会看到消息–请求的操作需要提升:错误740。此错误会阻止您运行应用程序或访问存储设备上的文件
 win11无法连接局域网打印机,应该如何解决?Jul 01, 2023 am 08:57 AM
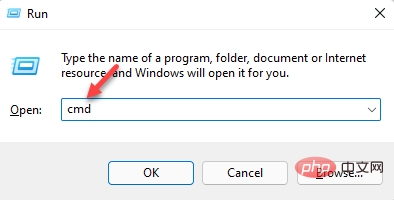
win11无法连接局域网打印机怎么办?有不少用户的win11系统在使用局域网打印机功能的时候,无法正常连接到共享打印机,出现这个问题,可能是连接步骤或者是某项功能服务没打开。今天小编就给大家带来了多种解决方法,很多小伙伴不知道怎么详细操作,小编下面整理了win11电脑不能连共享打印机解决技巧,如果你感兴趣的话,跟着小编一起往下看看吧!win11电脑不能连共享打印机解决技巧1、首先,按键盘上的Win+X组合键,或右键点击任务栏上的Windows开始图标,在打开的隐藏菜单项中,选择运行;2、运行窗口
 在打印机里cartridge是什么意思Jan 15, 2021 pm 02:41 PM
在打印机里,“cartridge”的意思为“墨盒”,是喷墨打印机(包括喷墨型多功能一体机)中用来存储打印墨水,并最终完成打印的部件。墨盒对于整个喷墨打印机来说具有相当重要的地位。墨盒可分为两种:1、一体式墨盒,是将喷头集成在墨盒上,当墨水用完更换一个新的墨盒之后,也就意味着同时更换了一个新的打印头;2、分体式墨盒,是指将喷头和墨盒设计分开的产品。
 ipp打印机是什么Mar 15, 2023 pm 04:26 PM
ipp打印机是指采用ipp协议的打印机。IPP代表“互联网打印协议”,是一个在互联网上打印的标准网络协议。IPP协议允许用户管理与Internet连接的打印机,并将打印机作业发送到在线主机打印机;用户可以透过相关界面来控制打印品所使用的纸张种类、分辨率等各种参数。
 打印机复印出来黑黑的怎么回事Nov 04, 2022 pm 02:12 PM
打印机复印出来黑黑的原因及解决办法:1、打印机的问题,把打印机清洗一下,然后把机子重新启动一下;2、墨盒的问题,拆开墨盒检查并摊均匀一些;3、打印机硒鼓质量不好,可以更换一个质量好的。
 打印机速度变慢了是什么原因Jun 28, 2023 pm 03:34 PM
打印机速度变慢的原因有:打印机设置问题,分辨率设置过高,设置为双面打印以及颜色设置异常都会影响打印速度;2、电脑系统问题,系统中存在病毒以及内存不足也会影响打印速度;3、打印机硬件问题。
 如何在麒麟操作系统上进行打印机和扫描仪的配置和使用?Aug 06, 2023 am 09:25 AM
如何在麒麟操作系统上进行打印机和扫描仪的配置和使用?作为一种基于Linux发行版的操作系统,麒麟操作系统在中国得到了广泛使用。为了满足不同用户的需求,麒麟操作系统提供了简便易用的打印机和扫描仪配置和使用方法。本文将告诉您如何在麒麟操作系统上配置和使用打印机和扫描仪,并提供相应的代码示例。打印机配置和使用麒麟操作系统使用CUPS(通用UNIX打印系统)作为打印
 打印机感叹号亮黄灯什么意思?Mar 08, 2023 am 10:39 AM
打印机感叹号亮黄灯的意思是打印机出现了故障,其产生原因及解决办法是:1、黑色墨盒有可能进入了空气,需要更换墨盒;2、打印机黑色墨盒里面没有墨汁了,需要增加墨汁;3、打印机卡纸了,看下槽口里面是否有纸张卡了,若是有,将其清理掉即可。


Hot AI Tools

Undresser.AI Undress
AI-powered app for creating realistic nude photos

AI Clothes Remover
Online AI tool for removing clothes from photos.

Undress AI Tool
Undress images for free

Clothoff.io
AI clothes remover

AI Hentai Generator
Generate AI Hentai for free.

Hot Article

Hot Tools

VSCode Windows 64-bit Download
A free and powerful IDE editor launched by Microsoft

DVWA
Damn Vulnerable Web App (DVWA) is a PHP/MySQL web application that is very vulnerable. Its main goals are to be an aid for security professionals to test their skills and tools in a legal environment, to help web developers better understand the process of securing web applications, and to help teachers/students teach/learn in a classroom environment Web application security. The goal of DVWA is to practice some of the most common web vulnerabilities through a simple and straightforward interface, with varying degrees of difficulty. Please note that this software

Notepad++7.3.1
Easy-to-use and free code editor

SecLists
SecLists is the ultimate security tester's companion. It is a collection of various types of lists that are frequently used during security assessments, all in one place. SecLists helps make security testing more efficient and productive by conveniently providing all the lists a security tester might need. List types include usernames, passwords, URLs, fuzzing payloads, sensitive data patterns, web shells, and more. The tester can simply pull this repository onto a new test machine and he will have access to every type of list he needs.

SublimeText3 Mac version
God-level code editing software (SublimeText3)


