Home >Software Tutorial >Office Software >How to insert multiple pictures in ppt2013
How to insert multiple pictures in ppt2013
- PHPzforward
- 2024-03-26 17:11:151334browse
php Xiaobian Youzi teaches you how to insert multiple pictures in PPT2013 to make your presentation more vivid. Inserting multiple pictures into PPT can help you better display your content and attract the audience's attention. Next, we will introduce in detail the specific operation method of inserting multiple pictures in PPT2013, so that you can easily master the skills and improve the presentation effect.
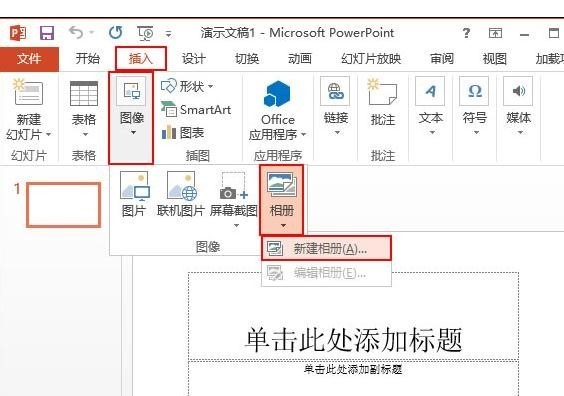
1. Open a blank document with ppt2013, switch to the [Insert] tab, and click the [New Album] function under [Album] in the [Image] group.

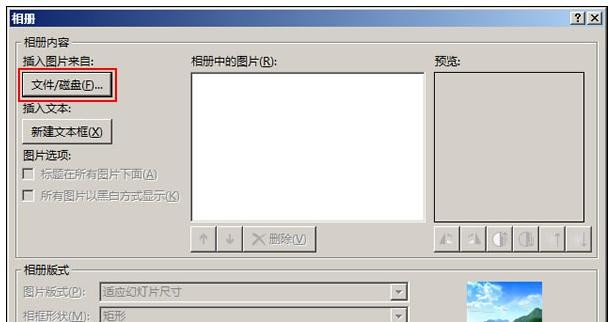
2. A [Album] dialog box will pop up. We click the [File/Disk] button and select the pictures stored in the disk.

3. In the pop-up [Insert New Picture] window, select the picture you need, and then click the [Insert] button.
4. Return to the [Album] dialog box and insert the pictures you need at one time according to steps 2 and 3. Here, only two pictures will be inserted.
5. When you return to the [Album] dialog box again, modify the album layout, click the drop-down button on the right side of the [Picture Layout] drop-down box, select the layout you need here, and now select [2 Picture (with title)].

6. Click the drop-down button on the right side of [Photo Frame Shape] and select the appropriate shape. Here, select [Simple Frame, White]. After completion, click the [Create] button to create photo album.

7. The system has automatically reconstructed a document and put the photo album into the newly created presentation. There are two PPTs. You can now modify the photo album, including Add titles, delete the first PPT, copy and move slides, etc.
The above is the detailed content of How to insert multiple pictures in ppt2013. For more information, please follow other related articles on the PHP Chinese website!

