


How to partition a newly purchased hard disk
There are 6 steps to partition a newly purchased mobile hard disk. The specific steps are as follows: Enter the management page to partition the newly purchased mobile hard disk. Insert the mobile hard disk into the USB interface of the computer, right-click this computer and select Manage. Select the compressed volume and select "Disk Management" on the page, right-click the mobile hard disk and select "Compressed Volume".
There are partition options during the system installation process, which can be divided according to personal usage habits. It is recommended that the system partition should be no less than 40G. There are not many requirements for other partitions. You can divide it equally by yourself.
First enter the winpe main menu, select Win10X64PE (more than 2G memory), and press to enter the winpe desktop. In the winpe desktop, find and open the program, as shown in the figure below.
Create primary partition Create extended partition Create logical partition Generally speaking, hard disk partition follows the order principle of "primary partition → extended partition → logical partition", while deleting a partition is the opposite. A hard disk can be divided into multiple primary partitions, but there is no need to divide so many, one is enough.
You can enter it in the search box through the system's own tool partition or right-click the Windows menu and select "Disk Management", right-click the C drive and select the compressed volume: the prompt "Querying the volume to obtain available compressed space, please wait" After..." Wait patiently for a while and the amount of available compression space will appear.
The first step is to enter the disk information interface. Right-click Computer and click Manage. After entering the computer management interface, select Disk Management. After entering, you can partition the disk accordingly. System partition computer diagram 1 Partition computer diagram 2 The second step is to calculate the size and drive letter of the partition you divide.
How to partition a new hard drive on a computer
1. Steps: Right-click on "This Computer", select "Manage", and then select "Disk Management" in the list on the left of the "Computer Management" window ". In Windows 10, you can also right-click the Start menu and directly select the "Disk Management" function.
2. There are 6 steps to partition a newly purchased mobile hard disk. The specific steps are as follows: Enter the management page, insert the newly purchased mobile hard disk into the USB interface of the computer, right-click the computer and select Manage. Select the compressed volume and select "Disk Management" on the page, right-click the mobile hard disk and select "Compressed Volume".
3. How to partition the hard disk. Open the computer, find the My Computer icon, right-click My Computer, and select Manage from the pop-up drop-down menu.
How to add a new hard drive to the computer host. How to do it
1. Right-click on "My Computer"-Manage. In the window that opens, there is Disk Management where you can find the newly installed hard drive. The name it should show is "Disk 1". If you're not sure, look at its capacity. It should be above 800G. That's right.
2. You need to connect the solid state drive to the first SATA interface, and connect the second hard drive to the rear SATA interface. As shown in the picture: There are 4 SATA interfaces on the motherboard. Just connect the solid state drive to SATA2_0 and the mechanical hard drive to the SATA interface at the back.
3. After installing the hard disk to the computer, turn it on. On the computer desktop, select My Computer and right-click - "Manage" to enter the computer management interface. Select "Disk Management", the system will detect a new hard disk and ask to initialize the hard disk. Click "OK" to initialize.
4. First open the ASUS Hongdao D320MT computer case and find the SATA interface cable inside the ASUS Hongdao D320MT computer case. Then plug the SATA interface cable inside the ASUS Hongdao D320MT computer case into the SATA interface of the hard drive. Then determine the installation position of the hard drive in the ASUS Hongdao D320MT computer case.
5. Open the host, find the hard disk installation location, place the SATA interface and power supply interface outward, connect the hard disk to the motherboard with a SATA cable, and then connect the power cord to the hard disk. After the installation is completed, you can enter the computer Check the BIOS interface to see if the installation is successful.
How to add a hard disk to set up the computer
First press Win R to open the "Run" window, enter: Diskmgmt.msc, click "OK" after entering. After opening "Disk Management", you can expand the hard disk. If the "Unallocated" partition is not displayed, you cannot create a new partition or extend the partition.
Originally there was already a system, now adding a hard drive, there is no need to redo the system, just connect the hard drive. If it is an IDE hard disk, you need to pay attention to the settings of the master and slave disks. If it is a SATA hard disk, you need to pay attention to the startup sequence.
After installing the hard disk on the computer, turn on the computer, on the computer desktop, select My Computer and right-click "Manage" to enter the computer management interface. Select "Disk Management" and the system will pop up to detect the new hard drive and request initialization of the hard drive. As shown in the figure, click "OK" to initialize.
Operating computer: Xiaoxin Pro162022 Operating system: Windows 10 After installing the hard disk, the setting steps are as follows: After installing the hard disk on the computer, turn it on, on the computer desktop, select My Computer and right-click - Manage to enter the computer management interface .
The hardware installation of dual hard drives is complete. CMOS setting parameters: After installing the hard disk, start the computer and hold down the "Delete" key to enter the CMOS setting interface. At this time, select "IDE HDD Auto Detection" and press Enter to check whether the two hard drives are normal.
After booting into the bios settings, you can see the boot device Priority, which is the choice of the boot order for the hard disk and other devices. If you have two hard disks, you need to set the priority of the hard disks first; enter the Hard Disk Drivers in the picture above and specify the order of the two hard disks.
What should I do if the new hard drive cannot be displayed when it is plugged into the computer?
1. First, you must clarify the interface of the hard drive. Take the common SATA hard drive as an example. It has a data cable interface and a power supply. line interface. If the hardware connection is not normal, the new hard drive will definitely not be displayed on the computer.
2. Turn off the power, open the case, re-plug and unplug the hard drive power cord and data cable (if it is a laptop, just re-plug the hard drive), then turn on the computer, press the DEL key (F2 or other for laptops) Enter the BOOT tab in CMOS to see if the hard disk information can be detected. If possible, set the hard disk as the first startup item.
3. Solution: Change an IDE cable or plug the IDE cable into another IDE slot on the motherboard. Do not connect the cable to the hard disk with other IDE devices, such as optical drives. Separate the two IDE cables and set the master correctly. From the plate. 3) The hard drive is faulty and may need to be replaced.
How to replace a computer hard drive
No matter what the situation is, here are some steps you should take: Back up your data Before replacing your hard drive, you should back up all of your data. This can be done by copying the files to an external hard drive or cloud storage. If you use cloud storage, make sure your data is fully synced and accessible.
The operation method and steps for replacing the desktop hard drive are as follows: First, unplug the monitor, mouse and keyboard interfaces, see the picture below, and then proceed to the next step. Secondly, after completing the above steps, use a screwdriver to open the cover of the main chassis. You can unscrew the rear screws by hand, as shown in the picture below, and then proceed to the next step.
After installing the hard disk into the computer, turn on the computer and enter the desktop. Press the shortcut key win R to open the run window. In the run window, enter compmgmt. msc, and then click the OK button to open the Computer Management window. In the Computer Management window, click Disk Management on the left.
Explanation on how to replace the hard drive of a laptop: Shut down the computer first, disconnect the power supply, and remove the battery to ensure safety. Turn the back of the notebook upward and look for the hard drive location. Use a screwdriver to unscrew the screws without picking them up and place them on the cover. Remove the lid.
Yes, the current hard drives all have SATA interfaces and can be replaced with solid-state drives. Method 1: Keep the original mechanical hard drive, disassemble the optical drive, and install a solid-state drive with an optical drive in the optical drive. If there is no built-in optical drive, you can also directly install a solid-state drive with an optical drive.
The location of the hard disk is generally in the front part of the chassis and in the lower middle part. See the picture below for the specific location. After you find the hard drive, you can see that there are two screws on the left and right. Use a matching screwdriver to remove the screws and you can remove the hard drive.
The above is the detailed content of New computer hard drive. For more information, please follow other related articles on the PHP Chinese website!

 Turn a Long Webpage into a PDF with a Single iPhone ScreenshotMay 09, 2025 am 12:59 AM
In iOS and iPadOS, Apple includes a built-in screenshot feature that also provides you with the ability to capture an entire webpage on your iPhone or iPad that you can then save or share with someone as a PDF document.By converting full‑page screens
 You will be able to watch the premiere of the next Star Wars TV show for free in Fortnite days before its Disney launchMay 08, 2025 am 09:54 AM
The first two episodes of Star Wars: Tales of the Underworld will premiere in FortniteThey will be free to watch in the game on May 2 ahead of a May 4 Disney releasePlayers can also claim a free Stormtrooper skin right nowThe first two episodes of t
 Best fighting games 2025 - top fighters to push you to the limitMay 08, 2025 am 09:02 AM
The best fighting games are designed to put your skills to the test, whether that's in an online match or couch co-op. These games could offer anything from an eclectic roster of characters, a high skill ceiling to test the might of competitively min
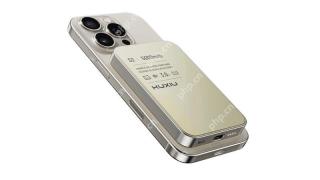 Review: Kuxiu S2 Power Bank - Semi-Solid State Tech Promises Longer Life, Better SafetyMay 08, 2025 am 01:05 AM
When it comes to the MagSafe power bank marketplace, it's largely a sea of sameness. Not this one. Kuxiu's S2 stands apart with its semi-solid state battery technology that promises enhanced safety and longevity, albeit at a steeper price than conven
 Sony State of Play: when is the next 2025 PlayStation event?May 07, 2025 am 09:58 AM
We've finally gotten an announcement for the next State of Play event of the year, and it'll focus on an upcoming PS5 looter shooter. Better yet, there's not long to wait at all.Since the series of shows began in 2019, Sony has used the State of Play
 Best PS5 games 2025 - top PlayStation 5 titles to play right nowMay 07, 2025 am 09:29 AM
Only the best PS5 games will give you top-tier experiences on Sony's current-gen console. Now that we're well into the lifecycle of the PlayStation 5, the library is more expansive than ever, offering an enormous range of games to get stuck into, no
 How to Share Safari Tab Groups in macOSMay 07, 2025 am 03:01 AM
In macOS, Apple allows you to share Tab Groups in Safari with colleagues, friends, and family. Keep reading to learn how it's done.Introduced back in macOS Monterey, Tab Groups are designed to make organizing and preserving open tabs more manageable
 Bookmark Multiple Tabs in Safari on iPhoneMay 01, 2025 am 01:02 AM
In Safari on iPhone, it's not unusual for the number of tabs you have open to quickly get out of hand. Here's how to temporarily clean things up without losing your tabs.If you have no use for all your open tabs, you can simply select one, then press


Hot AI Tools

Undresser.AI Undress
AI-powered app for creating realistic nude photos

AI Clothes Remover
Online AI tool for removing clothes from photos.

Undress AI Tool
Undress images for free

Clothoff.io
AI clothes remover

Video Face Swap
Swap faces in any video effortlessly with our completely free AI face swap tool!

Hot Article
Hot Tools

Safe Exam Browser
Safe Exam Browser is a secure browser environment for taking online exams securely. This software turns any computer into a secure workstation. It controls access to any utility and prevents students from using unauthorized resources.

SublimeText3 Mac version
God-level code editing software (SublimeText3)

mPDF
mPDF is a PHP library that can generate PDF files from UTF-8 encoded HTML. The original author, Ian Back, wrote mPDF to output PDF files "on the fly" from his website and handle different languages. It is slower than original scripts like HTML2FPDF and produces larger files when using Unicode fonts, but supports CSS styles etc. and has a lot of enhancements. Supports almost all languages, including RTL (Arabic and Hebrew) and CJK (Chinese, Japanese and Korean). Supports nested block-level elements (such as P, DIV),

Notepad++7.3.1
Easy-to-use and free code editor

WebStorm Mac version
Useful JavaScript development tools

