


php editor Banana today will share with you tips on how to use PPT design office software for beautification. As an important office tool, PPT should not only be rich in content when presenting, but also have aesthetics and visual impact. By rationally using color, fonts, layout and other design elements, you can make PPT more attractive and improve the presentation effect. Next, we will introduce some practical beautification techniques in detail to help you design more attractive PPT works.

2. First, let’s explain the content of this lesson, as shown in the figure.

3. During the production process, the default format most likely needs to be adjusted, checked and discarded, as shown in the figure shown.

4. Here we preview some typical default-made slides, as shown in the figure.


#6. Here we modify a default unit to see the difference, as shown in the figure.

#7. Using this case, we modify some fonts and adjust their styles, as shown in the picture.

8. Here we preview some charts for explanation, as shown in the figure.

9. We continue to conduct an analysis and explanation through this case, as shown in the figure.

10. Here we explain the relevant knowledge about typesetting, as shown in the figure.

#11. The blank space allows the eyes to relax. The more careful identification is required, the more visually disgusting and easy to fatigue, as shown in the picture.

12. Here we preview some excellent works for analysis, as shown in the figure.

13. Leave blank space. The so-called blank space does not refer to white but more space, as shown in the figure shown.

#14. If you have to, the visual experience is more important if you don’t see clearly, as shown in the picture.

15. Here we conduct an analysis and understanding through this case file, as shown in the figure.

16. Appropriate distance produces beauty. There is no appropriate fixed standard. Take visual experience as the benchmark and try and compare different ones. Distance setting, as shown in the figure.

17. Here we preview some excellent works and explain them, as shown in the picture.

18. Here we explain the relevant knowledge about text layout, as shown in the figure.

19. Here we refer to this step for an explanation, as shown in the figure.

20. Conduct an analysis and explanation through this case, as shown in the figure.

21. Here we explain the relevant knowledge about text layout, as shown in the figure.

#22. Through this picture case, we can feel the difference brought by the change of spacing, as shown in the picture.

23. Conduct an analysis and explanation through this case, as shown in the figure.

24. Using this case, we will explain the use of fonts, as shown in the figure.

25. Here we make a comparison through different fonts, as shown in the figure.

26. The use of fonts is very complicated. On the basis of ensuring safety, you can try different and more appropriate fonts. Font, as shown.

#27. Finally, we make a summary based on the content explained in this lesson, as shown in the figure.

28. Thank you for watching.

The above is the detailed content of How to beautify using PPT design office software. For more information, please follow other related articles on the PHP Chinese website!

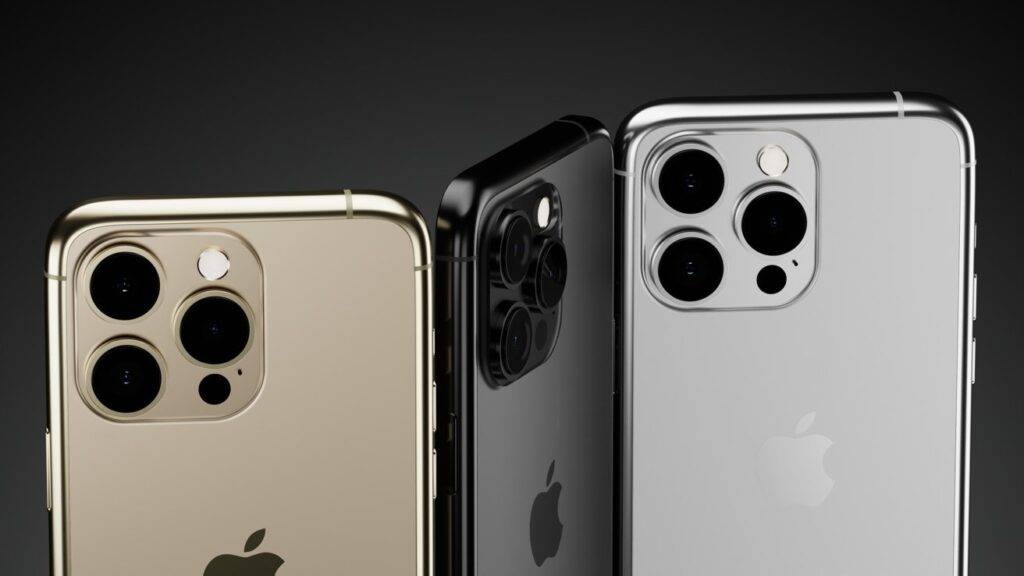 iPhone 16的设计特点是堆叠式后置感光元件Aug 11, 2023 am 10:17 AM
iPhone16系列将在全线型号也采用堆叠式后置感光元件设计。该设计在今年的iPhone15标准版上已有类似的应用。今年的标准版iPhone15和iPhone15Plus预期将配备一个4800万像素的后置镜头,并使用能够捕捉更多光线的堆叠式CMOS影像感光元件(CIS)设计。新感光元件设计的产能问题,导致苹果无法在所有iPhone15型号上全面采用此设计。尽管索尼的高端CIS产能预期将在2024年前持续紧张,但Apple已提前确保了大部分的Sony订单。根据郭明錤的说法,索尼产能紧张,将对竞争对
 在线投票系统的设计与实现Aug 09, 2023 am 10:13 AM
在线投票系统的设计与实现随着互联网的不断发展,在线投票系统成为了一种非常方便和高效的方式来进行民意调查和选举。本文将介绍在线投票系统的设计和实现,并附带一些代码示例。一、系统设计功能需求分析在线投票系统主要具备以下功能:用户注册与登录:用户可以通过注册账号并登录系统来参与投票活动。创建投票:管理员可以创建投票并设定投票的相关参数,如投票主题、选项内容和投票截
 Java API 开发中的 RESTful 接口设计Jun 18, 2023 am 08:31 AM
随着互联网技术的发展,RESTful风格的API设计成为了最为流行的一种设计方式。而Java作为一种主要的编程语言,也越来越多地在RESTful接口的开发中扮演着重要的角色。在JavaAPI开发中,如何设计出优秀的RESTful接口,成为了一个需要我们深入思考的问题。RESTful接口的基本原则首先,我们需要了解RESTful接口的基本原则。REST即Re
 Go语言中的面向服务架构设计Jun 04, 2023 am 09:51 AM
随着互联网技术的不断发展,面向服务架构(SOA)的理念越来越受到人们的重视。在这个背景下,Go语言作为一种高效、可靠的编程语言,也逐渐成为了很多企业与开发者实现SOA的首选语言。本文将深入探讨Go语言中的面向服务架构设计。一、SOA简介面向服务架构是一种软件设计的架构风格,它将复杂的系统拆分成多个相互独立、可复用的服务,每个服务都有独立的功能实现,并使用标准
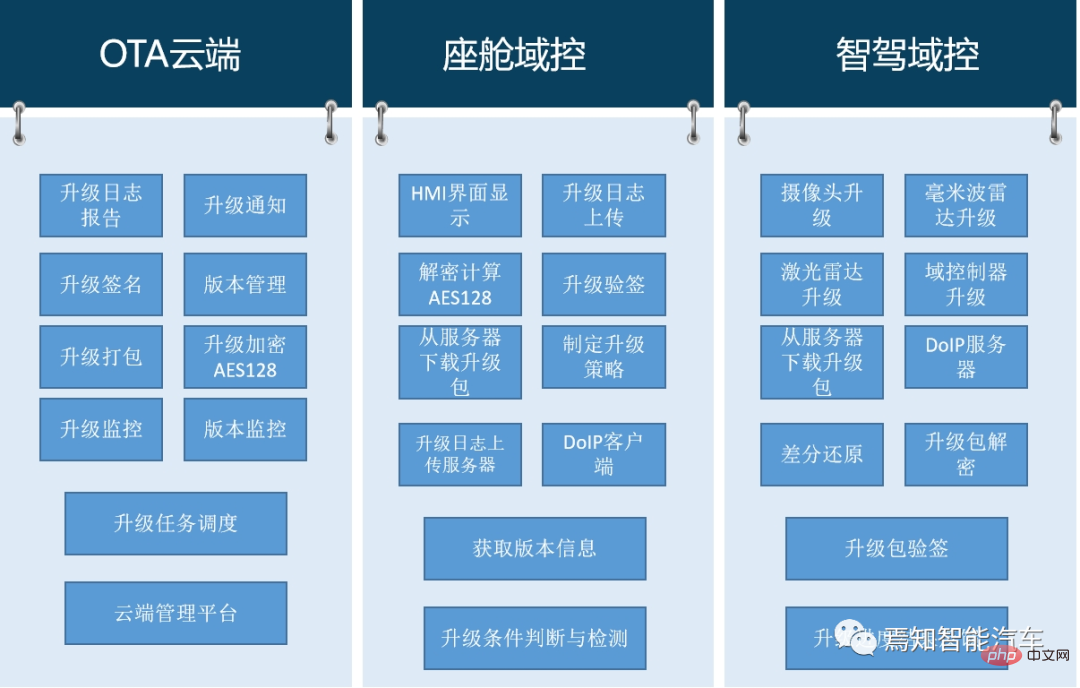 自动驾驶汽车的软件升级技术管理与监管策略分析May 16, 2023 am 08:40 AM
随着智能车辆在网联化、智能化及架构技术的发展,汽车无论是在固件还是软件上都已经不可逆转的需要进行软件迭代升级。要求在汽车生命周期内会不断的基于汽车OTA能力为整车提供软件升级、固件升级、售后服务等服务能力,可以说,汽车的智能化更迭对于OTA升级能力已经成为不可或缺的主流趋势。本文章将针对自动驾驶汽车的软件升级现状需求及监管要求等进行详细的描述。意在帮助读者整体了解自动驾驶中的软件升级过程原理、准入要求及其应对策略。1整车软件升级技术优势首先,软件定义汽车推动了整车软件升级技术的发展与应用,通过整
 RESTful API设计及其实现方法Jun 22, 2023 pm 04:07 PM
RESTfulAPI是目前Web架构中较为常用的一种API设计风格,它的设计理念是基于HTTP协议的标准方法来完成Web资源的表示与交互。在实现过程中,RESTfulAPI遵循一系列规则和约束,包括可缓存、服务器-客户端分离、无状态性等,这些规则保证了API的可维护性、扩展性、安全性以及易用性。接下来,本文将详细介绍RESTfulAPI的设计及其实现方
 Redis应用实例分享:文章点赞功能设计Jun 20, 2023 am 09:30 AM
在互联网时代,文章阅读与分享已经成为人们日常生活中必不可少的一部分。然而,对于文章的点赞与收藏功能来说,用户体验体现的非常关键。而Redis作为一个高性能的键值存储数据库,在文章点赞与收藏功能的实现中有很大的优势。本文将分享一个基于Redis实现的文章点赞功能设计。功能设计文章点赞功能的设计过程中,需要考虑到许多因素。首先,需要将点赞接口暴露给用户,用户可随
 如何使用Go语言进行代码安全性设计Aug 02, 2023 pm 05:29 PM
如何使用Go语言进行代码安全性设计在当今互联网时代,代码安全性是一项至关重要的任务。无论是为了保护用户的隐私还是避免遭受黑客攻击,代码安全性都是必不可少的。Go语言作为一种现代化的编程语言,提供了许多功能和工具,可以帮助我们进行代码安全性设计。本文将介绍一些在Go语言中实现代码安全性的最佳实践,并提供相应的代码示例。输入验证输入验证是代码安全性的第一道防线。


Hot AI Tools

Undresser.AI Undress
AI-powered app for creating realistic nude photos

AI Clothes Remover
Online AI tool for removing clothes from photos.

Undress AI Tool
Undress images for free

Clothoff.io
AI clothes remover

AI Hentai Generator
Generate AI Hentai for free.

Hot Article
Hot Tools

SAP NetWeaver Server Adapter for Eclipse
Integrate Eclipse with SAP NetWeaver application server.

SublimeText3 Linux new version
SublimeText3 Linux latest version

MinGW - Minimalist GNU for Windows
This project is in the process of being migrated to osdn.net/projects/mingw, you can continue to follow us there. MinGW: A native Windows port of the GNU Compiler Collection (GCC), freely distributable import libraries and header files for building native Windows applications; includes extensions to the MSVC runtime to support C99 functionality. All MinGW software can run on 64-bit Windows platforms.

WebStorm Mac version
Useful JavaScript development tools

VSCode Windows 64-bit Download
A free and powerful IDE editor launched by Microsoft

