


When we use WPS for daily office work, we often need to take screenshots of the documents at hand due to various work needs. So, do you know how to use WPS to take screenshots? In fact, it’s not difficult at all. As long as we can find the right menu, we can get the screenshots we want in just a few steps. Let’s take a look with the editor!
1. Open wps and enter the wps operation interface, as shown in the figure:

2. Find the "Insert" menu in the menu bar above , as shown in the picture:

3. Click the "Insert" menu to enter the editing area of the "Insert" menu, as shown in the picture:

4. Find the "Screenshot" option in the insertion editing area, as shown in the figure:

5. Click the "Screenshot" option to enter In the screenshot working state, the mouse becomes colored. Drag the left mouse button to get the range that needs to be screenshot, as shown in the picture:

6. In the picture below Find the "Save" option in the editing area, as shown in the figure:

7. Click "Save", the "Save As" dialog box will pop up, select the save path, this The screenshot is ready for use, as shown in the picture:

As long as we follow the above steps step by step, we can get the wps screenshot we need, you have learned it ? In fact, there are many tips on how to operate wps. The editor will teach you bit by bit, but no matter how practical or simple the skills are, they cannot be separated from careful operation. Now, open your wps document immediately, find an article at random, and try taking a wps screenshot!
The above is the detailed content of How to take screenshots with wps. For more information, please follow other related articles on the PHP Chinese website!

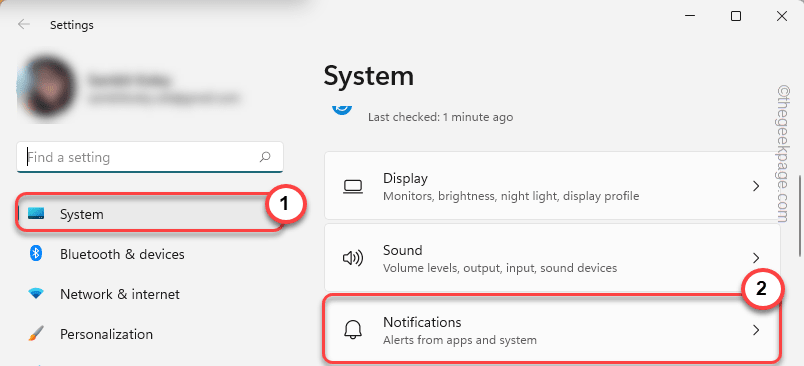 修复:Windows 11、10 中缺少截图工具通知May 16, 2023 pm 06:34 PM
Snip&Sketch是一款出色的Windows屏幕截图工具。微软添加了大量新的很酷的功能和快捷方式,使这个工具对用户来说几乎是不可或缺的。但是,您可能在截屏后注意到了一个问题,通知面板中没有出现预览通知!有很多原因可能是问题的根源。因此,无需浪费更多时间,只需遵循这些解决方案即可找到快速解决方案。修复1–检查通知设置您可能已阻止Snip&Sketch通知设置。1.您必须打开设置。因此,同时按下Windows键+I键。2.现在,从左侧窗格转到“系统”。3.在右侧,点击所有选项
 如何在联想ThinkPad X13笔记本上进行屏幕截图:快捷键指南Jan 01, 2024 pm 09:11 PM
截图是电脑上一项非常常用的功能,它可以方便地捕捉并分享屏幕上的内容。在电脑上,有许多方法可以进行截图。现在,我们来介绍一下联想ThinkPadX13笔记本常用的截图方法。联想ThinkPadX13屏幕截图方法介绍关于电脑上的截图方法,有多种选择可供使用。在这里,我们将重点介绍ThinkPadX13的快捷键截图和主流软件截图的方法。ThinkPadX13提供了简便的快捷键截图功能。您只需按下Fn键和PrtSc键,即可将当前屏幕的内容截图保存到剪贴板中。之后,您可以打开任何图片编辑软件,如Paint
 mac截图怎么发送微信Feb 06, 2024 am 09:55 AM
mac截图该怎么发送微信,首先在桌面找到launchpad打开进去后找到微信,然后点击微信进行登录最后再弹出来的偏好设置中进入快捷键设置窗口就可以了。mac截图怎么发送微信1、在桌面找到launchpad。2、然后找到微信。3、点击登录微信。4、登录上去后在电脑页面的左上角找到微信选项并打开。5、然后在弹出来的菜单中偏好设置选项进入快捷设置窗口,最后在快捷键设置页面中找到截图功能并设置好按键就可以了。
 《星刃》全新三主角海报曝光 紧身胶衣尽显女主身材Feb 09, 2024 pm 03:12 PM
近日动作冒险游戏《星刃》(剑星)发布了全新主视图公布,女主角伊芙(Eve)、莉莉(Lily)和亚当(Adam)登场亮相。《星刃》故事始于战士伊芙从异星殖居地降临的一刻,她受命来到地球,击败突然出现的人类宿敌奈提巴。奈提巴似乎会听令于由阿尔法和长老组成的高等同类,攻击人类。在满目疮痍的世界,主角伊芙遇见了留在地球的幸存者亚当,以及前腾空小队成员莉莉。他们并肩作战对抗奈提巴。本作将于4月26日发售,登陆PS5。有望在晚些时候登陆PC。
 win10电脑截图就黑屏怎么回事Jul 13, 2023 pm 11:21 PM
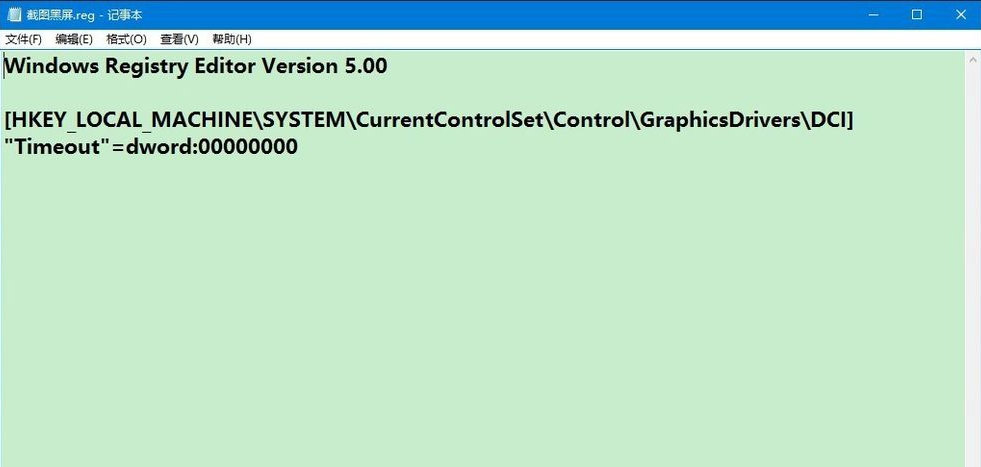
在使用win10电脑的时候,我们经常会需要用到截图功能把电脑上的重要信息截图保存下来,不过有网友说自己的win10电脑截图就黑屏怎么回事?这种情况可能是启用了DirectDraw加速造成的,下面小编就教下大家win10电脑截图就黑屏的解决方法。具体的操作方法如下:1、把下面的内容复制到记事本中:WindowsRegistryEditorVersion5.00[HKEY_LOCAL_MACHINE\SYSTEM\CurrentControlSet\Control\GraphicsDrivers\D
 一键截图教程:荣耀Magic5Pro的截屏方法Dec 28, 2023 pm 10:09 PM
荣耀Magic5Pro配备了MagicOS7.1操作系统,操作非常流畅。那么,如何在Magic5Pro上进行截屏呢?本文将为大家提供详细的一键截图教程荣耀Magic5Pro截屏教程荣耀Magic5Pro支持标准截屏、局部截屏和长截屏。下面是具体的截屏方法:在手机屏幕的顶部边缘向下滑动,就可以打开控制中心。在控制中心中找到截屏图标,点击它就可以快速进行截屏。另外,也可以同时按下【音量-】和【开机键】来进行截屏操作如果您需要进行局部截屏或长截图,您需要点击截屏图标右下角的倒三角。一旦点击,会显示【局
 修复:截图工具在 Windows 11 中不起作用Aug 24, 2023 am 09:48 AM
为什么截图工具在Windows11上不起作用了解问题的根本原因有助于找到正确的解决方案。以下是截图工具可能无法正常工作的主要原因:对焦助手已打开:这可以防止截图工具打开。应用程序损坏:如果截图工具在启动时崩溃,则可能已损坏。过时的图形驱动程序:不兼容的驱动程序可能会干扰截图工具。来自其他应用程序的干扰:其他正在运行的应用程序可能与截图工具冲突。证书已过期:升级过程中的错误可能会导致此issu简单的解决方案这些适合大多数用户,不需要任何特殊的技术知识。1.更新窗口和Microsoft应用商店应用程
 联想电脑win10截图快捷键Jan 01, 2024 pm 12:33 PM
联想电脑win10系统该如何截图呢?当我们工作的时候,快捷键截图可以省心跟多,节约时间又方便,今天小编整理了相关的截图方法,希望可以帮助到大家,下面一起来看吧。联想电脑win10截图快捷键方式一、电脑本身快捷键截图1、抓取全屏首先找到想截取的图片,点一下键盘上的PrintScreen键(或prtsc)键,,然后启动“画图(开始-程序-附件)”,按Ctrl+V或“编辑-粘贴”就可以将当前屏幕抓下来,然后保存为Bmp/Jpeg就可以了。2、抓取当前活动窗口(最常用)按下Alt键,点击PrintScr


Hot AI Tools

Undresser.AI Undress
AI-powered app for creating realistic nude photos

AI Clothes Remover
Online AI tool for removing clothes from photos.

Undress AI Tool
Undress images for free

Clothoff.io
AI clothes remover

AI Hentai Generator
Generate AI Hentai for free.

Hot Article
Hot Tools

Atom editor mac version download
The most popular open source editor

mPDF
mPDF is a PHP library that can generate PDF files from UTF-8 encoded HTML. The original author, Ian Back, wrote mPDF to output PDF files "on the fly" from his website and handle different languages. It is slower than original scripts like HTML2FPDF and produces larger files when using Unicode fonts, but supports CSS styles etc. and has a lot of enhancements. Supports almost all languages, including RTL (Arabic and Hebrew) and CJK (Chinese, Japanese and Korean). Supports nested block-level elements (such as P, DIV),

SublimeText3 Linux new version
SublimeText3 Linux latest version

VSCode Windows 64-bit Download
A free and powerful IDE editor launched by Microsoft

ZendStudio 13.5.1 Mac
Powerful PHP integrated development environment

