

 Software TutorialMobile ApplicationHow to put the cut out picture onto another picture in Xingtu? How to put the cut out picture on another picture!
php editor Strawberry will introduce to you today how to use the wake-up picture to put the cut out picture on another picture. This technique is especially important when doing image synthesis. Next, we will guide you through this process through simple steps to make your works more vivid and exciting!

1. How to put the cut out picture on another picture when you wake up? How to put the cut out picture on another picture!
1. Open the Xingtu app, click Import, and import the picture you want to change.

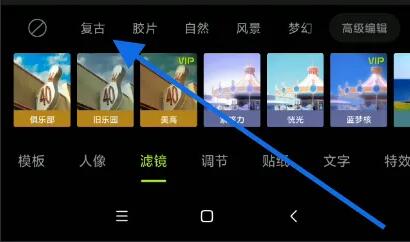
#2. Then click Import Picture under the picture and select the picture you want to cut out.

#3. Then you can select an area to cut out, and you can also choose smart cutout for characters.

#4. Adjust the size and position of the cut out picture.

#5. Finally, click Merge Layers in the upper right corner to put the cut out picture on another picture.

The above is the detailed content of How to put the cut out picture onto another picture in Xingtu? How to put the cut out picture on another picture!. For more information, please follow other related articles on the PHP Chinese website!

 美图秀秀怎么抠图放在另一个图呢?美图秀秀把抠的图放在另一个图片上教程!Mar 15, 2024 pm 11:00 PM
一、美图秀秀怎么抠图放在另一个图呢?美图秀秀把抠的图放在另一个图片上教程!1.打开美图秀秀app,点击图片美化功能。2.打开相册选择要抠图的图片。3.点击底部导航栏的抠图按钮。4.选择抠图的区域。5.抠图完成之后,点击替换背景图标。6.最后,点击导入另外一张图片,抠出的图片就可以放到另外一张图片上了。
 醒图怎么把抠出来的图放到另一张图上?醒图将抠的图放到另一张图上的操作方法!Mar 15, 2024 pm 06:52 PM
一、醒图怎么把抠出来的图放到另一张图上?醒图将抠的图放到另一张图上的操作方法!1.打开醒图app,点击导入,导入要换的图片。2.再点击图片下面的导入图片,选中要抠的图片。3.然后可以选择区域进行抠图,对于人物也可以选择智能抠图。4.把抠出来的图,调整大小和位置。5.最后点击右上角的合并图层,就能把抠出来的图放到另一张图上了。
 醒图使用教程Feb 24, 2024 pm 04:00 PM
醒图是能够让用户修改图片的软件,那么这个软件具体该怎么使用呢,用户们可以在使用软件的时候会遇到很多的问题,可以看到很多具体的解决方法。这篇醒图多功能使用教程汇总就能够告诉大家具体攻略,下面就是详细介绍,赶紧看看吧!醒图使用教程【2024-01-24】醒图如何快速找到滤镜【2024-01-24】醒图清晰画质在哪里【2024-01-24】醒图怎么换证件照背景【2024-01-24】醒图怎么镜像翻转【2024-01-24】醒图背景虚化怎么弄【2024-01-24】醒图怎么退出登录
 美图秀秀APP怎么抠图到另一张照片上Mar 19, 2024 pm 03:43 PM
美图秀秀手机版如何抠图放在另一个图?美图秀秀是很多人都在使用的一款修图软件,这款应用里面的图片处理工具很丰富,操作方法也很简单,下面小编介绍一下关于抠图的简单教程,希望对大家有所帮助。1.安装并打开美图秀秀APP,选择【图片美化】功能,前往修图页面中;2.接着点击一张需要处理的图片,然后选择图片下方的【抠图】工具;3.用户们可以手动修改抠图的区域,下图所示;4.完成抠图之后再点击下方的【背景替换】功能;5.最后大家将其导入到另外一张图片中即可。
 醒图有电脑版吗Mar 02, 2023 am 11:21 AM
醒图有电脑版;醒图电脑版是一款功能多样的修图工具,其内置了专业的图片制作功能,涵盖蒙版、拼图、美妆、瘦体等特色,用户可以轻松编辑自己的照片,一键快速分享。
 醒图怎么退出登录Feb 23, 2024 pm 09:25 PM
醒图是需要登录才能使用,那么该怎么退出登录呢?用户们需要在软件里点击修图,然后在左上角点击菜单选项。之后进入设置里就能够退出登录了。这篇醒图退出登录方法介绍就能够告诉大家具体的内容,下面就是详细的介绍,赶紧来看看吧。醒图使用教程醒图怎么退出登录答:在修图里点击左上的菜单,找到设置就能退出。具体介绍:1、首先点击里面的修图界面。2、之后点击左上的三横图标。3、在设置里点击下面的退出登录。
 《醒图》如何快速找到滤镜Feb 26, 2024 pm 10:50 PM
当今社交媒体的流行,滤镜成为了让我们的照片更加生动和吸引人的必备工具。然而,随着滤镜的不断增多,如何快速找到适合的滤镜成为了一项挑战。在本文中,我们将分享一些快速找到滤镜的技巧和窍门,让您的照片在众多滤镜中脱颖而出。醒图如何快速找到滤镜答:点击三横图标,在设置里打开高清画质。具体介绍:1、首先需要点击导入,选择一张照片。2、之后点击下面的滤镜选项。3、进入之后就能够看到很多的滤镜。
 ps怎么抠图-ps抠图教程Mar 04, 2024 pm 12:07 PM
有很多朋友还不知道ps怎么抠图,所以下面小编就讲解了ps的抠图教程,有需要的小伙伴赶紧来看一下吧,相信对大家一定会有所帮助哦。1、首先,把需要抠图的图片用ps打开(如图所示)。打开软件后,单击左侧工具栏中的魔棒工具。接着,利用鼠标点击图像的背景区域,并按下反选快捷键【Ctrl+shift+I】,这样便能选中图像的主体部分。3、选中主体后,按快捷键【Ctrl+J】,复制下一层图层;随后关闭背景图层,图片就被抠出来了(如图所示)。上面就是小编为大家带来的ps怎么抠图的全部教程,希望对大家能够有所帮助


Hot AI Tools

Undresser.AI Undress
AI-powered app for creating realistic nude photos

AI Clothes Remover
Online AI tool for removing clothes from photos.

Undress AI Tool
Undress images for free

Clothoff.io
AI clothes remover

AI Hentai Generator
Generate AI Hentai for free.

Hot Article
Hot Tools

SublimeText3 Chinese version
Chinese version, very easy to use

WebStorm Mac version
Useful JavaScript development tools

Zend Studio 13.0.1
Powerful PHP integrated development environment

SublimeText3 Linux new version
SublimeText3 Linux latest version

Safe Exam Browser
Safe Exam Browser is a secure browser environment for taking online exams securely. This software turns any computer into a secure workstation. It controls access to any utility and prevents students from using unauthorized resources.

