
Home >Technology peripherals >AI >Troubleshooting is too annoying, try the super power of GPT
Troubleshooting is too annoying, try the super power of GPT

- 王林forward
- 2024-03-14 19:52:141306browse
When using Kubernetes, you will inevitably encounter problems in the cluster, which need to be debugged and repaired to ensure that Pods and services can run normally. Whether you are a beginner or an expert in dealing with complex environments, debugging processes within a cluster is not always easy and can become time-consuming and tedious. In Kubernetes, the key to diagnosing problems is understanding the relationships between components and how they interact with each other. Logging and monitoring tools are key to problem solving and can help you quickly locate and resolve faults. In addition, an in-depth understanding of Kubernetes resource configuration and scheduling mechanism is also an important part of solving problems. When faced with a problem, first make sure your cluster and application are configured correctly. Then, locate the source of the problem by viewing logs, monitoring indicators, and events. Sometimes the problem may involve network configuration, storage issues or bugs in the application itself, which need to be carefully considered. In a cloud native environment, there are a variety of debugging solutions to choose from, which can help you easily access the cluster. Information. However, it is important to note that most solutions do not provide complete contextual information.
In this blog post, I’ll introduce you to K8sGPT, a project that aims to make the superpowers of Kubernetes available to everyone.
Application scenarios of K8sGPT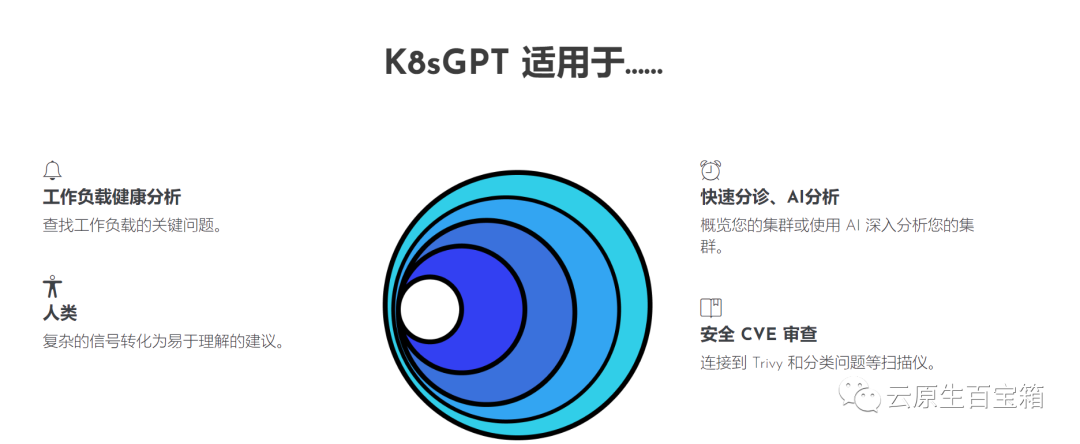 Overview
K8sGPT is a completely open source project developed by a group of experienced cloud native ecosystem experts Engineers launched in April 2023. The core idea of the project is to use artificial intelligence models to provide detailed and contextual explanations for Kubernetes error messages and cluster insights.
Picture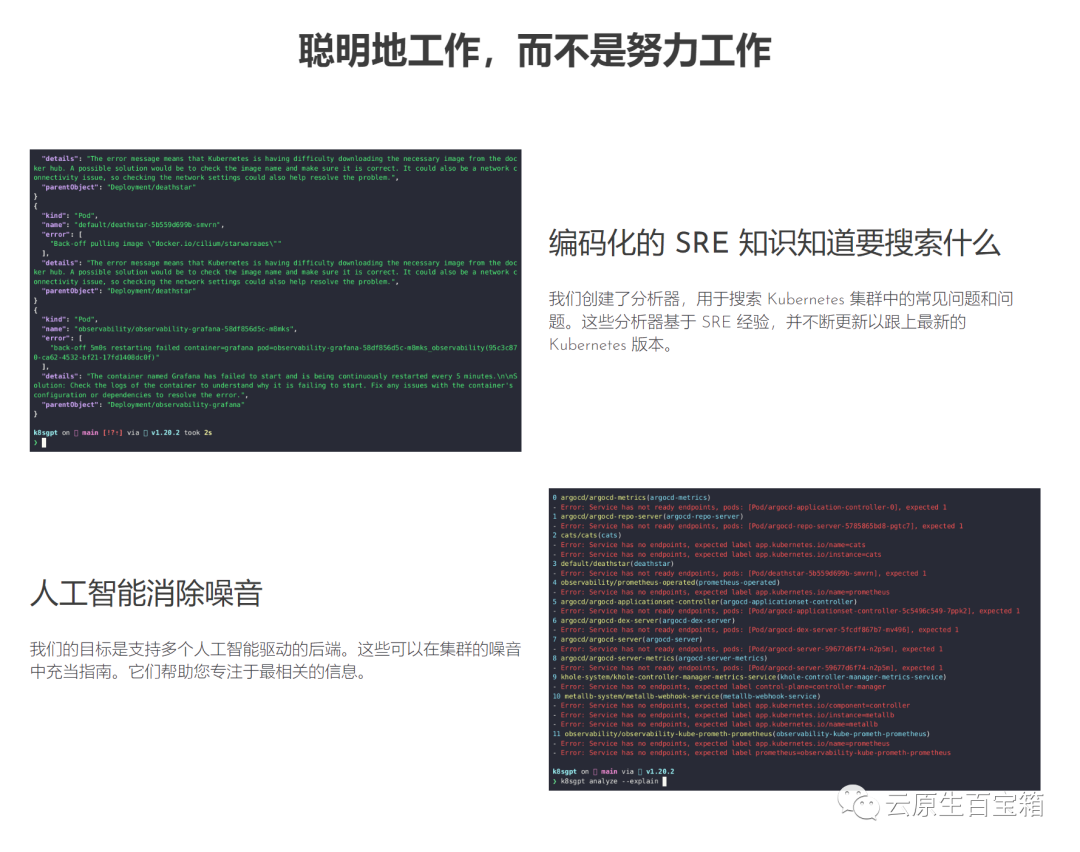 This project has been adopted by two organizations and applied to become a CNCF sandbox project. The vision of this project is to build task-oriented machine learning models for Kubernetes.
The project already supports multiple installation options and different artificial intelligence backends. In this article, I'll show you how to install and start using K8sGPT, the CLI tools and Operators, and how K8sGPT supports other integrations.
Installation
There are various installation options available depending on your preference and operating system. You can find different options in the installation section of the K8sGPT documentation.
The prerequisite for installing K8sGPT as described below is to install Homebrew on a Mac or WSL on a Windows computer.
Next, you can run the following command:
brew tap k8sgpt-ai/k8sgptbrew install k8sgpt
RPM-based installation (RedHat/CentOS/Fedora)
32-bit:
curl -LO https://github.com/k8sgpt-ai/k8sgpt/releases/download/v0.3.6/k8sgpt_386.rpmsudo rpm -ivh k8sgpt_386.rpm
curl -LO https://github.com/k8sgpt-ai/k8sgpt/releases/download/v0.3.6/k8sgpt_amd64.rpmsudo rpm -ivh -i k8sgpt_amd64.rpm
32 bit:
curl -LO https://github.com/k8sgpt-ai/k8sgpt/releases/download/v0.3.6/k8sgpt_386.debsudo dpkg -i k8sgpt_386.deb
curl -LO https://github.com/k8sgpt-ai/k8sgpt/releases/download/v0.3.6/k8sgpt_amd64.debsudo dpkg -i k8sgpt_amd64.deb
k8sgpt versionk8sgpt: 0.3.6 (9c0efe6), built at: unknown
To see all the commands provided by K8sGPT, use the --help flag:
k8sgpt --help
Prerequisites
The prerequisites for following the next section are having an OpneAI account and a running Kubernetes cluster such as microk8s or minikube which is enough.
After you have an OpneAI account, you need to visit this address https://platform.openai.com/account/api-keys to generate a new API key
Or, you can run the following command , K8sGPT will open the same address in the default browser:
k8sgpt generate
k8sgpt auth add openaiEnter openai Key: openai added to the AI backend provider list
k8sgpt auth listDefault:> openaiActive:> openaiUnused:> localai> azureopenai> noopai
apiVersion: apps/v1kind: Deploymentmetadata:name: nginx-deploymentlabels:app: nginxspec:replicas: 3selector:matchLabels:app: nginxtemplate:metadata:labels:app: nginxspec:containers:- name: nginximage: nginx:1.14.2ports:- containerPort: 80securityContext:readOnlyRootFilesystem: true
kubectl create ns demonamespace/demo createdkubectl apply -f ./deployment.yaml -n demodeployment.apps/nginx-deployment created
Picture If we look at the events for one of the pods, but we don’t know the specific Cause of the problem:
WarningBackOff 3s (x8 over 87s)kubelet Back-off restarting failed container
k8sgpt analyse
AI Provider: openai0 demo/nginx-deployment-5f4c7db77b-hq74n(Deployment/nginx-deployment)- Error: back-off 1m20s restarting failed cnotallow=nginx pod=nginx-deployment-5f4c7db77b-hq74n_demo(7854b793-21b7-4f81-86e5-dbb4113f64f4)1 demo/nginx-deployment-5f4c7db77b-phbq8(Deployment/nginx-deployment)- Error: back-off 1m20s restarting failed cnotallow=nginx pod=nginx-deployment-5f4c7db77b-phbq8_demo(74038531-e362-45a6-a436-cf1a6ea46d8a)2 demo/nginx-deployment-5f4c7db77b-shkw6(Deployment/nginx-deployment)- Error: back-off 1m20s restarting failed cnotallow=nginx pod=nginx-deployment-5f4c7db77b-shkw6_demo(2603f332-3e1c-45da-8080-e34dd6d956ad)
k8sgpt analyse --explain
附加功能
根据你的集群大小和 K8sGPT 在集群中识别的问题数量,你还可以按特定命名空间和工作负载类型进行过滤。
此外,如果你或你的组织担心 OpenAI 或其他后端接收有关你的工作负载的敏感信息,你可以使用--anonymize规避应用的敏感信息。
与其他工具的集成
云原生生态系统中大多数工具的价值源于它们与其他工具的集成程度。
在撰写本文时,K8sGPT 提供了与 Gafana 和 Prometheus 等可观察性工具的轻松集成。此外,还可以为 K8sGPT 编写插件。维护者提供的第一个插件是Trivy,一个一体化的云原生安全扫描器。
你可以使用以下命令列出所有可用的集成:
k8sgpt integration listActive:Unused:> trivy
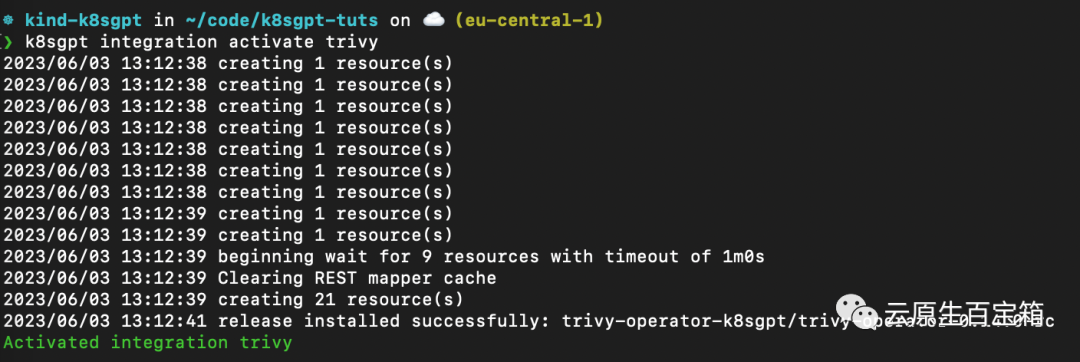
接下来,我们要激活 Trivy 集成:
k8sgpt integration activate trivy
这将在集群内安装 Trivy Operator(如果尚未安装):
 图片
图片
激活集成后,我们可以通过 k8sgpt 过滤器,使用 Trivy 创建的漏洞报告作为 K8sGPT 分析的一部分:
❯ k8sgpt filters listActive:> Pod> VulnerabilityReport (integration)Unused:> Deployment> ReplicaSet> Node> Service> Ingress> StatefulSet> CronJob> PersistentVolumeClaim> HorizontalPodAutoScaler> PodDisruptionBudget> NetworkPolicy
过滤器对应于 k8sgpt 代码中的特定分析器。分析器仅查看相关信息,例如最关键的漏洞。
要使用 VulnerabilityReport 过滤器,请使用以下命令:
k8sgpt analyse --filter=VulnerabilityReport
(FIXME)与之前类似,我们也可以要求 K8sGPT 对扫描提供进一步的解释:
k8sgpt analyse --filter=VulnerabilityReport --explain
K8sGPT Operator
虽然 CLI 工具为集群管理员提供了对其基础设施和工作负载执行即席扫描的功能,但 K8sGPT Operator 在集群中全天候 (24/7) 运行。它是 Kubernetes 原生的,这意味着它作为 Kubernetes 自定义资源运行,并生成作为 YAML 清单存储在集群中的报告。
要安装 Operator,请按照以下命令进行操作:
helm repo add k8sgpt https://charts.k8sgpt.ai/helm repo updatehelm install release k8sgpt/k8sgpt-operator -n k8sgpt-operator-system --create-namespace
如果你想将 K8sGPT 与 Prometheus 和 Grafana 集成,你可以通过向上面的安装提供values.yaml 清单来使用略有不同的安装:
serviceMonitor:enabled: trueGrafanaDashboard:enabled: true
然后安装 Operator 或更新现有安装:
helm install release k8sgpt/k8sgpt-operator -n k8sgpt-operator-system --create-namespace --values values.yaml
在本例中,我们告诉 K8sGPT 还安装一个 ServiceMonitor,它将扫描报告中的指标发送到 Prometheus,并为 K8sGPT 创建一个仪表板。如果你使用了此安装,则还需要安装 kube-prometheus-stack Helm Chart 才能访问 Grafana 和 Prometheus。这可以通过以下命令来完成:
helm repo add prometheus-community https://prometheus-community.github.io/helm-chartshelm repo updatehelm install prom prometheus-community/kube-prometheus-stack -n k8sgpt-operator-system --set prometheus.prometheusSpec.serviceMonitorSelectorNilUsesHelmValues=false
此时,你应该在集群内运行 K8sGPT Operator 和 Prometheus Stack Helm Chart(也是 Kubernetes Operator)。
与我们需要向 CLI 提供 OpenAI API 密钥的方式类似,我们需要使用 API 密钥创建 Kubernetes 密钥。为此,请使用与之前相同的密钥,或者在你的 OpenAI 帐户上生成一个新密钥。
要生成 Kubernetes 密钥,请将你的 OpenAI 密钥粘贴到以下命令中:
export OPENAI_TOKEN=<your api key here>kubectl create secret generic k8sgpt-sample-secret --from-literal=openai-api-key=$OPENAI_TOKEN -n k8sgpt-operator-system</your>
然后,我们需要配置 K8sGPT Operator 以了解要使用哪个版本的 K8sGPT 以及哪个 AI 后端:
apiVersion: core.k8sgpt.ai/v1alpha1kind: K8sGPTmetadata:name: k8sgpt-samplespec:model: gpt-3.5-turbobackend: openainoCache: falseversion: v0.3.2enableAI: truesecret:name: k8sgpt-sample-secretkey: openai-api-key
现在,我们需要将此文件应用到我们的 K8sGPT 集群命名空间:
kubectl apply -f k8sgpt-resource.yaml -n k8sgpt-operator-system
几秒钟内,Operator 将创建新结果:
kubectl get results -n k8sgpt-operator-system
以下是不同命令的屏幕截图,你可以按照这些命令从 K8sGPT Operator 查看结果报告:
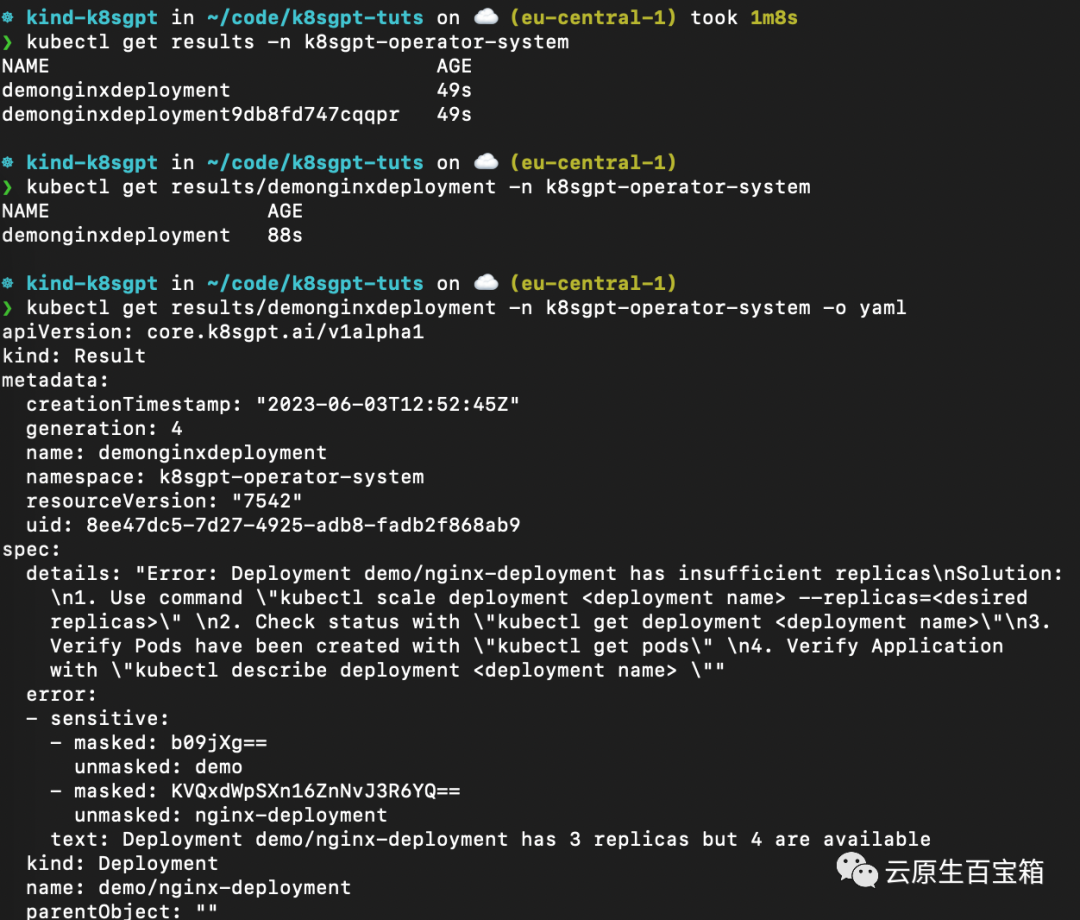 从 K8sGPT Operator 查看结果报告
最后,我们将看一下 Grafana 仪表板。端口转发 Grafana 服务以通过 localhost 访问它:
kubectl port-forward service/prom-grafana -n prom 3000:80
打开 localhost:3000,然后导航到 Dashboards>K8sGPT Overview,然后你将看到包含结果的仪表板:
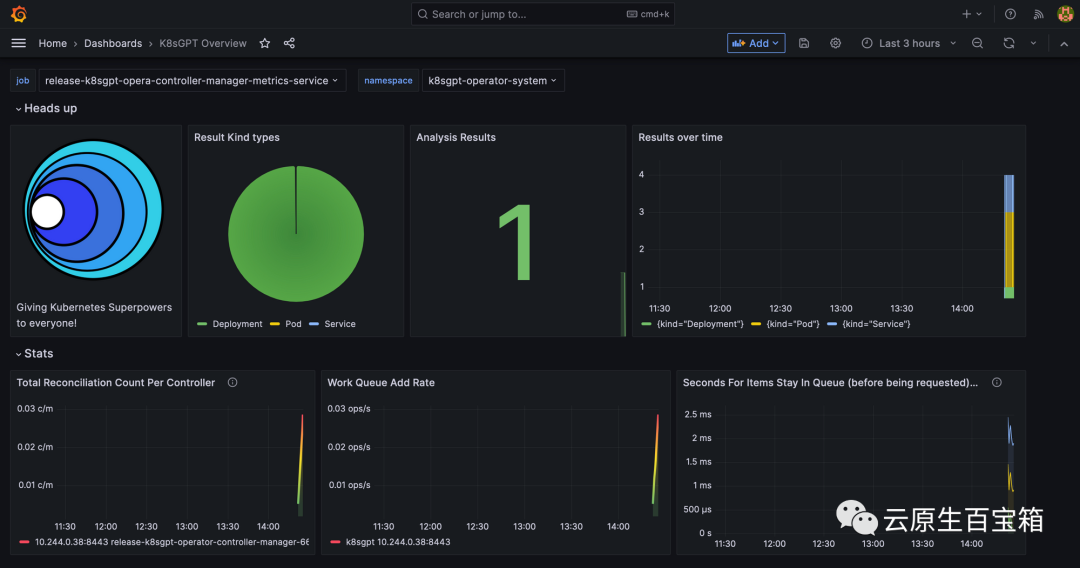 Grafana 中的 K8sGPT 仪表板
参考
- 1. https://k8sgpt.ai/
- 2. https://docs.k8sgpt.ai/
- 3. https://github.com/k8sgpt-ai
The above is the detailed content of Troubleshooting is too annoying, try the super power of GPT. For more information, please follow other related articles on the PHP Chinese website!
Related articles
See more- What is ChatGPT? It's becoming clearer
- It's so easy to connect WeChat to ChatGPT and turn it into a chatbot!
- Redis service governance and service grid in cloud native applications
- Application practice of Redis in cloud native applications
- Java Kubernetes and Java: Beyond tradition and embracing cloud-native architecture