


How to install an independent graphics card
Question 1: Can I install the independent graphics card myself if I buy it? If so, how can I install it myself? If there is a dedicated graphics card interface on the motherboard, I can install it myself. Install.
Insert the graphics card into the graphics card slot and fix the graphics card screws.
The specific method is as follows: To prepare for replacing the graphics card, find the necessary tools, including a good graphics card; a screwdriver; remove the back cover of the chassis and take out the original bad graphics card. When taking it off. Be careful not to dismantle the graphics card by force when removing it.
The first step is to open the main box. \x0d\x0aThe second step is to find the slot on the motherboard that can accommodate your graphics card and insert it. (Usually the longest one under the CPU)\x0d\x0aThe third step is to plug the rear monitor plug into the graphics card plug.
How to install an independent graphics card
1. There is a bracket at the bottom of the PCI slot of the graphics card. If the battery to the optical drive is the forward direction, facing the person, then the bracket is in the direction of the person. , pull the bracket outward, and the graphics card can be inserted and removed. Use a screwdriver to unscrew the graphics card iron screw on the back of the chassis.
2. Insert the graphics card into the graphics card slot and fix the graphics card screws.
3. Let the motherboard discharge. This time is best for 15-30 minutes. If the battery is difficult to remove, you can remove the graphics card first and wait for 15-30 minutes. After reinstalling the battery on the motherboard, install it again. graphics card. The above is the method for installing a discrete graphics card on a computer. It is very simple. Interested friends can also try it together.
4. Fix the graphics card to the computer case with a screwdriver. Then when the computer is turned on, the computer will discover the new hardware and initially search for it by itself. If the computer has been completed according to the instructions, you will be prompted that the new hardware cannot be used. At this point, you need to go online or install the existing graphics card driver.
5. The first step is to open the main chassis. \x0d\x0aThe second step is to find the slot on the motherboard that can accommodate your graphics card and insert it. (Usually the longest one under the CPU)\x0d\x0aThe third step is to insert the monitor plug at the rear of the host computer into the graphics card plug.
6. Open the main case, observe the structure inside, and find the location of the graphics card slot. Use a screwdriver to remove the baffle and screws on the main chassis. Insert the graphics card into the card slot of the graphics card, making sure to install the small clip on it when installing. After the installation is in place, make sure the graphics card is inserted properly and not incorrectly.
How to install an independent graphics card
1. First of all, your integrated graphics motherboard must have an independent graphics card socket, because some integrated graphics motherboards cannot expand independent graphics cards without independent graphics card sockets. . It is generally better to choose an independent graphics card with more than 256M of video memory. Especially some people like to play games. The game will run smoothly if the video memory is larger.
2. Insert the graphics card into the graphics card slot and fix the graphics card screws.
3. The first step is to open the main chassis. \x0d\x0aThe second step is to find the slot on the motherboard that can accommodate your graphics card and insert it. (Usually the longest one under the CPU)\x0d\x0aThe third step is to insert the monitor plug at the rear of the host computer into the graphics card plug.
4. Open the main case, observe the structure inside, and find the location of the graphics card slot. Use a screwdriver to remove the baffle and screws on the main chassis. Insert the graphics card into the card slot of the graphics card, making sure to install the small clip on it when installing. After the installation is in place, make sure the graphics card is inserted properly and not incorrectly.
How to install the independent graphics card driver
1. If there is no applicable CD, you can use Driver Wizard to automatically update the driver. When downloading the driver, first, check the model, and second, whether it is suitable for you. To use the system, you need to download a few more backups; after installing the graphics card driver, adjust the resolution and refresh rate.
2. Step 1: Find and right-click the "Computer" icon on the desktop, select "Properties" and click Open. Step 2: Click on the first "Device Manager" and open it. Step 3: Find and click the small triangle arrow in front of "Display Adapter", usually the last item.
3. Find the "Computer" icon on the desktop, select Properties, and click "Device Manager" Display Adapter on the panel that appears.
4. First, we need to right-click the computer, select the Device Manager option in the right-click menu bar, and then enter the Device Manager interface. Then we need to open the display adapter below and see the graphics card driver that has been installed on our computer.
The above is the detailed content of How to install a discrete graphics card. For more information, please follow other related articles on the PHP Chinese website!

 win11连接共享打印机错误0x00000bc4怎么办Jan 30, 2024 pm 11:33 PM
新系统win11给用户带来了许多优化和新特性,但是在连接共享打印机的时候可能会遇到错误代码0x00000bc4的问题,从而导致打印机无法连接、无法打印。那么共享打印机0x00000bc4要如何解决呢??来看看以下的处理方法吧。方法一、打印机共享(同操作系统):1、所有客户机设在同一网段内,如都在192.168.1.*网段内(路由器IP是192.168.1.1的话);2、所有客户机设在同一工作组内,如都在WORKGROUP;关闭WIN7的密码保护共享:打开网络和共享中心,选择更改高级共享设置,向下
 显卡需要驱动吗Jan 31, 2024 am 10:54 AM
更换显卡需要重新安装驱动吗1、是的,在更换显卡后通常需要安装新的驱动,以使显卡能够正常工作。首先,你需要卸载原来的1650s显卡的驱动。可以通过控制面板中的设备管理器或者使用专门的驱动卸载软件来完成。2、需要。新显卡和老显卡不是同一种显卡,那么必须要卸载原有显卡驱动程序,安装新显卡的驱动程序。显卡是电脑进行数模信号转换的设备,承担输出显示图形的任务。3、有些显卡驱动微软带了就不需要安装了。会自动安装的。是否要安装:如果你现在装的板载显卡驱动能适合独立显卡,不用重新装,不过就算能用,性能也不可恭维
 老款台式电脑怎么连wifiFeb 07, 2024 pm 05:06 PM
老式台式电脑没有无线连接怎么办1、在桌面右键点击“网上邻居”,选择属性菜单;后右键单击“无线网络连接”选择“属性”,进入无线网络连接属性对话框。在可用无线连接列表里找到对应的网络热点,双击。并输入密码。此时网络即可连接。2、首先打开控制面板,然后选择网络和共享中心,接着选择左侧的“更改适配器设置”,然后查看无线网络连接是否被禁用,如果被禁用了就重新连接。3、先将USB无线网卡插入台式电脑的任一USB接口中,电脑检测到USB无线网卡后会自动检测USB无线网卡驱动。当无线网卡驱动安装完成后,插入US
 先装显卡还是先装驱动Jan 29, 2024 pm 10:51 PM
一台新组装的电脑,从安装系统到安装各个硬件驱动的顺序是怎么样的...首先是准备组装的零组件:CPU,CPU散热器,内存,主板,显卡,硬盘,光驱,电源,机箱,除了上述这些东西,你还需要一把大小长短适中且好转的十字螺丝起子,还有平坦的桌面。安装操作系统:首先需要安装操作系统,例如Windows、Linux等。可以使用安装光盘或者U盘进行安装。安装驱动程序:安装操作系统后,需要安装电脑硬件的驱动程序,例如主板驱动、显卡驱动、声卡驱动等。安装向导正在安装驱动程序中,请等待安装完成。部分驱动程序可能会需要
 win7怎么打开笔记本的摄像头Jan 31, 2024 pm 08:57 PM
win7系统如何调出摄像头(笔记本win7系统如何调出摄像头)运行QQ软件来打开摄像头。在系统设置中选择视频设置,选择好视频设备,就可以看到摄像头的预览画面了。下载AMcap来打开摄像头。方法打开开始菜单,右键“计算机”选择“管理”;在“计算机管理”窗口左边一栏,双击“设备管理器”。然后,从右边栏中找到“图像设备”,点开。方法一:首先右键点击“计算机”,选择“管理”。接着打开里面的“设备管理器”,在图像设备中找到自己的摄像头,右键选中,选择“属性”。首先在电脑中打开win7系统的开始--设置。然
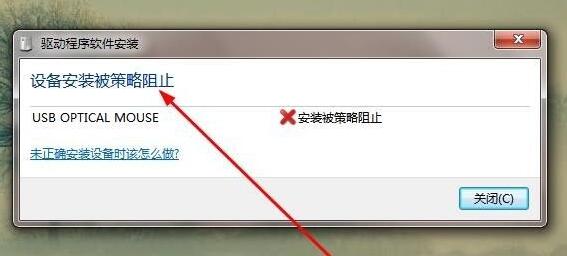 解决win7驱动安装被策略阻止的方法Jan 15, 2024 pm 02:36 PM
有些朋友在使用Windows7操作系统时,遇到了无法安装驱动程序的问题,这是因为组策略限制了驱动程序的安装。解决这个问题很简单,只需要在组策略编辑器中取消限制即可。接下来,我将为大家详细介绍解决方法,请跟随我的步骤一起操作。win7驱动安装被策略阻止:1、首先按下键盘“win+r”组合键调出运行。在开始之前,我们需要打开组策略编辑器。请按照以下步骤操作:1.打开开始菜单。2.在搜索栏中输入“gpedit.msc”。3.按下回车键,确认执行该命令。4.组策略编辑器将会打开。通过以上步骤,您将成功打
 单硬盘装双系统mac(imac双硬盘独立双系统)Jan 31, 2024 pm 12:27 PM
导读:本篇文章将为大家介绍关于在Mac上使用单硬盘安装双系统的相关内容,希望对大家有所帮助。让我们一起来了解吧。mac不用u盘装双系统怎么装|mac不用u盘安装双系统教程1、运行Setup,打开BootCamp安装程序,执行驱动安装;驱动安装完毕后,点击是,立即重启系统,双系统安装完毕。在Mac电脑上安装双系统的步骤如下:首先,确保Mac电脑上有足够的可用存储空间,并下载所需的操作系统安装镜像文件。接下来,打开“应用程序”文件夹中的“实用工具”文件夹。在苹果电脑上下载Win10镜像文件,或使用U
 无法在Mac双系统中输入键盘?Jan 30, 2024 am 10:15 AM
导读:许多用户询问关于Mac双系统键盘无法输入的问题。本文将提供详尽解答,以帮助解决这个问题。请继续阅读,希望对您有所帮助!苹果电脑双系统连接不了键盘您要问的是苹果双系统win7为什么用不了键盘了?苹果电脑硬件升级。根据查询中关村在线网显示,苹果电脑硬件升级后,导致原版Windows7无法识别苹果的键盘和鼠标,解决这个问题的方法是修改Windows7的安装文件,添加相应的驱动程序。在更换为日文键盘的驱动时,需要进行以下步骤:首先,进入Windows10系统下的“设备管理器”,找到“键盘”分类。然


Hot AI Tools

Undresser.AI Undress
AI-powered app for creating realistic nude photos

AI Clothes Remover
Online AI tool for removing clothes from photos.

Undress AI Tool
Undress images for free

Clothoff.io
AI clothes remover

AI Hentai Generator
Generate AI Hentai for free.

Hot Article
Hot Tools

ZendStudio 13.5.1 Mac
Powerful PHP integrated development environment

SAP NetWeaver Server Adapter for Eclipse
Integrate Eclipse with SAP NetWeaver application server.

EditPlus Chinese cracked version
Small size, syntax highlighting, does not support code prompt function

DVWA
Damn Vulnerable Web App (DVWA) is a PHP/MySQL web application that is very vulnerable. Its main goals are to be an aid for security professionals to test their skills and tools in a legal environment, to help web developers better understand the process of securing web applications, and to help teachers/students teach/learn in a classroom environment Web application security. The goal of DVWA is to practice some of the most common web vulnerabilities through a simple and straightforward interface, with varying degrees of difficulty. Please note that this software

Atom editor mac version download
The most popular open source editor

