
 Software TutorialComputer SoftwareHow to insert pictures in Adobe Acrobat Pro9-How to insert pictures in Adobe Acrobat Pro9
php Xiaobian Banana will introduce you how to insert pictures in Adobe Acrobat Pro 9. When using Adobe Acrobat Pro 9 to edit PDF documents, inserting pictures is one of the common requirements. With simple operations, you can easily insert the pictures you need into PDF documents to enrich the document content. Next, we will introduce in detail the method of inserting pictures in Adobe Acrobat Pro 9 so that you can easily master it.
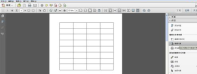
Adobe Acrobat Open the Sample.pdf document in Pro9, click "Tools" - "Content" - select "Edit Object" on the right side of the document, and the mouse cursor changes to a solid arrow and a small box in the lower right corner.
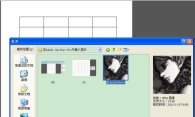
Right-click in a blank space of the document and select "Insert Image". A dialog box will pop up, then select the ElenaGilbert.JPEG image file in the dialog box (please make sure the selected file format matches the image type, for example, the JPEG type is selected this time).
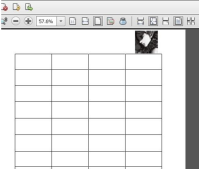
After inserting the picture, use the cursor to adjust the size and position of the picture. When adjusting, the cursor needs to be in the state of "Tools" - "Content" - "Edit Object". The Sample document is inserted into the document and finally achieves the desired effect.
Tip: When adjusting the position, you can use the keyboard's direction keys to make fine adjustments.
The above is the detailed content of How to insert pictures in Adobe Acrobat Pro9-How to insert pictures in Adobe Acrobat Pro9. For more information, please follow other related articles on the PHP Chinese website!

 修复:未检测到 Adobe Photoshop 图形处理器问题Apr 28, 2023 pm 01:25 PM
AdobePhotoshop使用您系统上的图形处理器来渲染3D效果等等。拥有一张好的显卡是流畅运行AdobePhotoshop的额外优势。但是,如果AdobePhotoshop甚至无法识别您系统上的显卡怎么办?导致这个问题的原因有很多。但是,没有什么可担心的。只需按照这些简单的说明,只需几个快速步骤即可让Photoshop检测GPU。修复1–将应用程序设置为使用专用GPU如果您的系统上有两个GPU,则必须将Photoshop设置为使用专用GPU。1.关闭
 如何在 Windows 11 平台上免费获取 Adobe Reader 的下载May 10, 2023 am 09:16 AM
使用RestoroPCRepairTool修复Windows11操作系统错误:该软件通过将有问题的系统文件替换为初始工作版本来修复常见的计算机错误。它还使您远离严重的文件丢失、硬件故障以及由恶意软件和病毒造成的损坏。现在只需3个简单的步骤即可修复PC问题并删除病毒:下载带有专利技术的RestoroPC修复工具(此处提供专利)。单击开始扫描以查找可能导致PC问题的Windows11问题。单击全部修复以修复影响计算机安全和性能的问题本月有793,675名读者下载了R
 AI应用“龙头”浮现:Adobe!Oct 14, 2023 pm 08:21 PM
强大的人工智能功能将重振增长前景,这可能会使Adobe的业绩得到兑现!在本周的AdobeMAX年度创意大会上,软件科技巨头Adobe宣布了一系列新的AI工具和服务,并在与分析师的讨论中表示,第四财季将是一个非常强劲的季度具体来看,Adobe展示了AI视频编辑技术ProjectFastFill,用户只需输入文字提示,就能在几秒钟内删除、添加对象或更改背景元素,减少了大量的琐碎工作。此外,Adobe推出了三个新的生成式人工智能模型,图片编辑功能获得全面升级。新发布的FireflyVector汇集了A
 Adobe Illustrator CS6怎样设置键盘增量-Adobe Illustrator CS6设置键盘增量的方法Mar 04, 2024 pm 06:04 PM
很多用户办公中都在使用AdobeIllustratorCS6软件,那么你们知道AdobeIllustratorCS6怎样设置键盘增量吗?接着,小编就为大伙带来了AdobeIllustratorCS6设置键盘增量的方法,感兴趣的用户快来下文看看吧。第一步:启动AdobeIllustratorCS6软件,如下图所示。第二步:在菜单栏中,依次单击【编辑】→【首选项】→【常规】命令。第三步:弹出【键盘增量】对话框,在【键盘增量】文本框中输入需要的数字,最后单击【确定】按钮。第四步:使用快捷键【Ctrl】
 Macromedia Flash 8线条工具怎么使用-Macromedia Flash 8线条工具使用的方法Mar 04, 2024 pm 05:40 PM
本章节为你们带来的文章是关于MacromediaFlash8软件的,你们晓得MacromediaFlash8线条工具怎么使用吗?下文就是小编为各位带来的MacromediaFlash8线条工具使用的方法,对此感兴趣的用户快来下文看看吧。单击flash工作舞台,然后单击“属性”键下拉框打开属性控制面板在属性控制面板中找到颜色选择框,点击它选择背景色在弹出来的颜色选择框中输入"#99FF66",之后敲键盘中的“ENTER”(回车键)应用颜色找到工具选择栏,选择“线条”工具在属性控制面板中找到颜色选择
 Adobe Reader XI怎么删除最近打开的文件-Adobe Reader XI删除最近打开的文件方法Mar 04, 2024 am 11:13 AM
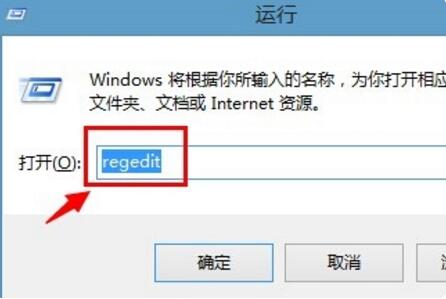
近期有很多小伙伴咨询小编AdobeReaderXI怎么删除最近打开的文件,接下来就让我们一起学习一下AdobeReaderXI删除最近打开文件的方法教程吧,希望可以帮助到大家。第一步:首先"win+R"快捷键打开运行输入"regedit",回车打开,如图所示。第二步:进入新界面后,依次点击左侧的"HKEY_CURRENT_USERSoftwareAdobeAcrobatReader11.0AVGeneralcRecentFiles",选中"c1"右击选择"删除"选项,如图所示。第三步:接着在弹出
 Adobe PhotoShop CS6如何设置图片边缘渐隐-Adobe PhotoShop CS6设置图片边缘渐隐教程Mar 04, 2024 am 11:07 AM
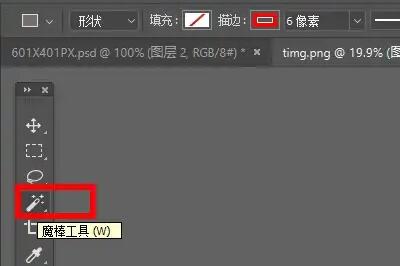
有很多朋友还不知道AdobePhotoShopCS6如何设置图片边缘渐隐,所以下面小编就讲解了AdobePhotoShopCS6设置图片边缘渐隐的方法教程,有需要的小伙伴赶紧来看一下吧,相信对大家一定会有所帮助哦。第一步:首先我们导入想修改的图片,并选择左边的魔棒工具,如图所示。第二步:然后使用魔棒选中“图片外轮廓区域”,如图所示。第三步:选中后鼠标右键点击它,选择“羽化”,如图所示。第四步:然后设置羽化半径并保存(这里半径就代表了渐隐边缘的大小,设置越大),如图所示。第五步:设置完成后就能发现
 Adobe Premiere pro 2020怎么进行字体替换-Adobe Premiere pro 2020进行字体替换的方法Mar 04, 2024 pm 03:50 PM
本章节为你们带来的文章是关于AdobePremierepro2020软件的,你们晓得AdobePremierepro2020怎么进行字体替换吗?接下来,小编就为各位带来了AdobePremierepro2020进行字体替换的方法,感兴趣的用户快来下文看看吧。首先打离矿开AdobePremierePro2020软件然后点击菜单栏中的图塑信仗形,如图示:之后在弹出的菜单中点击替换项目中的字体,如图所示:最后等待收集字体完成即可悦墨替换


Hot AI Tools

Undresser.AI Undress
AI-powered app for creating realistic nude photos

AI Clothes Remover
Online AI tool for removing clothes from photos.

Undress AI Tool
Undress images for free

Clothoff.io
AI clothes remover

AI Hentai Generator
Generate AI Hentai for free.

Hot Article
Hot Tools

Safe Exam Browser
Safe Exam Browser is a secure browser environment for taking online exams securely. This software turns any computer into a secure workstation. It controls access to any utility and prevents students from using unauthorized resources.

PhpStorm Mac version
The latest (2018.2.1) professional PHP integrated development tool

MinGW - Minimalist GNU for Windows
This project is in the process of being migrated to osdn.net/projects/mingw, you can continue to follow us there. MinGW: A native Windows port of the GNU Compiler Collection (GCC), freely distributable import libraries and header files for building native Windows applications; includes extensions to the MSVC runtime to support C99 functionality. All MinGW software can run on 64-bit Windows platforms.

WebStorm Mac version
Useful JavaScript development tools

mPDF
mPDF is a PHP library that can generate PDF files from UTF-8 encoded HTML. The original author, Ian Back, wrote mPDF to output PDF files "on the fly" from his website and handle different languages. It is slower than original scripts like HTML2FPDF and produces larger files when using Unicode fonts, but supports CSS styles etc. and has a lot of enhancements. Supports almost all languages, including RTL (Arabic and Hebrew) and CJK (Chinese, Japanese and Korean). Supports nested block-level elements (such as P, DIV),

