 Software Tutorial
 Computer Software
 How to use the polygon tool in orelDRAW - Detailed method of using the polygon tool in orelDRAW
php Xiaobian Banana will introduce to you how to use the polygon tool in orelDRAW. The polygon tool is one of the commonly used functions in orelDRAW, which can quickly draw shapes with multiple sides. With simple operations, you can easily create a variety of polygons, including triangles, squares, hexagons, and more. The following is a detailed introduction to the method of using polygon tools in orelDRAW, allowing you to easily master this function and improve design efficiency.
Create a new blank drawing or open the drawing we need to edit.
Then, we select the Polygon Tool from the left menu.

After selecting, set the number of sides of the polygon in the upper menu bar.

After setting the number of sides, we draw a rectangle on the file.

Then we select this polygon and press the Ctrl C key on the keyboard to copy this shape, or click the right mouse button to copy this shape.

Then press Ctrl V to paste the graphic, then hold down the Shift key to select the transform button of the graphic, and zoom in or out according to the center point of the graphic.

Repeat this step several times to draw more polygons.

Then use the straight line tool to draw several straight lines to connect the points. At this time, we can see that we have successfully drawn this polygon into a spider web. Hey, this is the polygon tutorial. In the future, we should use it more and practice more in actual operations.

The above is the detailed content of How to use the polygon tool in orelDRAW - Detailed method of using the polygon tool in orelDRAW. For more information, please follow other related articles on the PHP Chinese website!
 七边形数Sep 24, 2023 am 10:33 AM
Aheptagonalnumberisanumberwhichcanberepresentedasaheptagon.Aheptagonisapolygonwith7sides.Aheptagonalnumbercanberepresentedasacombinationofsuccessivelayersofheptagon(7-sidedpolygon).Heptagonalnumbercanbebetterexplainedwiththebelowfigures.第一个七边形数是1。因此,
 使用JavaScript和腾讯地图实现地图多边形绘制功能Nov 21, 2023 pm 06:28 PM
使用JavaScript和腾讯地图实现地图多边形绘制功能腾讯地图(TencentMaps)是腾讯开发的一款实用的地图服务API,提供了丰富的地图展示和交互功能。在开发Web应用程序时,可以使用腾讯地图提供的API来完成各种地图相关的需求。本文将介绍如何使用JavaScript和腾讯地图API来实现地图多边形的绘制功能,并提供具体的代码示例。第一步:引入腾讯
 使用Java开发高德地图API的地理围栏多边形绘制简介Jul 29, 2023 pm 02:17 PM
使用Java开发高德地图API的地理围栏多边形绘制简介地理围栏是一种用于判断某个地理位置是否在指定区域内的技术手段,可以在很多场景中使用,例如运动轨迹分析、电子围栏报警等。高德地图API提供了地理围栏的多边形绘制功能,可以方便地在地图上标注并判断某个位置是否在指定的区域内。下面将介绍如何使用Java开发高德地图API的地理围栏多边形绘制功能。首先,需要引入高
 给定半径的n边正多边形的面积是多少?Sep 01, 2023 pm 08:49 PM
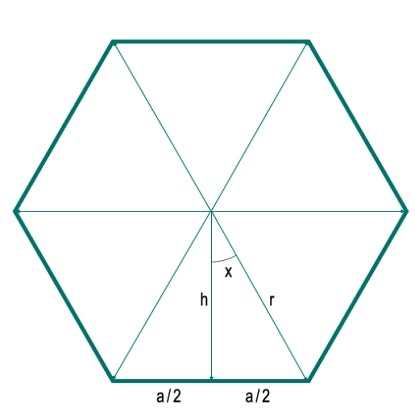
在这里,我们将看到如何计算给定半径的n边正多边形的面积。这里的半径是从任意顶点到中心的距离。为了解决这个问题,我们从中心向一条边画了一条垂线。假设每条边的长度为'a'。垂线将边分成两部分,每部分的长度为a/2。垂线和一个半径形成一个角度x。假设半径的长度为h。在这里,我们可以看到多边形被分成N个相等的三角形。因此,对于任何具有N条边的多边形,将被分成N个三角形。因此,中心的角度为360度。这被分成360°/N个不同的角度(这里360°/6=60°)。因此,角度x为180°/N。现在我们可以使用三
 利用php和高德地图API创建地图的多边形覆盖物点击事件Jul 31, 2023 pm 08:21 PM
利用PHP和高德地图API创建地图的多边形覆盖物点击事件简介:随着Web应用程序的发展,地图成为了网站中常用的组件之一。而与此同时,很多网站也对地图的交互性有了更高的需求,例如通过点击地图上的覆盖物实现一些特定的功能。本文将介绍如何利用PHP和高德地图API创建地图的多边形覆盖物,并实现点击事件。准备工作:在开始之前,我们需要先注册高德开发者账号,并创建一个
 PHP画一多边形并填充Mar 21, 2024 am 09:51 AM
这篇文章将为大家详细讲解有关PHP画一多边形并填充,小编觉得挺实用的,因此分享给大家做个参考,希望大家阅读完这篇文章后可以有所收获。PHP绘制和填充多边形简介phpGD库提供了一组功能用于在图像上绘制和填充多边形。以下指南将介绍如何使用PHPGD库绘制和填充多边形。绘制多边形以下代码片段演示了如何使用PHP绘制多边形:
 orelDRAW怎么使用多边形工具-orelDRAW使用多边形工具的详细方法Mar 04, 2024 pm 04:19 PM
很多人在办公的时候都在使用CorelDraw软件,那么你们知道CorelDraw怎么使用多边形工具吗?下文小编就为大伙带来了CorelDraw使用多边形工具的详细方法,让我们一同去下文看看吧。新建一张空白图纸或者打开我们需要编辑的图纸。然后,我们在左侧菜单选择多边形工具。选定之后,在上方菜单栏设置多边形的边数。设置好边数,我们在文件上绘制一个矩形。然后我们再选中这个多边形,按键盘上Ctrl+C键复制一个这个图形,或者点击鼠标右键复制这个图形。然后按下Ctrl+V粘贴一下这个图形,再按住Shift
 PHP画一个多边形Mar 21, 2024 am 10:31 AM
这篇文章将为大家详细讲解有关PHP画一个多边形,小编觉得挺实用的,因此分享给大家做个参考,希望大家阅读完这篇文章后可以有所收获。PHP中绘制多边形简介多边形是一种具有多个直边的封闭几何形状。在php中,可以通过使用GD库的图像处理函数来绘制多边形。绘制多边形要绘制多边形,请执行以下步骤:创建图像画布:使用imagecreate()函数创建一个新图像画布。设置画布大小:使用imagesetsize()函数设置画布的宽度和高度。分配颜色:使用imagecolorallocate()函数分配要用于多边


Hot AI Tools

Undresser.AI Undress
AI-powered app for creating realistic nude photos

AI Clothes Remover
Online AI tool for removing clothes from photos.

Undress AI Tool
Undress images for free

Clothoff.io
AI clothes remover

AI Hentai Generator
Generate AI Hentai for free.

Hot Article

Hot Tools

EditPlus Chinese cracked version
Small size, syntax highlighting, does not support code prompt function

Dreamweaver CS6
Visual web development tools

WebStorm Mac version
Useful JavaScript development tools

SublimeText3 Mac version
God-level code editing software (SublimeText3)

DVWA
Damn Vulnerable Web App (DVWA) is a PHP/MySQL web application that is very vulnerable. Its main goals are to be an aid for security professionals to test their skills and tools in a legal environment, to help web developers better understand the process of securing web applications, and to help teachers/students teach/learn in a classroom environment Web application security. The goal of DVWA is to practice some of the most common web vulnerabilities through a simple and straightforward interface, with varying degrees of difficulty. Please note that this software


