

 Computer TutorialsSystem InstallationASUS notebook USB flash drive system reinstallation: simple and quick operation guide
php editor Yuzi introduces you to the simple and quick operation guide for reinstalling the system of ASUS notebook USB flash drive. No tedious steps required, just a few simple operations to bring your laptop back to life. This guide will introduce in detail the process of reinstalling the system such as USB disk creation, BIOS settings, system installation, etc., allowing you to easily deal with system crashes, lags and other problems and restore the normal operation of the device. Follow the guide and give your notebook a new look!

In daily use, we often encounter various problems with the computer system, such as system crashes, virus infections, etc. At this time, reinstalling the system is a common solution. This article will introduce a simple and quick operation guide for reinstalling the system of ASUS notebook USB flash drive to help users easily solve system problems.
Tool materials:
Brand model: ASUS notebook
Operating system version: Windows 10
1. Choose the appropriate reinstallation system software
Reinstalling the system requires the help of some professional software. Here are several commonly used reinstallation software:
1. Magic Pig Installation Master Software
2. Fish one-click system software reinstallation
3, Pocket machine one-click system software reinstallation
4, Xiaobai one-click system software reinstallation
5, Kaka installation master software
6. One-click reinstallation of system software in System Home
According to actual needs and personal preferences, choose a system reinstallation software that suits you.
2. Operation steps
1. Back up important data: Before reinstalling the system, be sure to back up important personal data to avoid loss.
2. Make a bootable U disk: Use the function of making a bootable U disk and write the selected reinstallation system software to the U disk.
3. Set BIOS: Restart the computer, follow the prompts to enter the BIOS setting interface, and set the boot order to U disk priority.
4. Restart the computer: After restarting the computer, the system will automatically boot from the U disk and enter the system reinstallation interface.
5. Follow the prompts: According to the prompts of reinstalling the system software, select the corresponding operation options, such as formatting the hard disk, installing the system, etc.
6. Wait for the system installation to be completed: According to the system installation progress bar, wait patiently for the system installation to be completed.
Summary:
Users can easily solve system problems through the ASUS laptop U disk reinstallation system operation guide introduced in this article. During the operation, choosing the appropriate system software to reinstall is key, and at the same time, attention should be paid to backing up important data to avoid data loss. We hope that this article will help users when reinstalling the system, and encourage users to choose the system reinstallation software that suits them based on actual needs.
The above is the detailed content of ASUS notebook USB flash drive system reinstallation: simple and quick operation guide. For more information, please follow other related articles on the PHP Chinese website!

 主板电源线插错会烧吗?Jan 30, 2024 pm 09:45 PM
主板电源线插错会烧吗?是的有可能,比如说你把USB插针接线插乱了,以后你插入USB设备时,就可能烧掉USB设备或者主板上的USB控制电路;再比如你把“重启”按钮的接线插在电源指示灯或者硬盘指示灯插针上了,你以后按下重启按钮时,可能会烧掉主板上的指示灯电路。但是这些故障发生的可能性比较小,即使发生了也只是烧坏主板上的某一小部分电路使它不能工作,不会造成整块主板都烧坏不能启动运行的故障。话说主板上的线如果插错了.会不会烧坏硬件?主板上的线如果插错了有可能会发生烧坏硬件的情况产生,这是因为一旦相关硬件
 教你如何回退到上一个版本的Win11 23H2Jan 29, 2024 pm 06:57 PM
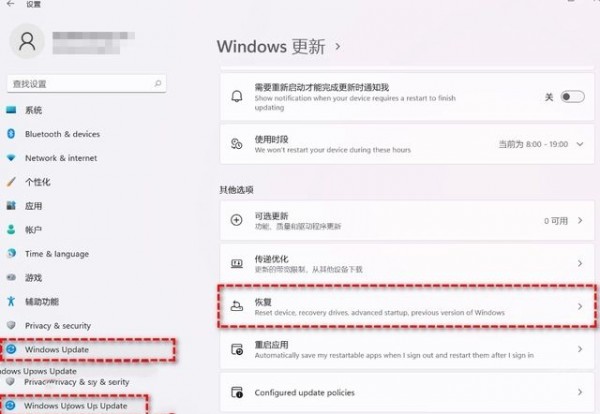
Win1123H2正式版就在近期推送啦,很多的用户们在升级完后觉得一些操作使用得不是很喜欢,那么Win1123H2如何退回上一个版本?下面就让本站来为用户们来仔细的介绍一下升级完Win1123H2退回上一个版本的三种教程吧。升级完Win1123H2退回上一个版本的三种教程方法一:从设置菜单退回1、点击任务栏的开始菜单,然后单击设置选项,选择Windows更新,然后点击恢复。3、选择退回的原因,然后点击下一步。4、你将看到检查更新的通知,选择不,谢谢。5、阅读需要了解的内容,然后点击下一页。6、阅
 解决win11无法安全弹出移动硬盘的方法Jan 30, 2024 pm 05:45 PM
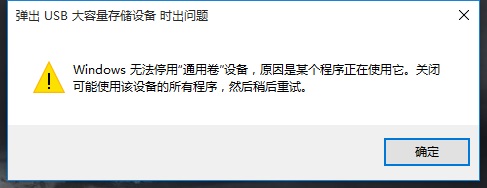
许多用户在连接Win11电脑后,发现无法安全弹出移动硬盘。他们尝试了多次但都失败了,最后只能强行拔出。那么,如何解决这个问题呢?在这里,本站小编为大家提供了两种解决方法,让我们一起来看看详细的操作步骤吧。3、在其中找到并右键Windows资源管理器,选择重新启动。2、打开后,输入MSConfig,回车运行。4、然后勾选隐藏所有Microsoft服务,点击全部禁用。
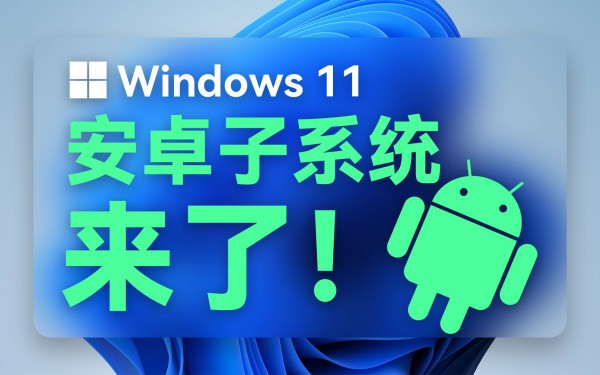 Win11安卓子系统启动问题解决方法(已解决)Jan 30, 2024 pm 07:18 PM
Win11系统带来一项全新功能,即安卓子系统(WSA),用户不用通过安卓模拟器就能轻松运行安卓应用和安卓游戏。不过有时候也会遇到安卓子系统无法启动的情况,这要如何解决?下面就来看看小编整理的操作流程吧。
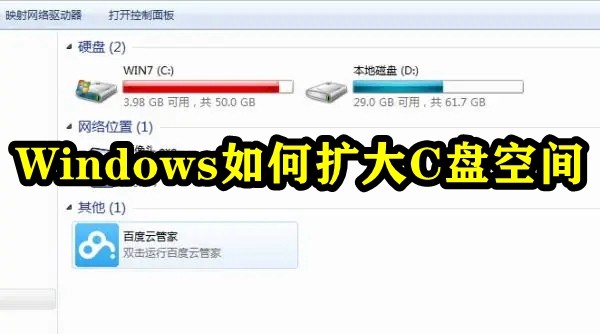 如何增加C盘的存储空间Jan 29, 2024 pm 04:48 PM
c盘是电脑的系统盘,c盘空间不足会导致电脑运行卡顿,进而影响到软件和游戏的程序运行,即便是将软件程序安装到其他盘软件仍会占用c盘的空间,使用时间久了,当遇到c盘空间不足的情况时最好的解决办法就是扩大c盘的内存空间,本期小编整理了四种扩大c盘的办法,轻松解决c盘内存不足的问题。Windows如何扩大C盘空间方法1.使用DiskPart扩展C盘DiskPart是一个Windows系统自带的程序,它通过脚本或输入命令来处理磁盘、分区或卷。简单地说,要扩大C盘,需要在diskpart命令中输入“list
 硬盘全新安装mac(新硬盘安装macos)Jan 31, 2024 pm 05:00 PM
本站将分享有关硬盘全新安装Mac的内容,如果能解决您的问题,请关注。现在开始!如何在mac上安装固态硬盘?首先,使用专门拆卸产品的小号螺丝刀,将笔记本电脑机身下方的八个小型螺丝拆卸下来。这样就可以打开笔记本电脑的后盖了。需要特别注意的是,在打开的过程中要小心,避免用力过猛,以免损坏电脑内部的元件。拆下主板后,将主板电源接头旋转90度,然后取出电源。之后,拆下硬盘,使用T9螺丝刀拧掉螺丝,然后更换为你想要的SSD固态硬盘。最后,按照相反的顺序将之前拆卸的零件重新安装回去。苹果笔记本可以安装固态硬盘
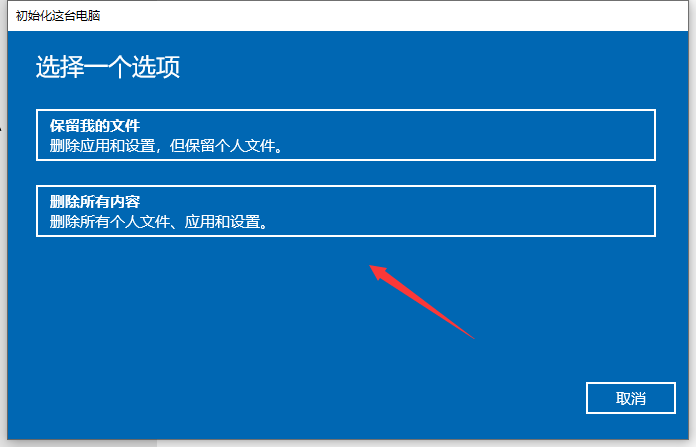 恢复Windows 10系统是否导致数据丢失?Dec 31, 2023 am 09:40 AM
我们在使用windows10系统的时候一定经历过还原,重装系统的经历。那么win10系统还原之后会不会丢失数据,win10系统还原会不会丢失文件数据,这个取决于你的选择。win10系统还原会丢失数据吗答:不会丢失个人数据以及文件夹的。如果电脑未正常运行,重置此电脑可能会解决问题。还原时,可以选保留个人文件或删除个人文件,然后重新安装Windows。对于这个问题,其实也简单,大家在Win10的「设置」→「更新和安全」-「恢复」中,就可以看到“重置此电脑”功能。从描述中可以看出,Win10重置电脑,
 搜狗浏览器内存占用高咋办Jan 30, 2024 pm 10:30 PM
搜狗浏览器内存占用高咋办?如今,我们已经迈入21世纪20年代的大门,这个时代下,互联网技术非常发达,以至于大多数人都会上网冲浪,因此这会让搜狗浏览器等多款高速、多核浏览器成为当下热门;然而,也有的用户反映在使用搜狗浏览器的时候,内存、CPU的占用过高,以至于电脑整体运行很慢。既然如此,对于搜狗浏览器内存占用高,我们该怎么办呢。解决搜狗浏览器内存占用高的办法为了能很好地帮助大家解决问题,本站小编也在本站、搜狗浏览器官网等网站查找资料,以及亲自测试搜狗浏览器,发现解决搜狗浏览器内存占用高的方法如下:


Hot AI Tools

Undresser.AI Undress
AI-powered app for creating realistic nude photos

AI Clothes Remover
Online AI tool for removing clothes from photos.

Undress AI Tool
Undress images for free

Clothoff.io
AI clothes remover

AI Hentai Generator
Generate AI Hentai for free.

Hot Article
Hot Tools

Atom editor mac version download
The most popular open source editor

Dreamweaver CS6
Visual web development tools

Dreamweaver Mac version
Visual web development tools

Notepad++7.3.1
Easy-to-use and free code editor

MinGW - Minimalist GNU for Windows
This project is in the process of being migrated to osdn.net/projects/mingw, you can continue to follow us there. MinGW: A native Windows port of the GNU Compiler Collection (GCC), freely distributable import libraries and header files for building native Windows applications; includes extensions to the MSVC runtime to support C99 functionality. All MinGW software can run on 64-bit Windows platforms.

