


php editor Strawberry brings you a detailed explanation of CentOS 7 graphical interface installation with pictures and texts. CentOS 7 is a stable and reliable Linux distribution. It is installed through a graphical interface, which is not only simple and easy to understand, but also helps you quickly complete system configuration. This article will introduce you to the CentOS 7 graphical interface installation steps in detail, including downloading the ISO image, making a bootable USB disk, and entering the installation interface. Follow our guide to easily master the installation skills of CentOS 7 and enjoy an efficient operating experience!
Write before installation:
If your centos7 is minimally installed, it does not come with X WINDOWS by default. Then before installing the graphical interface, you must first install X WINDOWS. This control function
yum groupinstall "X Window System"
1. Enter the installation command
yum groupinstall -y "GNOME Desktop"

Wait for the installation to complete and Complete
appears.2. Enter the command to enter the graphical interface
init 5

Enter the language selection interface, of course we choose Chinese

3.Select the location service switch

Depending on personal needs, I enable it by default
4.Select time zone

The default is enough, of course you can also change it yourself
5. Connect online account (can be skipped)

is of no use to the business for the time being, so we skip
6. Get a username

7.Set password

8. Enter the start interface

9. Click Start to enter the GNOME Help page, click ❌ in the upper right corner to exit the help page

10. Enter the login page and list the current computer to all user lists

11. Click on the corresponding user and enter the corresponding password

12. The first time is a bit slow, wait for a while and the graphical operation interface you like will appear

At this point, the centos7 installation graphical interface has come to a perfect end!
PS: In the future, you will definitely thank yourself for working hard today!
The above is the detailed content of Centos7 graphical interface graphic installation detailed explanation. For more information, please follow other related articles on the PHP Chinese website!

 Python小技之不用 Gui,照样实现图形界面Apr 12, 2023 pm 04:43 PM
如果说程序员有什么怕的,那我想可能就是 —— 需求又变了!这不,客户在笔者开发完一个基于浏览器的 Web 应用程序之后说:程序需要在内(无)部(网)环境中运行……这就意味着无法安装 Python 环境!谁叫咱是程序员呢,不就开发一个 GUI 版本吗,难不倒我……可是听到给的时间后,就不淡定了……为了不影响客户的评测,只能给出一周时间!构思GUI 虽然也不难,不过需要梳理一遍服务以及与用户的交互接口,弄不好就得为 GUI 单独编写接口,这点时间显然不够呀。不行,就再想想办法……不然直接将 Web
 word界面变小了怎么办Mar 20, 2024 pm 09:30 PM
我们在使用电脑进行word文档操作编辑的时候,经常不知道是触碰到了什么位置,界面忽然变得很小,有时候word文档里的文字都看不太清楚了。有人可能遇到这样的问题会惊慌失措了,以为是不是电脑出了故障,其实,这只是因为你碰到了某种设置,将显示做了调整。那么,如果不小心改变了界面显示的大小,应该怎么恢复和调整呢?word界面变小了怎么办呢?下边,我们就分享几种方式加以解决,希望你遇到这样的问题的时候能够轻松应对和处理。首先,我们新建并打开一个Word文档,进行简单的编辑操作,以便于展示操作步骤。在下图中
 centos7怎么查看php安装目录?三种方法分享Mar 22, 2023 am 10:38 AM
如果你正在使用 CentOS 7 操作系统,需要查看 PHP 安装目录以便定位配置文件、扩展等相关信息,那么就需要了解一些相关命令和技巧。下面,我们将为您介绍一些方法来查看 CentOS 7 上的 PHP 安装目录。
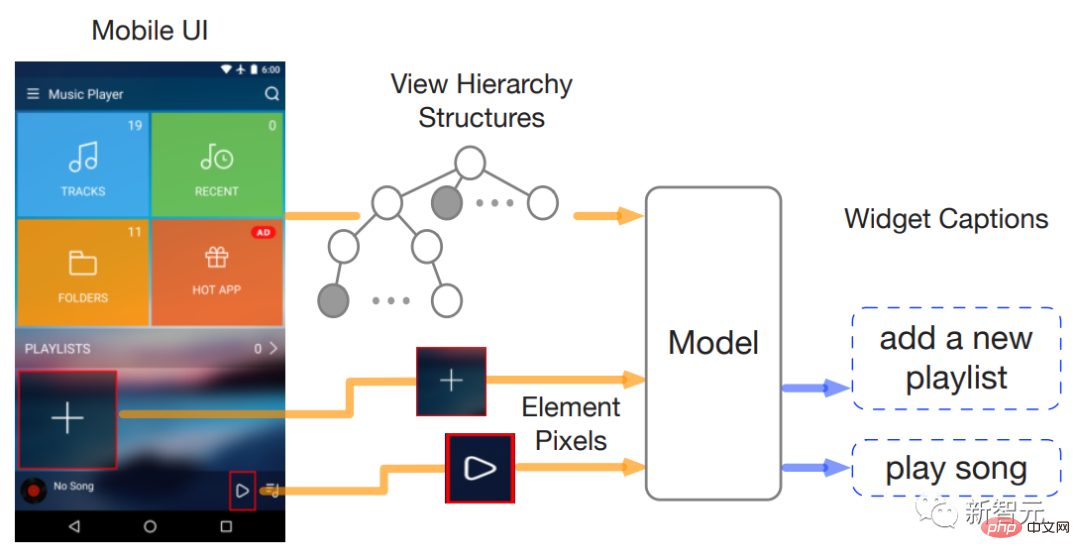 两位谷歌华人研究员发布首个纯视觉「移动UI理解」模型,四大任务刷新SOTAApr 12, 2023 pm 04:40 PM
对AI来说,「玩手机」可不是一件易事,光是识别各种用户界面(user interface, UI)就是一大难题:不光要识别出各个组件的类型,还要根据其使用的符号、位置来判断组件的功能。对移动设备UI的理解,能够帮助实现各种人机交互任务,比如UI自动化等。之前的工作对移动UI的建模通常依赖于屏幕的视图层次信息,直接利用了UI的结构数据,并借此绕过了从屏幕像素开始对组件进行识别的难题。不过并不是所有的场景下都有可用的视图层次,这种方法通常会因为对象描述的缺失或结构信息的错位而输出错误结果,所以尽管使
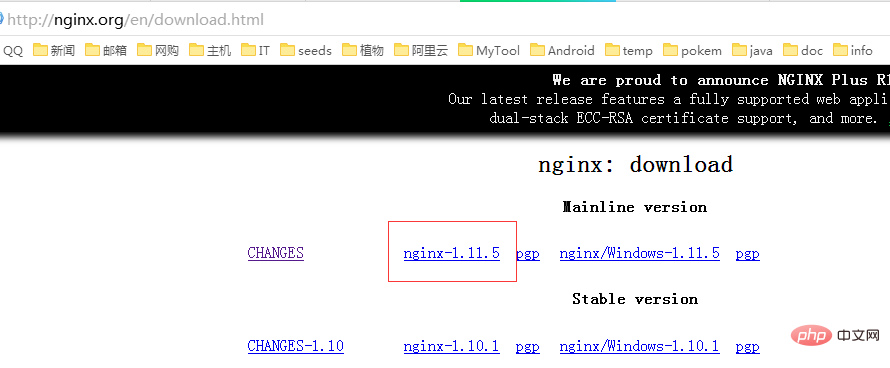 CentOS7如何安装Nginx并配置自动启动May 14, 2023 pm 03:01 PM
1、官网下载安装包选择适合linux的版本,这里选择最新的版本,下载到本地后上传到服务器或者centos下直接wget命令下载。切换到/usr/local目录,下载软件包#cd/usr/local#wgethttp://nginx.org/download/nginx-1.11.5.tar.gz2、安装nginx先执行以下命令,安装nginx依赖库,如果缺少依赖库,可能会安装失败,具体可以参考文章后面的错误提示信息。#yuminstallgcc-c++#yuminstallpcre#yumins
 上代机皇能否再战?三星 Galaxy S23 Ultra 实际使用体验分享Mar 12, 2024 pm 01:58 PM
在智能手机市场,三星的Galaxy系列一直以其卓越的性能和创新的设计备受瞩目。而GalaxyS23Ultra作为上代机皇,自发布以来便受到了广大消费者的喜爱。随着时间的推移,新机型层出不穷,那么,这款昔日的机皇如今还能否再战呢?接下来,我将分享自己在使用三星GalaxyS23Ultra过程中的实际体验,带大家一同探讨这个问题。首先,从外观设计上来看,GalaxyS23Ultra依然保持着三星一贯的精致与高端。其独特的微曲屏设计不仅提升了手机的整体美感,更为用户带来了更加沉浸的视觉体验。在日常使用
 如何在 CentOS 7 中安装并配置 Java 环境变量?Apr 22, 2023 pm 04:28 PM
安装环境:Centos764位Jdk1.864位Xshell免费版win10*64位一、先进来,你需要检查自己的openjdk是否卸载(或者判断是否存在,因为一般centos都会预装openjdk):在xshell或rpm-qa|grepjdk中输入rpm-qa|grepjavarpm-qa|grepjava第二,如果有一个对应的openjdk,并且显示了一个响应列表,那么就需要卸载它。在xshell中输入rpm-e-nodepstzdata-文件名(这个文件名是你查看的openjdk文件列表中
 Centos7改系统时区方法有哪些Mar 03, 2023 am 10:47 AM
Centos7修改系统时区的两种方法:1、使用timedatectl命令,可设定和修改时区信息,语法“timedatectl set-timezone 时区标识”;2、修改用户目录下的“.bash_profile”文件,在文件末尾追加“TZ='时区标识'; export TZ”即可。


Hot AI Tools

Undresser.AI Undress
AI-powered app for creating realistic nude photos

AI Clothes Remover
Online AI tool for removing clothes from photos.

Undress AI Tool
Undress images for free

Clothoff.io
AI clothes remover

AI Hentai Generator
Generate AI Hentai for free.

Hot Article
Hot Tools

EditPlus Chinese cracked version
Small size, syntax highlighting, does not support code prompt function

ZendStudio 13.5.1 Mac
Powerful PHP integrated development environment

VSCode Windows 64-bit Download
A free and powerful IDE editor launched by Microsoft

SublimeText3 Mac version
God-level code editing software (SublimeText3)

Dreamweaver Mac version
Visual web development tools

