

 Computer TutorialsSystem InstallationBoot your computer from a USB flash drive and reinstall the system: a simple step-by-step guide
The "U disk boot computer reinstallation system: simple step guide" tutorial brought by php editor Xiaoxin is suitable for users who need to reinstall the operating system. System reinstallation can be completed conveniently and quickly through U disk booting, avoiding the cumbersome CD installation process. This guide will introduce in detail the steps of creating a USB flash drive, BIOS settings, and system installation, allowing you to easily reinstall the system and make your computer look brand new.

Tool materials:
Computer brand and model: Dell XPS 15, Lenovo Xiaoxin Air 14
Operating system version: Windows 10, Windows 7
Text:
1. Prepare U disk and reinstall system software
1. Select a suitable U disk. It is recommended that the capacity is not less than 8GB. Make sure that the U disk does not have Important data.
2. Download and install a reliable U disk boot creation tool, such as Magic Pig Installation Master software.
2. Make a U disk boot disk
1. Insert the U disk and open the Magic Pig Installation Master software.
2. Select the "Create USB bootable disk" option and follow the software prompts.
3. Wait for the creation to be completed and ensure that the U disk becomes a bootable disk.
3. Set the computer startup sequence
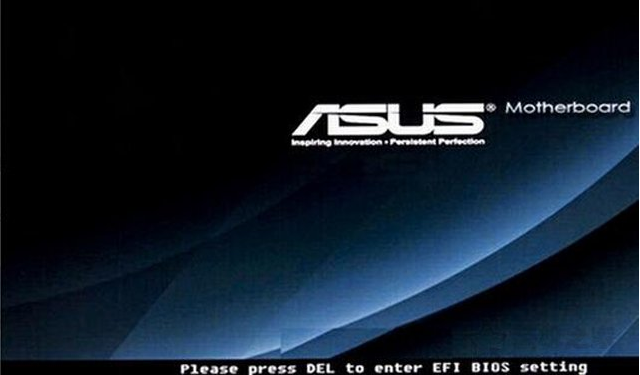
1. Restart the computer and enter the BIOS setting interface.
2. Find the "Boot Order" or "Boot Order" option and adjust the U disk boot item to the first place.
3. Save settings and exit BIOS.
4. Restart the computer and start reinstalling the system
1. Restart the computer and the system will boot from the U disk.
2. Follow the prompts on the system installation interface to select settings such as language and time zone.
3. Select the "Custom Installation" option to partition and format according to personal needs.
4. Wait for the system installation to be completed and follow the prompts for subsequent settings.
Summary:
By using a USB flash drive to start the computer and reinstall the system, we can easily solve computer problems or improve performance. During the operation, we need to prepare the USB flash drive and reinstall the system software, and follow the guide to create the USB boot disk. Then, we need to set the computer startup sequence to ensure that the system boots from the USB flash drive. Finally, we can restart the computer and follow the prompts on the system installation interface to complete the system reinstallation. I hope the simple step-by-step guide provided in this article can help you successfully complete booting the computer from a USB flash drive and reinstalling the system.
The above is the detailed content of Boot your computer from a USB flash drive and reinstall the system: a simple step-by-step guide. For more information, please follow other related articles on the PHP Chinese website!

 微星主板bios安全启动怎么开启?Feb 01, 2024 am 09:21 AM
微星主板bios安全启动怎么开启?1.以华为matebookx、windows10为例。以Z390为例,重启按DEL进入BIOS,按F7进入高级模式,点击进入Settings的选项,再进入TrustedComputing。2.有个安全设备支持(SecurityDeviceSupport),将其改为允许(Enable),TPM设备选择为PTT,设置完成后按F10保存重启。3.以B550M为例,重启按DEL进BIOS后选择左侧的SETTINGS以进入设置界面,同样进入安全选项里的TrustedCom
 进入华硕主板bios设置图解教程Jul 08, 2023 pm 01:13 PM
有很多操作都是需要进到电脑的bios系统进行操作,比如说调整启动项,磁盘模式,cpu参数,刷新bios等等。不过不同的电脑品牌主板的bios设置等界面会有不同,那么如何进入华硕bios?华硕主板bios设置界面又是怎么样的呢?下面小编就给大家分享下进入华硕主板bios设置图解教程。一、如何进入华硕bios1、首先重启华硕电脑,在开机的一瞬间并跳出ASUS的标志界面的时候,马上不断按“Delete”键进入bios界面。2、进入到bios界面后,就可以对bios系统进行设置了。二、华硕主板bios设
 asus安装win7找不到引导启动菜单的解决方案Jul 17, 2023 am 10:37 AM
在安装系统的过程中,许多网民可能会遇到一些问题,导致重新安装系统的失败。最近,一些网民报告说,他们的sus安装win7找不到引导启动菜单,安装后不能正常引导启动菜单进入新系统。下面的小边教你安装win7后找不到引导启动菜单的解决方案。asus安装win7找不到引导启动菜单的解决方案:1.进入华硕主板BIOS,F7进入高级设置。2.进入启动选项。3.修改CSM(兼容性支持模块)。打开CSM,完全支持非UEFI启动附加设备或WindowsUEFI模式。4.返回修改,修改安全启动菜单。5.修改其他操作
 win7怎样进去bios设置方式介绍Jul 11, 2023 pm 06:09 PM
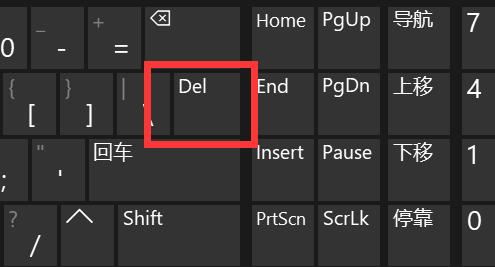
win7怎样进去bios设置呢,用户应用win17的时候如果碰到要进入bios的现象要怎么办呢,最先开机后重启,随后等候系统发生黑底白字时按着del,根据这个方式用户就可以很容易进入bios中,在这儿用户能够设置许多作用,非常的容易且便捷哦,下面就是具体的win7怎样进去bios设置方式介绍。win7怎样进去bios设置1、最先打开电脑以后,点击左下方的菜单栏。2、点击菜单里的‘重启’。3、在重启时,直到显示屏发生黑背景,白字时,就会见到进入bios的方法了,这儿提醒要按照del键。4、不停的按
 如何进入华硕主板的BIOS设置界面?Jan 30, 2024 am 11:33 AM
华硕主板开机怎么进入bios设置?步骤/方式1工具/原料:系统版本:windows7系统品牌型号:华硕无畏14开机的时候按下键盘中的“Del”快捷键步骤/方式2即可进入BIOS界面。华硕主板怎么进入bios?1.启动华硕笔记本2.开机的时候按下键盘中的“Del”快捷键即可进入bios设置3.进入bios的主界面华硕主板进bios?进入华硕主板的BIOS有多种方法,以下是其中的两种常见方法:方法一:打开计算机,当出现华硕主板的logo时,按下“删除”键,直到进入BIOS设置页面。在BIOS界面中,
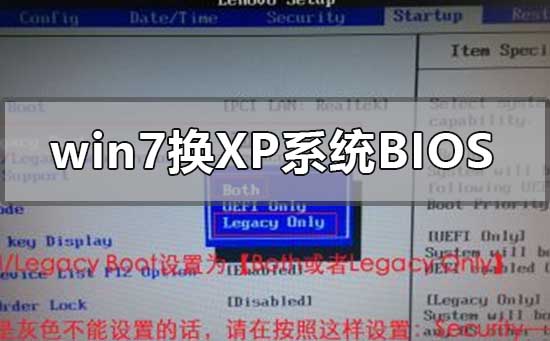 如何更改BIOS设置以在Win7上安装XP系统Jan 05, 2024 am 08:42 AM
我们在使用win7操作系统的时候,有的小伙伴们因为一些需要想要把自己的系统换成xp操作系统。那么在这个过程中一些小伙伴们可能就遇到了一些问题。对于win7换xp系统bios怎么设置,小编觉得首先通快捷键进入我们电脑的bios,然后找到相关选项跟着小编进行设置即可。具体操作步骤一起来看下吧~win7换xp系统bios怎么设置1.进BIOSThinkPad和联想VBKEM系列的笔记本进BIOS是按键盘的F1键(部分机型是按键盘组合键Fn+F1,Fn键按住不放,反复按F1键)。2.选择Restart标
 解决win11关机后外设仍然亮的问题Dec 26, 2023 pm 10:37 PM
有时候我们关机要睡觉了,结果win11关机后外设还亮着灯,非常影响体验,这其实是由于关机后usb接口还在供电导致的,我们只要进入bios设置禁用它就可以了。win11关机后外设还亮:1、首先我们重启电脑,在品牌logo跳出时按下“DEL”进入bios设置。(不同电脑进入bios的方法不一定一样,可以查一下说明书)2、进入后,我们先将语言改到中文,方便操作。3、接着我们进入“高级”设置,打开“高级电源管理”4、然后在其中找到“ErP支持”5、随后将它改为“开启(S4+S5)”6、最后按下键盘“F1
 惠普bios设置U盘启动的教程Jul 16, 2023 pm 02:21 PM
在使用惠普的用户却不少,很多人要进入快启动pe系统进行维护的时候却不知道该怎么设置U盘启动,主要是惠普bios设置U盘启动的方法和平常的方法略有不同,那么,惠普电脑如何U盘启动呢,下面我们来看看惠普bios设置U盘启动的教程,大家快来看看吧。1、首先,将u盘插入hp台式机的USB接口处。2、开机快速断续的按F10键进入BIOS设置界面。3、进入BIOS设置后,将界面切换到“Boot”选项,将光标移到“BootDevicePriority”选项按回车键进入。4、选择“HDDGroupBootPri


Hot AI Tools

Undresser.AI Undress
AI-powered app for creating realistic nude photos

AI Clothes Remover
Online AI tool for removing clothes from photos.

Undress AI Tool
Undress images for free

Clothoff.io
AI clothes remover

AI Hentai Generator
Generate AI Hentai for free.

Hot Article
Hot Tools

SublimeText3 English version
Recommended: Win version, supports code prompts!

VSCode Windows 64-bit Download
A free and powerful IDE editor launched by Microsoft

MantisBT
Mantis is an easy-to-deploy web-based defect tracking tool designed to aid in product defect tracking. It requires PHP, MySQL and a web server. Check out our demo and hosting services.

WebStorm Mac version
Useful JavaScript development tools

EditPlus Chinese cracked version
Small size, syntax highlighting, does not support code prompt function

