


The motherboard sound card driver is an important component to ensure that the computer can play audio normally. Before installing the motherboard sound card driver, we need to confirm the following points:
- Confirm the motherboard model: Different motherboards need to install the corresponding sound card driver.
- Download the sound card driver: You can download the appropriate sound card driver from the motherboard manufacturer's official website or other trusted hardware driver download sites.
The following will introduce the installation steps of the motherboard sound card driver in detail:
Step 1: Preparation
- Before starting the installation, shut down the computer and Make sure the motherboard's power cord is unplugged from the motherboard.
- Next, you need to open the computer main box to obtain relevant information about the motherboard.
Step 2: Find the motherboard model
- Open the computer chassis and find the model identification on the motherboard. Usually located in the center or at the edge of the motherboard.
- Record the complete information of the motherboard model for subsequent use.
Step 3: Download the sound card driver
- Open the browser and enter the official website of the motherboard manufacturer.
- Find support and download or driver download related options on the website.
- Enter the motherboard model and search for the corresponding sound card driver in the search bar.
- After finding the suitable sound card driver, click to download and save it to the designated folder on your computer.
Step 4: Install the sound card driver
- Open the downloaded sound card driver folder and double-click to run the installation program. User Account Control or security warning prompts may appear, please click on options such as Allow or Continue.
- Follow the instructions of the installation program and gradually complete the installation of the sound card driver. It generally includes steps such as reading the license agreement and selecting the installation path.
- During the installation process, you may be prompted to restart the computer. Please follow the prompts and continue the installation after rebooting.
- After the installation is complete, open the Control Panel and click on the "Sounds, Audio Devices" option. Confirm whether the newly installed sound card device is displayed.
Step 5: Test the sound playback function
- Open the volume control interface through the volume control panel or the volume button on the speaker.
- Confirm whether the volume is adjusted to the appropriate position.
- Open a media player or other program with audio playback function and play the test audio file.
- If you can hear the sound normally and there are no obvious abnormalities in the sound, it means that the sound card driver has been successfully installed.
Summary:
Installing the motherboard sound card driver is a key step to ensure that the computer sound plays normally. Be careful to select the correct sound card driver and install it correctly. If you encounter problems during the installation process, you can refer to the installation guide provided by the motherboard manufacturer or seek professional help.
The above is the detailed content of Steps to install motherboard sound card driver. For more information, please follow other related articles on the PHP Chinese website!

 如何在技嘉主板上设置键盘启动功能 (技嘉主板启用键盘开机方式)Dec 31, 2023 pm 05:15 PM
技嘉的主板怎么设置键盘开机首先,要支持键盘开机,一定是PS2键盘!!设置步骤如下:第一步:开机按Del或者F2进入bios,到bios的Advanced(高级)模式普通主板默认进入主板的EZ(简易)模式,需要按F7切换到高级模式,ROG系列主板默认进入bios的高级模式(我们用简体中文来示范)第二步:选择到——【高级】——【高级电源管理(APM)】第三步:找到选项【由PS2键盘唤醒】第四步:这个选项默认是Disabled(关闭)的,下拉之后可以看到三种不同的设置选择,分别是按【空格键】开机、按组
 如何在Windows 10上查看电脑主板型号Jan 08, 2024 pm 07:59 PM
很多小伙伴买了win10系统的新电脑,却不知道电脑的主板型号如何查看。了解电脑的主板型号有助于我们更好的理解电脑,装配更合适电脑的软件。其实我们不必拆开电脑,只要适用鲁大师或者在系统设置里就可以查看了,具体的步骤一起来看看吧。win10查看电脑主板型号的方法第一种方法1、右击此电脑,点击管理2、选择设备管理器。3、右侧找到系统设备。4、就可以查看主板型号了。第二种方法1、使用鲁大师等电脑检测类软件2、可以看见自己电脑的主板型号了。第三种方法1、这个方法是最老土的啦,直接拆开自己的电脑来查看电脑主
 由于 fTPM 错误,AMD PC 在 Windows 10 和 11 上出现卡顿,临时解决方法May 13, 2023 pm 07:04 PM
一两个月以来,AMD的Ryzen处理器被发现在启用固件TPM(fTPM)的Windows10和11系统上卡顿(通过Reddit)或冻结。今天,AMD在确定导致这些问题的原因后发布了一份公告。据该公司称,挂起和卡顿是由串行外设接口(SPI)闪存ROM内的扩展内存事务操作引起的。AMD已确定,选定的AMDRyzen™系统配置可能会间歇性地在位于主板上的SPI闪存(“SPIROM”)中执行与fTPM相关的扩展内存事务,这可能导致系统交互性或响应性暂时暂
 主板不支持uefi安装win11的教程Jan 01, 2024 am 10:38 AM
一些比较老的主板不支持uefi启动,不过win11的系统自动更新升级就是需要uefi启动的,因此大家就无法在系统更新中直接升级win11。但是这不代表我们真的无法安装win11,还是可以使用pe系统来安装的,下面就一起来看一下吧。主板不支持uefi怎么装win111、主板不支持uefi的话,可以使用pe系统来安装,因为pe系统安装能够无视几乎所有的安装条件。2、首先大家需要先下载一个win11的镜像系统文件。3、然后再下载一个优启通软件,帮助我们快速进入pe系统。4、准备工作完成后,打开优启通,
 b460主板支持什么cpuSep 08, 2022 pm 03:23 PM
b460主板支持的CPU:1、酷睿10代系列;2、奔腾G6系列;3、赛扬G5系列。主板也即主机板,是计算机最基本也是最重要的部件之一,b460主板内存支持频率2933MHz,不支持超频,有线网卡为原生支持2.5G,通常搭配酷睿十代i5系列处理器。
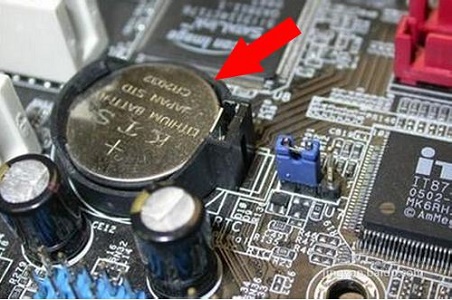 教你如何拆卸win7主板电池Jan 03, 2024 pm 07:15 PM
很多人可能不知道,我们的电脑主板是需要用自带电池的,不是连上电源就可以直接使用的。而这个电池就有可能出现没电的状况,如果电池没电了我们又不想带到维修店更换,可以通过下面的教程亲自进行更换。win7主板电池拆除教程1、首先我们需要拆开主机,找到主板。2、然后在主板上找到一个背面带“+”号,直径1-2cm的纽扣电池,这就是主板电池了。3、用比较平的工具压住旁边的卡扣。4、电池会自动弹起,然后我们将它取出即可。5、然后将新的电池装回,首先放没有卡扣的地方,然后按下有卡扣的地方就可以完成安装了。6、上面
 推荐5款适用于Windows 11的顶级主板Apr 25, 2023 pm 10:19 PM
拥有一流规格的最佳Windows11主板是构建重型PC的必要条件。主板是每台PC不可或缺的一部分。因此,根据您要制造PC的目的,在购买像样的主板之前,您应该熟悉主板技术信息。我们为您挑选了五款最佳的Windows11主板。买主板要注意什么?如果您寻找最好的Windows11主板,您应该考虑一些因素。最关键的因素是主板尺寸。您的主板是ATX、ITX还是Mini-ITX?ATX主板比ITX更大,并且比ITX系列拥有更多的PCI插槽。因此,选择合适的主板取决于您要添
 换主板需要重装系统吗Sep 08, 2023 pm 06:11 PM
换主板需要重装系统分两种情况:1、更换相同品牌型号的主板不需要重装系统,相同品牌型号的主板驱动完全一样,一般来说,更换主板后可以正常进入系统,主板的各种驱动都存在硬盘里,更换主板后可以直接开机正常进入系统,更换主板一般需要调整系统日期等设置;2、两个主板的驱动不一样需要重装系统或重装主板驱动,更换主板后,如果能进入系统,则可以联网安装主板驱动,若无法进入系统则可直接选择重装系统


Hot AI Tools

Undresser.AI Undress
AI-powered app for creating realistic nude photos

AI Clothes Remover
Online AI tool for removing clothes from photos.

Undress AI Tool
Undress images for free

Clothoff.io
AI clothes remover

AI Hentai Generator
Generate AI Hentai for free.

Hot Article
Hot Tools

mPDF
mPDF is a PHP library that can generate PDF files from UTF-8 encoded HTML. The original author, Ian Back, wrote mPDF to output PDF files "on the fly" from his website and handle different languages. It is slower than original scripts like HTML2FPDF and produces larger files when using Unicode fonts, but supports CSS styles etc. and has a lot of enhancements. Supports almost all languages, including RTL (Arabic and Hebrew) and CJK (Chinese, Japanese and Korean). Supports nested block-level elements (such as P, DIV),

SublimeText3 Linux new version
SublimeText3 Linux latest version

Notepad++7.3.1
Easy-to-use and free code editor

PhpStorm Mac version
The latest (2018.2.1) professional PHP integrated development tool

Dreamweaver CS6
Visual web development tools

