


OpenCV is an open source library for computer vision and image processing, which is widely used in machine learning, image recognition, video processing and other fields. When developing using OpenCV, in order to better debug and run programs, many developers choose to use PyCharm, a powerful Python integrated development environment. This article will provide PyCharm users with an installation tutorial for OpenCV, with specific code examples.
Step One: Install Python
First, make sure you have Python installed. Using OpenCV in PyCharm requires installing the Python environment first. You can download the latest Python version from the Python official website (https://www.python.org/) and follow the installation wizard.
Step 2: Install PyCharm
Next, download and install PyCharm. You can find the download link for PyCharm on the JetBrains official website (https://www.jetbrains.com/pycharm/). Once the installation is complete, open PyCharm and create a new Python project.
Step 3: Install OpenCV
Installing OpenCV in PyCharm can be completed through the pip command. Enter the following command in PyCharm's Terminal:
pip install opencv-python
This command will automatically download and install the OpenCV library. Once the installation is complete, you can start using OpenCV in PyCharm for image processing and computer vision development.
Sample code:
Next, let’s look at a simple OpenCV sample code. The following code implements a simple image reading and display operation:
import cv2

# 读取图片
image = cv2.imread('example.jpg')

# 显示图片
cv2.imshow('image', image)
cv2.waitKey(0)
cv2.destroyAllWindows()
In this code, we first use the cv2.imread() function to read the image named The picture of example.jpg is then displayed using the cv2.imshow() function. Finally, wait for the user to press any key to close the display window through cv2.waitKey(0).
Summary:
Through the tutorial in this article, you should have mastered how to install and use OpenCV in PyCharm, and be able to run simple OpenCV code examples. I hope this tutorial will be helpful to you and enable you to better carry out image processing and computer vision related development work. If you have any questions or concerns, please leave a message for discussion. Good luck with your use of OpenCV and PyCharm!
The above is the detailed content of OpenCV installation tutorial: a must-read for PyCharm users. For more information, please follow other related articles on the PHP Chinese website!

 python OpenCV图像金字塔实例分析May 11, 2023 pm 08:40 PM
1.图像金字塔理论基础图像金字塔是图像多尺度表达的一种,是一种以多分辨率来解释图像的有效但概念简单的结构。一幅图像的金字塔是一系列以金字塔形状排列的分辨率逐步降低,且来源于同一张原始图的图像集合。其通过梯次向下采样获得,直到达到某个终止条件才停止采样。我们将一层一层的图像比喻成金字塔,层级越高,则图像越小,分辨率越低。那我们为什么要做图像金字塔呢?这就是因为改变像素大小有时候并不会改变它的特征,比方说给你看1000万像素的图片,你能知道里面有个人,给你看十万像素的,你也能知道里面有个人,但是对计
 Python+OpenCV怎么实现拖拽虚拟方块效果May 15, 2023 pm 07:22 PM
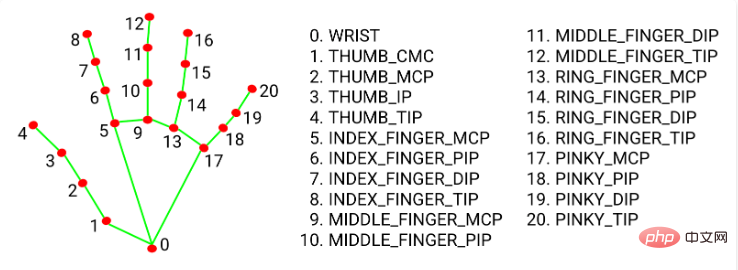
一、项目效果二、核心流程1、openCV读取视频流、在每一帧图片上画一个矩形。2、使用mediapipe获取手指关键点坐标。3、根据手指坐标位置和矩形的坐标位置,判断手指点是否在矩形上,如果在则矩形跟随手指移动。三、代码流程环境准备:python:3.8.8opencv:4.2.0.32mediapipe:0.8.10.1注:1、opencv版本过高或过低可能出现一些如摄像头打不开、闪退等问题,python版本影响opencv可选择的版本。2、pipinstallmediapipe后可能导致op
 如何使用PHP和OpenCV库实现视频处理?Jul 17, 2023 pm 09:13 PM
如何使用PHP和OpenCV库实现视频处理?摘要:在现代科技应用中,视频处理已经成为一项重要的技术。本文将介绍如何使用PHP编程语言结合OpenCV库来实现一些基本的视频处理功能,并附上相应的代码示例。关键词:PHP、OpenCV、视频处理、代码示例引言:随着互联网的发展和智能手机的普及,视频内容已经成为人们生活中不可或缺的一部分。然而,要想实现视频的编辑和
 在PHP中使用OpenCV实现计算机视觉应用Jun 19, 2023 pm 03:09 PM
计算机视觉(ComputerVision)是人工智能领域的重要分支之一,它可以使计算机能够自动地感知和理解图像、视频等视觉信号,实现人机交互以及自动化控制等应用场景。OpenCV(OpenSourceComputerVisionLibrary)是一个流行的开源计算机视觉库,在计算机视觉、机器学习、深度学习等领域都有广泛的应用。本文将介绍在PHP中使
 在Python中,可以使用OpenCV库中的方法对图像进行分割和提取。May 08, 2023 pm 10:55 PM
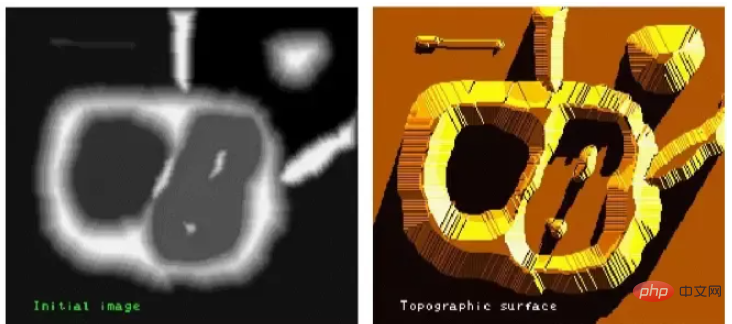
图像分割与提取图像中将前景对象作为目标图像分割或者提取出来。对背景本身并无兴趣分水岭算法及GrabCut算法对图像进行分割及提取。用分水岭算法实现图像分割与提取分水岭算法将图像形象地比喻为地理学上的地形表面,实现图像分割,该算法非常有效。算法原理任何一幅灰度图像,都可以被看作是地理学上的地形表面,灰度值高的区域可以被看成是山峰,灰度值低的区域可以被看成是山谷。左图是原始图像,右图是其对应的“地形表面”。该过程将图像分成两个不同的集合:集水盆地和分水岭线。我们构建的堤坝就是分水岭线,也即对原始图像
 如何使用PHP和OpenCV库实现图像锐化?Jul 17, 2023 am 08:31 AM
如何使用PHP和OpenCV库实现图像锐化?概述:图像锐化是一种常见的图像处理技术,用于提高图像的清晰度和边缘的强度。在本文中,我们将介绍如何使用PHP和OpenCV库来实现图像锐化。OpenCV是一款功能强大的开源计算机视觉库,它提供了丰富的图像处理功能。我们将使用OpenCV的PHP扩展来实现图像锐化算法。步骤1:安装OpenCV和PHP扩展首先,我们需
 利用Java、Selenium和OpenCV结合的方法,解决自动化测试中滑块验证问题。May 08, 2023 pm 08:16 PM
1、滑块验证思路被测对象的滑块对象长这个样子。相对而言是比较简单的一种形式,需要将左侧的拼图通过下方的滑块进行拖动,嵌入到右侧空槽中,即完成验证。要自动化完成这个验证过程,关键点就在于确定滑块滑动的距离。根据上面的分析,验证的关键点在于确定滑块滑动的距离。但是看似简单的一个需求,完成起来却并不简单。如果使用自然逻辑来分析这个过程,可以拆解如下:1.定位到左侧拼图所在的位置,由于拼图的形状和大小固定,那么其实只需要定位其左边边界离背景图片的左侧距离。(实际在本例中,拼图的起始位置也是固定的,节省了
 利用PHP和OpenCV库进行图像霍夫变换的方法Jul 17, 2023 pm 08:53 PM
利用PHP和OpenCV库进行图像霍夫变换的方法引言:图像处理在计算机视觉和图像分析领域中发挥着重要的作用。其中,霍夫变换是一种广泛应用于边缘检测、直线检测和圆检测等场景的技术。本文将介绍如何使用PHP和OpenCV库进行图像霍夫变换,并附上代码示例。一、准备工作下载安装OpenCV库首先,我们需要在本地环境中安装OpenCV库。你可以从OpenCV官方网站


Hot AI Tools

Undresser.AI Undress
AI-powered app for creating realistic nude photos

AI Clothes Remover
Online AI tool for removing clothes from photos.

Undress AI Tool
Undress images for free

Clothoff.io
AI clothes remover

AI Hentai Generator
Generate AI Hentai for free.

Hot Article
Hot Tools

Dreamweaver Mac version
Visual web development tools

VSCode Windows 64-bit Download
A free and powerful IDE editor launched by Microsoft

MinGW - Minimalist GNU for Windows
This project is in the process of being migrated to osdn.net/projects/mingw, you can continue to follow us there. MinGW: A native Windows port of the GNU Compiler Collection (GCC), freely distributable import libraries and header files for building native Windows applications; includes extensions to the MSVC runtime to support C99 functionality. All MinGW software can run on 64-bit Windows platforms.

PhpStorm Mac version
The latest (2018.2.1) professional PHP integrated development tool

SAP NetWeaver Server Adapter for Eclipse
Integrate Eclipse with SAP NetWeaver application server.

