


If you want to improve computer performance, installing a radiator is essential. For AM3 motherboards, properly installed radiators can effectively reduce CPU temperature and improve overall performance. This article by PHP editor Banana introduces in detail how to correctly install the radiator on the AM3 motherboard to help you easily complete the assembly process and ensure that the computer runs smoothly.

How to install the radiator am3 on the motherboard?
Hello, 1. Prepare tools and radiator: you need a screwdriver and a radiator.
2. Clean the CPU and radiator: Use a cleaning cloth or paper towel to clean the dust and dirt on the CPU and radiator to ensure the surface is clean.
3. Apply thermal paste: Apply a layer of thermal paste on the CPU surface to improve the heat dissipation effect.
4. Install the radiator: Align the radiator with the CPU, put the screws on the radiator into the holes on the motherboard, and tighten the screws with a screwdriver.
5. Connect the fan power supply: Connect the fan on the radiator to the fan interface on the motherboard and make sure the power cord is connected correctly.
6. Test the radiator: After turning on the computer, check whether the radiator and fan are operating normally and confirm that the heat dissipation effect is normal.
How to plug in the cables on Gigabyte am3 motherboard?
Send the motherboard diagram, especially the part where the wires are plugged in should be clear. It is best to just send the wiring part.
My motherboard has an AM3 interface and can be plugged into an AM3 CPU. ?
Let me share some relevant knowledge with you: AM2/AM2 has 940 pins, AM3 has 938 pins (white socket), and AM3 also has 938 pins (black socket). Therefore, the AM3 CPU can be plugged into the AM2/AM2 motherboard, and the AM3 CPU can be plugged into the AM3 motherboard, but the AM3 CPU needs to be plugged into the AM3 motherboard by flashing the BIOS.
How to plug in the wires on the am3 motherboard?
You need to pay attention to the following points when plugging in the AM3 motherboard wires:
First, make sure the motherboard and power supply are turned off and disconnect the power cord.
Then, according to the logo on the motherboard, insert the power cord into the corresponding slot, usually there is a 24-pin main power slot and a 4/8-pin CPU power slot.
Make sure the plug is aligned with the slot and push in gently until the plug is fully inserted.
Next, insert the data cables of the hard disk and optical drive into the SATA slot on the motherboard, making sure that the plug is aligned with the slot and inserted all the way.
Finally, insert the power button, restart button, USB interface and other cables on the front panel into the corresponding slots on the motherboard.
After the plugging is completed, check again that all plugs are securely connected, then reconnect the power cord and start the computer.
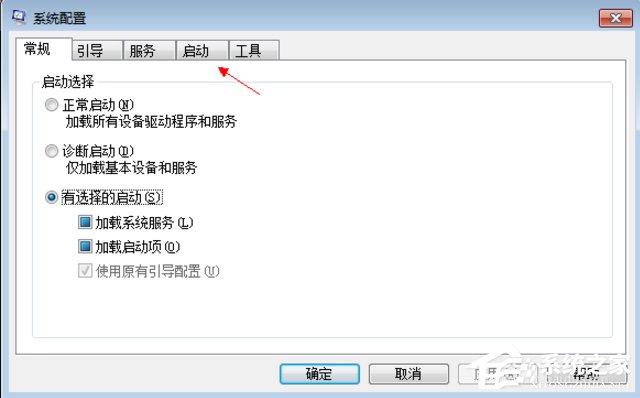
Asus am3 motherboard bios settings?
The BIOS settings of ASUS AM3 motherboards (such as: ASUS M4A89TD PRO Deluxe, ASUS M4A88T-M LE, etc.) may differ depending on the specific model. However, most ASUS AM3 motherboard BIOS settings have similar interfaces and features. The following are some recommended BIOS setup steps:
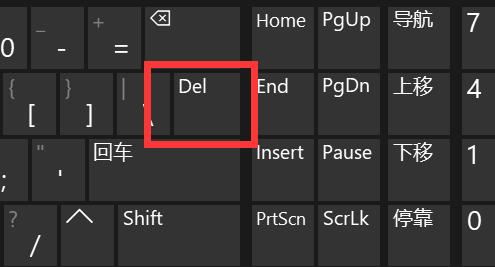
1. Restart the computer: During the startup process, press and hold the "Delete" key or the "F2" key on the keyboard to enter the BIOS setup interface. Different models of ASUS AM3 motherboards may require different button combinations, please refer to the motherboard manual.
2. Select the "Advanced" or "Advanced Settings" option to enter the BIOS setting interface.
3. Under the "Advanced" or "Advanced Settings" option, find "CPU Configuration" or a similar option.
4. Under the "CPU Configuration" option, find "CPU Core Ratio" or similar options. This option controls the CPU frequency multiplier.
5. Adjust the CPU core ratio. By default, the multiplier may be locked. You can adjust the CPU multiplier as needed. For example, if you want to increase the CPU frequency to 3.0GHz, you can set the multiplier to 30.
6. Under the "Advanced" or "Advanced Settings" option, find "CPU Clock Gating" or a similar option. This option controls the turning on and off of the CPU core.
7. Turn off the CPU core. For example, if your CPU has two cores but only needs one core to run, you can set "CPU Clock Gating" to "Off" and save the settings.
8. Under the "Advanced" or "Advanced Settings" option, find the "Memory Type" or similar option. This option controls the type of memory.
9. Adjust the memory type. By default, the memory type may be set to "DDR3". If you are using DDR2 memory, please set the memory type to "DDR2".
10. Under the "Advanced" or "Advanced Settings" option, find "Memory Clock" or a similar option. This option controls the memory frequency.
11. Adjust the memory frequency. Depending on your memory type and clock speed, the memory frequency can be adjusted. For example, if your memory frequency is 1066MHz, you can set "Memory Clock" to 1066MHz.
12. Save settings and exit BIOS: At the bottom of the BIOS setup interface, find "Save & Exit" or a similar option. Click this option to save your changes and exit BIOS Setup.
Please note that these steps are for reference only. Actual BIOS settings may vary depending on the specific model and motherboard manufacturer. When setting up the BIOS, be sure to refer to your motherboard manual to ensure correct operation.
The above is the detailed content of How to install radiator am3 on the motherboard?. For more information, please follow other related articles on the PHP Chinese website!

 微星主板bios安全启动怎么开启?Feb 01, 2024 am 09:21 AM
微星主板bios安全启动怎么开启?1.以华为matebookx、windows10为例。以Z390为例,重启按DEL进入BIOS,按F7进入高级模式,点击进入Settings的选项,再进入TrustedComputing。2.有个安全设备支持(SecurityDeviceSupport),将其改为允许(Enable),TPM设备选择为PTT,设置完成后按F10保存重启。3.以B550M为例,重启按DEL进BIOS后选择左侧的SETTINGS以进入设置界面,同样进入安全选项里的TrustedCom
 进入华硕主板bios设置图解教程Jul 08, 2023 pm 01:13 PM
有很多操作都是需要进到电脑的bios系统进行操作,比如说调整启动项,磁盘模式,cpu参数,刷新bios等等。不过不同的电脑品牌主板的bios设置等界面会有不同,那么如何进入华硕bios?华硕主板bios设置界面又是怎么样的呢?下面小编就给大家分享下进入华硕主板bios设置图解教程。一、如何进入华硕bios1、首先重启华硕电脑,在开机的一瞬间并跳出ASUS的标志界面的时候,马上不断按“Delete”键进入bios界面。2、进入到bios界面后,就可以对bios系统进行设置了。二、华硕主板bios设
 asus安装win7找不到引导启动菜单的解决方案Jul 17, 2023 am 10:37 AM
在安装系统的过程中,许多网民可能会遇到一些问题,导致重新安装系统的失败。最近,一些网民报告说,他们的sus安装win7找不到引导启动菜单,安装后不能正常引导启动菜单进入新系统。下面的小边教你安装win7后找不到引导启动菜单的解决方案。asus安装win7找不到引导启动菜单的解决方案:1.进入华硕主板BIOS,F7进入高级设置。2.进入启动选项。3.修改CSM(兼容性支持模块)。打开CSM,完全支持非UEFI启动附加设备或WindowsUEFI模式。4.返回修改,修改安全启动菜单。5.修改其他操作
 win7怎样进去bios设置方式介绍Jul 11, 2023 pm 06:09 PM
win7怎样进去bios设置呢,用户应用win17的时候如果碰到要进入bios的现象要怎么办呢,最先开机后重启,随后等候系统发生黑底白字时按着del,根据这个方式用户就可以很容易进入bios中,在这儿用户能够设置许多作用,非常的容易且便捷哦,下面就是具体的win7怎样进去bios设置方式介绍。win7怎样进去bios设置1、最先打开电脑以后,点击左下方的菜单栏。2、点击菜单里的‘重启’。3、在重启时,直到显示屏发生黑背景,白字时,就会见到进入bios的方法了,这儿提醒要按照del键。4、不停的按
 如何进入华硕主板的BIOS设置界面?Jan 30, 2024 am 11:33 AM
华硕主板开机怎么进入bios设置?步骤/方式1工具/原料:系统版本:windows7系统品牌型号:华硕无畏14开机的时候按下键盘中的“Del”快捷键步骤/方式2即可进入BIOS界面。华硕主板怎么进入bios?1.启动华硕笔记本2.开机的时候按下键盘中的“Del”快捷键即可进入bios设置3.进入bios的主界面华硕主板进bios?进入华硕主板的BIOS有多种方法,以下是其中的两种常见方法:方法一:打开计算机,当出现华硕主板的logo时,按下“删除”键,直到进入BIOS设置页面。在BIOS界面中,
 如何更改BIOS设置以在Win7上安装XP系统Jan 05, 2024 am 08:42 AM
我们在使用win7操作系统的时候,有的小伙伴们因为一些需要想要把自己的系统换成xp操作系统。那么在这个过程中一些小伙伴们可能就遇到了一些问题。对于win7换xp系统bios怎么设置,小编觉得首先通快捷键进入我们电脑的bios,然后找到相关选项跟着小编进行设置即可。具体操作步骤一起来看下吧~win7换xp系统bios怎么设置1.进BIOSThinkPad和联想VBKEM系列的笔记本进BIOS是按键盘的F1键(部分机型是按键盘组合键Fn+F1,Fn键按住不放,反复按F1键)。2.选择Restart标
 解决win11关机后外设仍然亮的问题Dec 26, 2023 pm 10:37 PM
有时候我们关机要睡觉了,结果win11关机后外设还亮着灯,非常影响体验,这其实是由于关机后usb接口还在供电导致的,我们只要进入bios设置禁用它就可以了。win11关机后外设还亮:1、首先我们重启电脑,在品牌logo跳出时按下“DEL”进入bios设置。(不同电脑进入bios的方法不一定一样,可以查一下说明书)2、进入后,我们先将语言改到中文,方便操作。3、接着我们进入“高级”设置,打开“高级电源管理”4、然后在其中找到“ErP支持”5、随后将它改为“开启(S4+S5)”6、最后按下键盘“F1
 惠普bios设置U盘启动的教程Jul 16, 2023 pm 02:21 PM
在使用惠普的用户却不少,很多人要进入快启动pe系统进行维护的时候却不知道该怎么设置U盘启动,主要是惠普bios设置U盘启动的方法和平常的方法略有不同,那么,惠普电脑如何U盘启动呢,下面我们来看看惠普bios设置U盘启动的教程,大家快来看看吧。1、首先,将u盘插入hp台式机的USB接口处。2、开机快速断续的按F10键进入BIOS设置界面。3、进入BIOS设置后,将界面切换到“Boot”选项,将光标移到“BootDevicePriority”选项按回车键进入。4、选择“HDDGroupBootPri


Hot AI Tools

Undresser.AI Undress
AI-powered app for creating realistic nude photos

AI Clothes Remover
Online AI tool for removing clothes from photos.

Undress AI Tool
Undress images for free

Clothoff.io
AI clothes remover

AI Hentai Generator
Generate AI Hentai for free.

Hot Article
Hot Tools

SublimeText3 Mac version
God-level code editing software (SublimeText3)

SAP NetWeaver Server Adapter for Eclipse
Integrate Eclipse with SAP NetWeaver application server.

ZendStudio 13.5.1 Mac
Powerful PHP integrated development environment

mPDF
mPDF is a PHP library that can generate PDF files from UTF-8 encoded HTML. The original author, Ian Back, wrote mPDF to output PDF files "on the fly" from his website and handle different languages. It is slower than original scripts like HTML2FPDF and produces larger files when using Unicode fonts, but supports CSS styles etc. and has a lot of enhancements. Supports almost all languages, including RTL (Arabic and Hebrew) and CJK (Chinese, Japanese and Korean). Supports nested block-level elements (such as P, DIV),

SublimeText3 English version
Recommended: Win version, supports code prompts!

