


Word table of contents generation is a very practical function that can help us quickly generate a table of contents for articles. However, sometimes due to some reasons, we need to modify the generated directory. Below I will introduce some common methods of modifying directories.
First, open your file in Word and find the location of the directory. Typically, the table of contents will be located at the beginning of the document or in the preface. If you cannot find the table of contents, you can click the "View" tab on the Word toolbar, and then select the "Navigation Pane" command. The structure of the document will be displayed in the navigation pane. You can locate the table of contents by clicking on the table of contents title. Location.
Modifying the font and style of the directory is the most common need. Select the text in the table of contents with the mouse, and then select the corresponding font and style in the Word toolbar. You can change the font size, color, bold, italics, etc. You can also use different heading levels to distinguish different chapters.
If you need to adjust the order of titles in the table of contents, you can do so by modifying the structure of the document. Select a title in the table of contents, then click the "Home" tab on the Word toolbar to modify the title's level to an appropriate level. After changing the level, the title will be automatically reordered. You can also adjust the order of the titles by dragging them to the target location.
Sometimes, we also need to modify the format and style of the directory. First, select a row or several rows in the table of contents, then click the "Home" tab on the Word toolbar and select the "Paragraph" command. In the Paragraph dialog box, you can adjust line spacing, indentation, alignment, and more. If you want to change the style of the table of contents, click the "Reference" tab on the Word toolbar, and then select the "Style" command. In the style panel, you can select a preset style or modify an existing style.
In addition to the methods mentioned above, there are some other techniques for modifying directories. For example, you can add or remove a title from the table of contents. Select a title in the table of contents and use the Delete key or Delete command to delete it. If you want to add a new title, just insert a new title in the corresponding position and regenerate the table of contents.
When modifying the table of contents, the most important thing is to maintain the structure and coherence of the document. When modifying the directory, be careful not to destroy the original document structure, otherwise the directory may not be displayed correctly. Before making modifications, it is best to make a backup to prevent accidents.
The above are some tips and methods on how to modify the Word directory after it is generated. Whether it's adjusting fonts and styles, or changing title order and format, as long as you master these methods, you can easily modify the Word table of contents to make it more in line with your needs. Hope it helps!
The above is the detailed content of How to modify the word directory after it is generated. For more information, please follow other related articles on the PHP Chinese website!

 不再担心下班前被领导叫住开小会,AI助手帮你自动生成会议纪要Sep 04, 2023 pm 11:21 PM
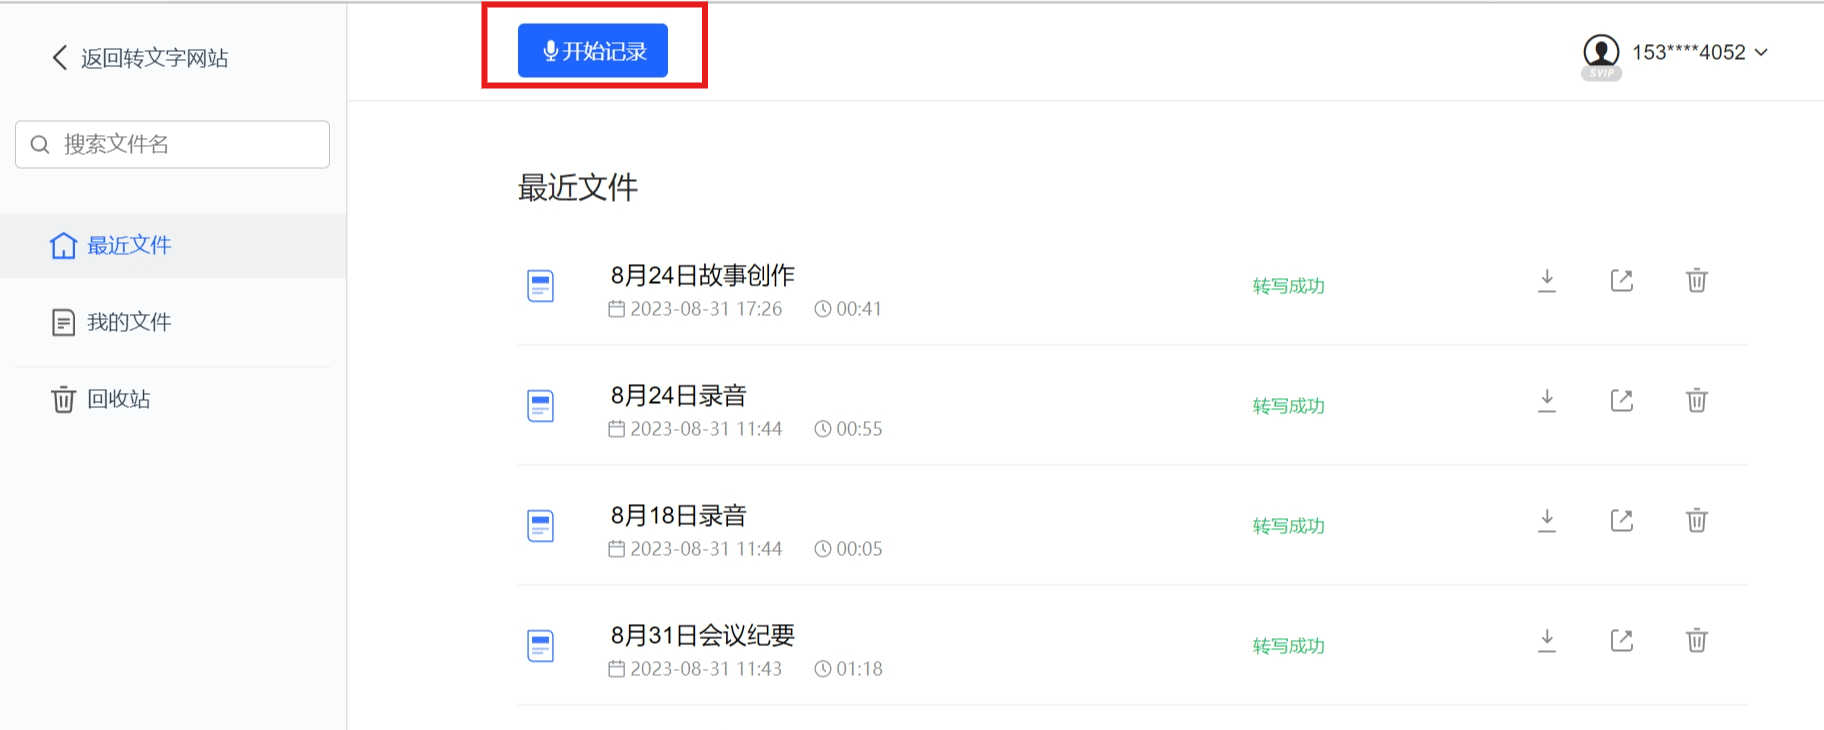
讯飞听见升级会议纪要功能,可以将口语表述直接转化为书面稿,AI能够根据录音总结会议纪要。AI能够帮助您完成会议纪要的撰写工作8月31日,讯飞听见网页端进行了版本升级,新增了PC端实时录音功能,能够利用人工智能智能生成会议纪要。这一功能的推出将大大提高用户在会议后整理内容、跟进重点工作事项的效率。对于经常参加会议的人来说,这个功能无疑是一个非常实用的工具,能够节省大量时间和精力该功能的应用场景主要是PC电脑端录音转文字自动生成会议纪要,旨在为用户提供最优质的服务和最先进的技术,快速提升办公效率的产
 如何使用PHP生成可刷新的图片验证码Sep 13, 2023 am 11:54 AM
如何使用PHP生成可刷新的图片验证码随着互联网的发展,为了防止恶意攻击和机器自动操作现象,很多网站都使用了验证码来进行用户验证。其中一种常见的验证码类型就是图片验证码,通过生成一张包含随机字符的图片,要求用户输入正确的字符才能进行后续操作。本文将介绍如何使用PHP生成可刷新的图片验证码,并提供具体的代码示例。步骤一:创建验证码图片首先,我们需要创建一个用于生
 如何使用PHP进行基本的自然语言生成Jun 22, 2023 am 11:05 AM
自然语言生成是一种人工智能技术,它能够将数据转换为自然语言文本。在当今的大数据时代,越来越多的业务需要将数据可视化或呈现给用户,而自然语言生成正是一种非常有效的方法。PHP是一种非常流行的服务器端脚本语言,它可以用于开发Web应用程序。本文将简要介绍如何使用PHP进行基本的自然语言生成。引入自然语言生成库PHP自带的函数库并不包括自然语言生成所需的功能,因此
 使用Python中的pyWaffle生成一个华夫饼图Aug 17, 2023 am 11:49 AM
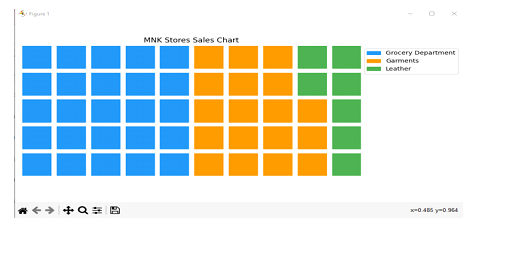
数据可视化对于高效的信息理解和展示至关重要。在众多可用的图表类型中,华夫饼图以方形瓦片在网格状结构中显示数据的新颖方式。强大的Python模块PyWaffle方便了华夫饼图的开发,类似于许多计算和数据分析方法。在本文中,我们将看看如何使用复杂的Python模块PyWaffle创建华夫饼图。让我们安装PyWafle并看看如何使用它来可视化分类数据。在您的cmd中运行以下命令来安装该库,然后将其导入到您的代码中pipinstallpywaffleExample1的中文翻译为:示例1在这个例子中,我们
 word目录生成错乱怎么办Feb 20, 2024 am 08:08 AM
word目录生成错乱怎么办随着科技的发展,电子文档已经成为我们日常工作和学习中不可或缺的一部分。而在编辑电子文档时,尤其是长篇文章或论文中,目录的生成是一个非常重要的步骤。目录能够方便读者查找到文章的内容和结构,提高阅读效率。然而,有时候我们在生成目录的过程中会遇到一些问题,比如目录生成出错,顺序混乱等。那么,如果word目录生成错乱,我们应该如何解决呢?首
 如何使用PHP生成带有时间限制的二维码?Aug 26, 2023 pm 04:34 PM
如何使用PHP生成带有时间限制的二维码?随着移动支付和电子门票的普及,二维码成为了一种常见的技术。在很多场景中,我们可能需要生成一种带有时间限制的二维码,即使在一定时间后,该二维码也将失效。本文将介绍如何使用PHP生成带有时间限制的二维码,并提供代码示例供参考。安装PHPQRCode库要使用PHP生成二维码,我们需要先安装PHPQRCode库。这个库
 win7系统如何修改开机等待时间Jul 08, 2023 pm 06:49 PM
当我们使用win7系统时,在开机过程中,可能要等很长时间才进入系统,每一次启动都要浪费大量时间,如不希望每次开机都要等很长时间,可以修改开机等待时间,下面小编为大家介绍win7修改开机等待时间的方法。win7系统如何修改开机等待时间:1.点击win7系统桌面左下角的开始菜单,在菜单中选择“电脑”右键,然后选择“属性”选项;2.然后在计算机属性面板中,选择面板左边的“高级系统设置”项目;3.然后在系统属性弹出窗口中,切换到Advanced选项卡,在启动和故障恢复部分,点击Settings按钮;4.
 如何生成在在线答题中的错题本Sep 25, 2023 am 10:24 AM
如何生成在线答题的错题本在现如今的信息时代,网上答题已经成为了许多学生和教育工作者的常见任务。而错题一直是学习过程中的难题之一,很多人都希望能够方便地生成在线答题的错题本,以便更好地复习和掌握知识。本文将介绍如何通过编程实现在线答题错题本的生成功能,并提供具体的代码示例。第一步:搭建网页界面生成在线答题错题本需要一个网页界面来显示题目和答案。可以使用HTML


Hot AI Tools

Undresser.AI Undress
AI-powered app for creating realistic nude photos

AI Clothes Remover
Online AI tool for removing clothes from photos.

Undress AI Tool
Undress images for free

Clothoff.io
AI clothes remover

AI Hentai Generator
Generate AI Hentai for free.

Hot Article
Hot Tools

SAP NetWeaver Server Adapter for Eclipse
Integrate Eclipse with SAP NetWeaver application server.

MinGW - Minimalist GNU for Windows
This project is in the process of being migrated to osdn.net/projects/mingw, you can continue to follow us there. MinGW: A native Windows port of the GNU Compiler Collection (GCC), freely distributable import libraries and header files for building native Windows applications; includes extensions to the MSVC runtime to support C99 functionality. All MinGW software can run on 64-bit Windows platforms.

VSCode Windows 64-bit Download
A free and powerful IDE editor launched by Microsoft

MantisBT
Mantis is an easy-to-deploy web-based defect tracking tool designed to aid in product defect tracking. It requires PHP, MySQL and a web server. Check out our demo and hosting services.

mPDF
mPDF is a PHP library that can generate PDF files from UTF-8 encoded HTML. The original author, Ian Back, wrote mPDF to output PDF files "on the fly" from his website and handle different languages. It is slower than original scripts like HTML2FPDF and produces larger files when using Unicode fonts, but supports CSS styles etc. and has a lot of enhancements. Supports almost all languages, including RTL (Arabic and Hebrew) and CJK (Chinese, Japanese and Korean). Supports nested block-level elements (such as P, DIV),

