


php editor Banana guides you on how to cut files from Mac to hard drive. On a Mac, cutting files is not as straightforward as in Windows, but requires copying and pasting. Below we will introduce in detail how to cut files to the hard drive on Mac so that you can master this skill easily.
How to export photos to a mobile hard drive on a Mac computer
Mac computers can use the "Finder" or "Photos" application to export photos to a mobile hard drive. When using Finder to export photos, first make sure the mobile hard drive is connected to the Mac and is successfully recognized by the Mac.
The steps to transfer photos from Mac to hard drive are simple: first, connect the mobile hard drive to the computer, and then open the [Launcher] icon. Then, find and click the [Photos] icon in the pop-up window. In the opened [Photos] window, hold down the [Shift] key and select all photos in sequence. Finally, click the [File-Export-Export X Photos] option to export the photos to your hard drive.
3. First start our MAC and click Launchpad in the list on the left, as shown in the figure. Then click [mounty] to apply. If it is not available on the computer, we can download it from the software website, as shown in the picture. Afterwards, a mountain icon will be displayed in the upper menu bar, as shown in the picture.
First, on your Apple computer, find the photos you want to copy to the hard drive. For example, let's say these photos are stored on your desktop. Place your mouse on the photo, right-click, and select "Copy Image.JPG" from the pop-up options. This way, you can successfully copy the photos to your hard drive.

How to copy files to a mobile hard drive on a MAC Apple computer?
1. First start our MAC, click Launchpad in the list on the left, As shown in the picture. Then click [mounty] to apply. If it is not available on the computer, we can download it from the software website, as shown in the picture. Afterwards, a mountain icon will be displayed in the upper menu bar, as shown in the picture.
The mobile hard disk is displayed in NTFS format. Right-click the mobile hard drive and find that there is no "New Folder" option. Using Mounty11 software can help us copy files to NTFS format storage devices.
It is very important to ensure that NTFS for Mac is installed correctly. After the Mac system restarts, you can find the icon for the software in System Preferences. Generally speaking, after installing the software, when you insert the ntfs file system disk again, you will be able to perform normal file storage, new creation and deletion operations on the disk immediately without the need for other software settings. This allows you to get started without having to go through tedious configuration steps.
How to copy and cut files on Mac
1. Select the text you want to copy and paste. Press command C on your keyboard to copy the text. Just press command V on your keyboard to paste the text.
Copying and pasting are common editing operations. First, you can select the text or items you want to copy or cut. You can then save it to your clipboard so you can paste it later. After copying, you can place the cursor where you want to paste, and then follow the steps to paste. This allows information to be moved from one location to another quickly and easily, increasing productivity.
3. In most cases, you can use it directly as the Ctrl key of the Windows keyboard, such as the following three sets of shortcut keys in the Mac keyboard: copy shortcut key C, paste shortcut key V, and cut and paste shortcut key X. See the above three sets of commonly used shortcut keys.
4. How to cut files on Mac system with the Option key. Step 1: Right-click on the item you want to cut and select the "Copy" option. Step 2: Go to the directory you want to paste, right-click, and hold down the Option key. You will find that the "Paste Here" item in the menu changes to "Move Here".
5. Right-click on the watch to select a piece of text. Here we take "How to copy files" as an example, as shown in the figure. Apple computers have a dedicated mand key, similar to Ctrl in Windows. With the text selected, press the "mand c" key at the same time to copy the text. The specific key positions of the keyboard are as shown in the figure.
How to copy files from Apple computer to mobile hard drive
Correctly install NTFS for Mac. After the Mac system restarts, open System Preferences to find the software icon. Under normal circumstances, after the software is installed, when you insert the ntfs file system disk again, you can immediately store, create, and delete files on the disk normally, and you can use it directly without any other software settings.
Export photos using Finder First, make sure your mobile hard drive is connected to your Mac and that your Mac can recognize it. Usually, the external hard drive will appear on the desktop or in the sidebar of the Finder. Open the folder containing the photos you want to export.
First start our MAC and click Launchpad in the list on the left, as shown in the picture. Then click [mounty] to apply. If it is not available on the computer, we can download it from the software website, as shown in the picture. Afterwards, a mountain icon will be displayed in the upper menu bar, as shown in the picture.
How to copy things from Apple computer to mobile hard drive
1. Drag the selected photos to the icon of the mobile hard drive, and then wait for the photo copying to complete. You can also complete the copy process by right-clicking on the selected photo, then selecting "Copy", then right-clicking on the icon of the mobile hard drive and selecting "Paste".
2. Go to the official website to download the genuine installation package, and then install it. After successful installation, you can find this software in mac system preferences and open it. Click "Volume" and we can find that the previous USB flash drive is mounted.
3. First, find the photo you want to copy to the hard drive on your Apple computer. Here is an example of a photo stored on the desktop. Place the mouse within the picture and right-click. Then the pop-up Click the copy image .JPG in the options box that comes.
4. The method of copying photos from Mac to the hard drive is as follows: Connect the mobile hard drive to the computer and click the [Launch Pad] icon at the bottom. In the pop-up window, find and click the [Photo] icon. After opening the [Photos] window, hold down the [Shift] key and select all photos in sequence. Click the [File-Export-Export X Photos] option.
Conclusion: The above is all the content about cutting files to the hard disk on Mac introduced by this site. I hope it will be helpful to everyone. If you want to know more about this, remember to bookmark it. Follow this site.
The above is the detailed content of Can Mac cut files to hard drive?. For more information, please follow other related articles on the PHP Chinese website!

 ip与mac绑定什么意思Mar 09, 2023 pm 04:44 PM
ip与mac绑定是指将特定的IP地址与特定的MAC地址关联起来,使得只有使用该MAC地址的设备才能够使用该IP地址进行网络通信。ip与mac绑定可以防止被绑定的主机的IP地址不被假冒,前提条件:1、MAC地址是唯一的,并且不可假冒;只能绑定与路由器直接相连的网络上的主机(也就是主机的网关在路由器上)。
 mac版下载是什么意思Mar 06, 2023 am 09:52 AM
mac版下载的意思是当软件在选择安装时,选择MAC版下载;Windows版和MAC版是两个不同的操作系统,所以大多数软件在选择安装的同时需要选择Windows版还是MAC版。
 mac鼠标滚轮相反怎么办Mar 16, 2023 pm 05:44 PM
mac鼠标滚轮相反的解决办法:1、打开mac电脑,点击屏幕的苹果标志,然后选择“系统偏好设置”;2、在“系统偏好设置”窗口中,选择“鼠标”;3、在“鼠标”窗口中,将“滚动方向:自然”前面的勾去掉即可。
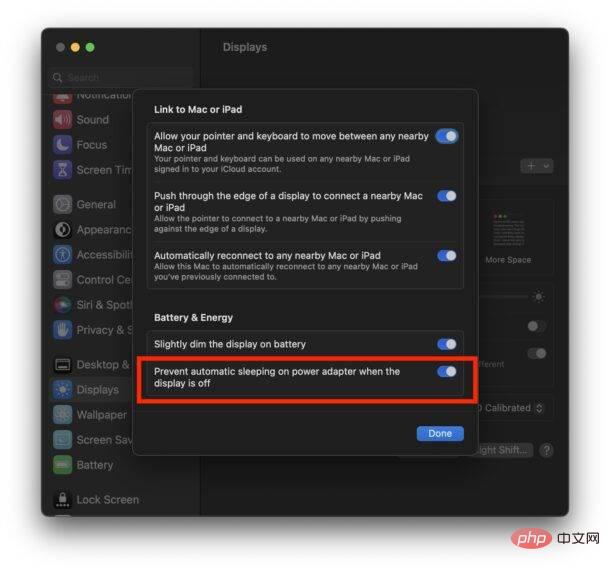 如何防止 Mac 在显示器关闭时进入睡眠状态 (MacOS Ventura)Apr 13, 2023 pm 12:31 PM
显示器关闭时如何防止 Mac 休眠如果您希望 Mac 显示器能够在整个计算机不进入睡眠状态的情况下关闭,请在此处进行适当的设置调整:下拉 Apple 菜单并转到“系统设置”转到“显示”点击“高级...”切换“防止显示器关闭时电源适配器自动休眠”的开关现在 Mac 显示屏可以关闭,同时防止 Mac 本身进入睡眠状态。这可能主要与 Mac 笔记本电脑用户相关,但即使是那些没有 MacBook 的用户也可能会发现该功能很有用。
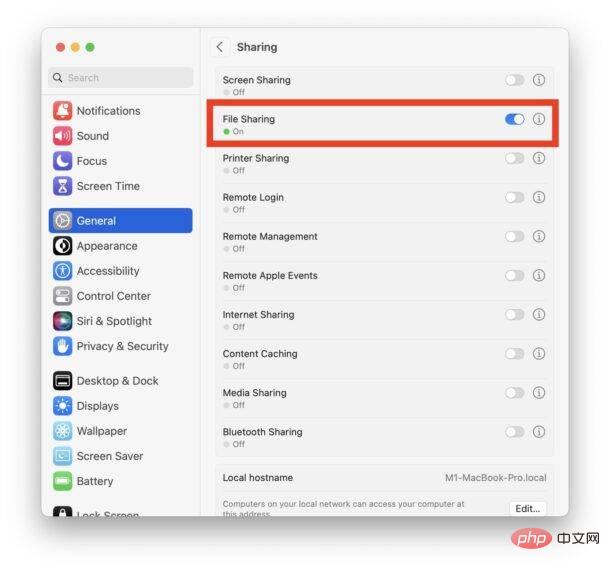 修复文件共享在 MacOS Ventura 中不起作用Apr 13, 2023 am 11:34 AM
修复 SMB 文件共享在 MacOS Ventura 中不起作用的问题从 Apple 菜单打开 Mac 上的“系统设置”应用程序转到“常规”,然后转到“共享”找到“文件共享”的开关并将其关闭通过转到 Apple 菜单并选择重新启动来重新启动 Mac重新启动后,返回共享系统设置面板并将“文件共享”重新设置为打开位置像往常一样恢复文件共享,它应该按预期工作如果 MacOS Ventura Mac 与另一台 Mac 或设备之间的文件共享突然再次停止工作,您可能需要在几天后或随机重复此过程。
 mac的shift键是哪个键Mar 13, 2023 pm 02:20 PM
mac的shift键是fn键上方、caps lock键下方的一个键,该键在键盘最左侧,由右下往上数第2个键;shift键是键盘中的上档转换键,可以通过“Ctrl+Shift”组合键来切换输入法。
 mac解压rar用什么软件Mar 03, 2023 pm 04:18 PM
mac解压rar的软件:1、The Unarchiver,是一款完全免费、小巧,而且非常易于使用的压缩、解压缩小工具;2、Keka,是一款免费、实用的压缩、解压缩工具,支持解压缩RAR格式的压缩包;3、360压缩大师,是一款免费的压缩、解压缩软件,完全支持RAR文件解压;4、MacZip,支持包括RAR在内的超过20种压缩格式的解压;5、BetterZip;6、FastZip。
 mac克隆是什么意思Jan 31, 2023 am 10:33 AM
mac克隆全称mac地址克隆,是固化在网卡上串行EEPROM中的物理地址,通常有48位长。mac克隆一般应用在路由器上,用户在用电脑直接拨号上网,后来又加了个路由器,通过路由器来实现多台电脑同时上网,这时要用到mac地址克隆了,就是把当前的电脑的mac地址克隆到路由器中去,因为运营商是把你的电脑mac地址绑定你的账号的,所以得克隆以后才能用。


Hot AI Tools

Undresser.AI Undress
AI-powered app for creating realistic nude photos

AI Clothes Remover
Online AI tool for removing clothes from photos.

Undress AI Tool
Undress images for free

Clothoff.io
AI clothes remover

AI Hentai Generator
Generate AI Hentai for free.

Hot Article
Hot Tools

SublimeText3 Chinese version
Chinese version, very easy to use

SublimeText3 English version
Recommended: Win version, supports code prompts!

MantisBT
Mantis is an easy-to-deploy web-based defect tracking tool designed to aid in product defect tracking. It requires PHP, MySQL and a web server. Check out our demo and hosting services.

Dreamweaver CS6
Visual web development tools

WebStorm Mac version
Useful JavaScript development tools

