


php Editor Xigua will introduce you how to change the account name in Win11 system. In Windows 11, changing your account name is a simple operation that can be completed in just a few steps. By changing your account name, you can personalize your user experience and make the system more consistent with your preferences and habits. Next, we will introduce in detail how to easily change the account name in Win11 system.
In Win11 system, changing the account name is a very simple operation. Whether it's for personalization or to better manage your user account, changing your account name is a common need. Below, I will introduce in detail how to change the account name in Win11 system.
Method 1: Change the account name through the Settings application
1. First, click the "Start" button in the lower left corner of the taskbar to open the Start menu.
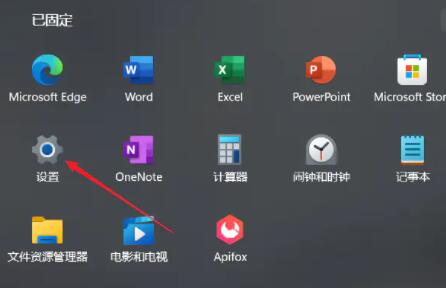
2. In the start menu, click the "Settings" icon to enter the system settings interface.
3. In the system settings interface, click the "Account" option on the left, and then click "Manage your Microsoft Account" in the "Your Information" section on the right.
4. At this time, the system will automatically open the default browser and jump to the Microsoft account management page.
5. On the Microsoft account management page, find the "Personal Information" column and click "Edit Personal Information".
6. On the edit profile page, find the "Change your name" option and click "Change".
7. In the change name page, enter the new account name you want to change and click "Save".
8. Return to the settings interface of the Win11 system, and you will find that the account name has been successfully changed.
Method 2: Change the account name through the control panel
1. Similarly, click the "Start" button in the lower left corner of the taskbar to open the start menu.
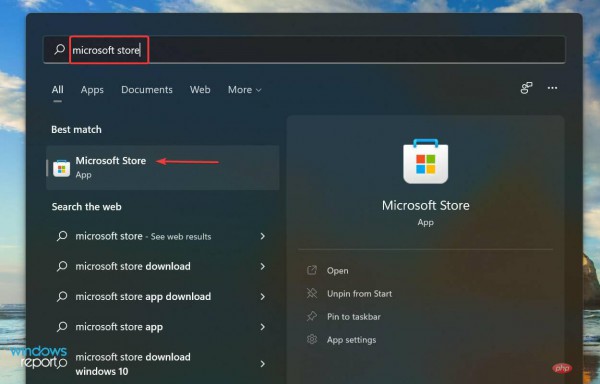
2. In the Start menu, search for and open "Control Panel."
3. In the control panel, select the "User Accounts" option.
4. In the user account interface, click "Change your account name".
5. Enter the new account name you want to change and click "Change Name".
6. Close the control panel and you will find that the account name has been changed successfully.
Whether it is through the settings application or the control panel, you can easily change the account name in the Win11 system. In this way, you can change your account name at any time according to your personal preferences or needs to make it more in line with your personalized needs.
It should be noted that changing the account name will only affect the display name and will not have any impact on the permissions and settings of the account itself. Therefore, you can safely change your account name without worrying about any damage to system functionality and data.
To sum up, the method to change the account name in Win11 system is very simple and can be completed in just a few simple steps. Hope the above tutorial is helpful to you!
The above is the detailed content of How to change account name in win11 system. For more information, please follow other related articles on the PHP Chinese website!

 在win11系统中如何调整虚拟内存?win11系统虚拟内存设置指南Jan 29, 2024 pm 06:45 PM
虚拟内存是一种可以弥补软件内存不足的技术,它能够提供更好的使用体验。然而,一些用户在升级到Windows11系统后可能不知道如何设置虚拟内存。为了解决这个问题,本站小编为大家提供了最新的设置方法。如果你需要了解完整的步骤,请访问本站获取详细信息。win11设置虚拟内存操作方法1、首先,按键盘win按键,点击找到并进入设置页面。3、接着,在里面找到相关链接中的高级系统设置选项。5、在跳转后的页面中,找到虚拟内存,点击更改按钮即可。
 Win11 HEVC扩展安装指南:如何正确安装HEVC视频扩展Jan 30, 2024 pm 02:12 PM
HEVC视频扩展是专业的视频网页浏览插件,能够帮助用户将高清的视频压缩并提升到高质量画质。那就有用户问了Win11系统怎么安装HEVC视频扩展?下面就和小编一起来看看详细教程。1、从MicrosoftStore购买并安装HEVC扩展按Windows+S启动搜索菜单,在顶部的文本字段中输入MicrosoftStore,然后单击出现的相关搜索结果。单击HEVCVideoExtension的搜索结果。完成付款以在Windows11中下载HEVC扩展程序。获得VLC媒体播放器后,无需在Windows11
 Win11设置音量的快捷键步骤Jan 12, 2024 pm 04:12 PM
你知道Win11怎么使用键盘快捷键来控制音量吗?今天就为大家带来详细的Win11设置音量快捷键方法,图文并茂,一起来看看吧!设置方法:1、右击桌面空白处,选择"新建"一个"快捷方式"。2、进入到新界面后,在请键入对象的位置中输入"%windir%System32SndVol.exe-f49825268",点击下一步。3、随后输入快捷方式的名称,系统会默认输入SndVol,点击完成。4、右击刚刚创建的快捷方式,选择选项列表中的"属性"。5、在打开的窗口中,找到"快捷键",设置一个自己想要使用的快捷
 Win11系统如何禁用通知Jan 30, 2024 pm 04:54 PM
Win11系统如何关闭消息提醒在使用Win11系统时,我们经常会收到各种消息提醒,比如系统更新、软件安装、邮件通知等。虽然这些消息提醒对于我们及时了解信息很有帮助,但有时候也会给我们带来一些干扰。如果你希望在特定情况下关闭Win11系统的消息提醒,下面是一些方法供你参考。方法一:使用系统设置关闭消息提醒1.点击Win11系统的“开始”按钮,然后点击“设置”图标。2.在设置窗口中,点击“系统”选项。3.在系统设置页面中,点击“通知和动作”选项。4.在通知和动作页面中,你可以看到各种消息提醒的开关。
 如何在 windows 11 上设置共享文件夹?Jan 30, 2024 pm 04:09 PM
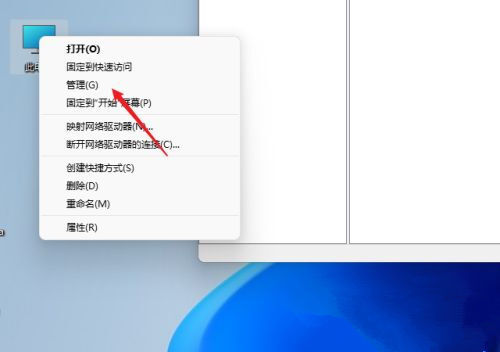
很多用户在将电脑升级为Win11系统后,发现之前设置的共享文件夹被关闭了,并且在新系统中不清楚如何重新设置启动。为了帮助广大用户解决这个问题,本站小编特意整理了最新的共享文件夹设置步骤,并在今天的Win11教程中与大家分享操作方法。如果您需要重新设置共享文件夹,请按照以下步骤进行操作。win11怎么设置共享文件夹为了安全起见,建议设置一个特殊共享账户。右键单击电脑图标,打开设置。3、打开创建新用户窗口,自己设置一个用户名与密码,把用户下次登录时须更改密码给取消。选择高级共享选项,勾选共享此文件夹
 win11系统的缩放比例设置及功能介绍Jan 29, 2024 pm 05:33 PM
在使用Win11系统时,许多用户需要使用缩放比例功能来调整界面。然而,由于这是一个新的系统,许多用户不知道缩放比例功能在哪里。因此,本站小编今天将与大家分享具体的位置和操作方法。有兴趣的用户可以在本站查看完整内容。win11缩放比例在哪:1、同时按下键盘的Win+i组合键打开设置。3、打开右边第一歌显示设置。
 Win11系统遇到蓝牙无法连接问题的解决方法Jan 29, 2024 pm 02:36 PM
Win11系统蓝牙无法使用怎么办随着Win11系统的推出,许多用户都迫不及待地升级了他们的电脑。然而,一些用户在升级后遇到了一个常见的问题:蓝牙无法使用。这对于那些依赖蓝牙设备的用户来说是一个令人沮丧的问题。幸运的是,有一些简单的解决方法可以帮助您解决这个问题。首先,您可以尝试重新启动您的电脑。有时候,只需简单地重新启动系统就可以解决一些问题,包括蓝牙无法使用的问题。在重新启动后,检查蓝牙是否正常工作。如果重新启动没有解决问题,那么您可以尝试更新蓝牙驱动程序。有时候,旧的或损坏的驱动程序可能会导
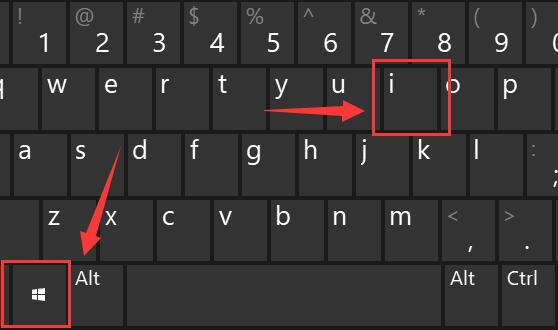
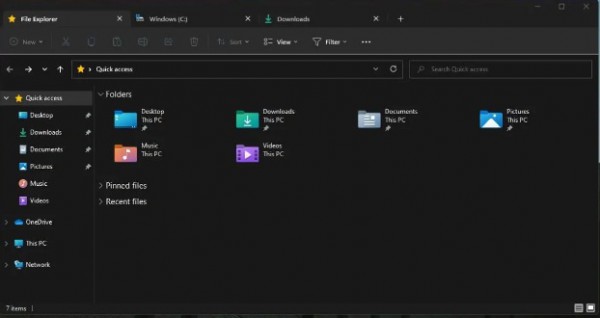 如何在win11 23H2中打开多个标签的文件管理器?详细说明Jan 29, 2024 pm 06:54 PM
win11系统自带了一个资源管理器多标签功能,他可以帮助用户们更加便捷的实现文件管理,可是不少的用户们在升级完23h2版本后发现不会开启文件管理器多标签,那么文件管理器多标签要怎么开启?用户们可以直接的输入explorer.exe命令就可以了。下面就让本站来为用户们来仔细的介绍一下win1123h2资源管理器多标签打开方法吧。win1123h2资源管理器多标签打开方法2、固定到任务栏,以后打开资源管理器就不用那么麻烦。4、点击左侧任务栏下面的外观和个性化。


Hot AI Tools

Undresser.AI Undress
AI-powered app for creating realistic nude photos

AI Clothes Remover
Online AI tool for removing clothes from photos.

Undress AI Tool
Undress images for free

Clothoff.io
AI clothes remover

AI Hentai Generator
Generate AI Hentai for free.

Hot Article
Hot Tools

SublimeText3 Mac version
God-level code editing software (SublimeText3)

SAP NetWeaver Server Adapter for Eclipse
Integrate Eclipse with SAP NetWeaver application server.

Atom editor mac version download
The most popular open source editor

mPDF
mPDF is a PHP library that can generate PDF files from UTF-8 encoded HTML. The original author, Ian Back, wrote mPDF to output PDF files "on the fly" from his website and handle different languages. It is slower than original scripts like HTML2FPDF and produces larger files when using Unicode fonts, but supports CSS styles etc. and has a lot of enhancements. Supports almost all languages, including RTL (Arabic and Hebrew) and CJK (Chinese, Japanese and Korean). Supports nested block-level elements (such as P, DIV),

SecLists
SecLists is the ultimate security tester's companion. It is a collection of various types of lists that are frequently used during security assessments, all in one place. SecLists helps make security testing more efficient and productive by conveniently providing all the lists a security tester might need. List types include usernames, passwords, URLs, fuzzing payloads, sensitive data patterns, web shells, and more. The tester can simply pull this repository onto a new test machine and he will have access to every type of list he needs.

