1. Introduction to Linux LVM
Linux Logical Volume Manager (LVM) is a tool for managing disks and storage space, providing flexible storage management through volume groups and logical volumes. The core concepts of LVM include physical volumes, volume groups and logical volumes.
- Physical Volume (PV): A physical volume is a physical hard disk or partition, which is used by LVM to store data. LVM combines one or more physical volumes into volume groups.
- Volume Group (VG): A volume group is a logical storage unit composed of one or more physical volumes. Logical volumes are created on volume groups, and they can dynamically allocate and reclaim storage space. A system can contain multiple volume groups.
- Logical Volume (LV): A logical volume is a logical storage unit created on a volume group. They can be formatted as a file system and mounted on the file system tree like ordinary hard disk partitions. The size and location of logical volumes can be dynamically adjusted at runtime without shutting down or restarting the system.
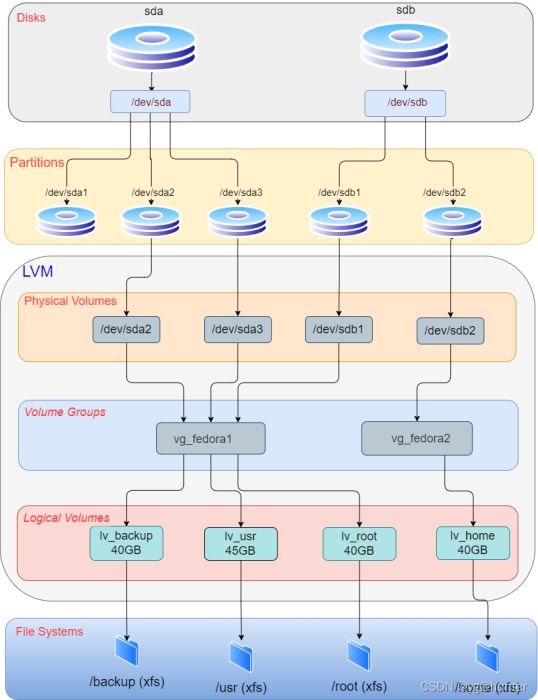
The following is a visual diagram of the working principle of LVM. Assume there are 5 different disks, each with a partition mapped to a physical volume (PV), and these disks are combined into a volume group (VG), which is split into two different logical volumes (LV), Each LV is used for one file system.
picture
Assume that a disk with 100GB space is divided on the ubuntu system. According to the LVM principle, the division level is as follows:
2.Linux system installation program default settings
When installing the Ubuntu system, a screen prompt will appear requiring approval of the storage layout. By default, the storage layout will include several small boot partitions and a third partition that LVM will use to create the root file system.
picture
picture
3. Use the default available space
By default in Ubuntu, the root file system uses less than half of the total disk space. You can use the df -h command to check the free space of the root file system.
As shown in the figure, only about 14% of the 49GB storage space is currently used. In actual use, this part of the space may be filled up quickly. So now the task is to expand this 49GB volume.
To check the existing free space on the volume group (the space left by the installation program's default settings), you can run: vgdisplay command to check the available space, as shown in the figure:
As you can see from the picture above, there is approximately 49.25GB of space available. Of course, the available space here may not be enough, as will be discussed below.
To use the available space on the volume group (VG) of the root logical volume (LV), you can first run: lvdisplay command to check the logical volume size, and then run:
lvextend -l +100%FREE /dev/ubuntu-vg/ubuntu-lv
Expand the LV to the maximum available size, and then run lvdisplay again to ensure that the change is successful, as shown in the figure:
At this time, the size of the block volume where the root file system is located has been increased, but the file system still needs to be expanded on top of it. Run df -h to check the root file system, and then run the command:
resize2fs /dev/mapper/ubuntu — vg-ubuntu — lv
Expand the file system, and run df -h again to confirm, as shown in the figure:
picture
You can see that the space left by the system by default has been allocated successfully. If the space is still not enough, you need to expand the basic disk to allocate more space.
4.Expand physical disk space
Assume that the expansion space plan is to expand the current 100GB to 200GB. In actual applications, the expanded space may be a virtual machine or a RAID controller or other storage system. First, execute the: cfdisk command to check and see whether the available space is listed. space, use q to exit after completion, as shown in the figure:
If you don’t see the available space listed, you can use:
echo 1>/sys/class/block/sda/device/rescan
Start the rescan of /dev/sda. After completion, re-run cfdisk. You should be able to see the new available space, as shown in the figure:
Select the /dev/sda3 partition from the list and select "Resize" from the bottom menu. Press the Enter key and it will prompt to confirm the new size. Press the Enter key again and you will see that the /dev/sda3 partition has the new space size.
Select "Write" from the bottom menu, enter yes to confirm, then press Enter, enter q to exit the program.
Now that the LVM partition of the /dev/sda3 physical volume (PV) has been extended, you need to extend the PV and run the command:
pvresize /dev/sda3
Perform this operation, and then use pvdisplay to check the new size, as shown in the figure:
picture
Now you can see that the PV has increased from 98.5GB to 198.5GB. Use vgdisplay again to check the available space of the volume group (VG), as shown in the figure:
picture
You can see that VG has 100GB of available space, continue to enter the command:
lvextend -l +100%FREE /dev/ubuntu-vg/ubuntu-lv
Expand LV to use up all available space of VG, and then execute the lvdisplay command to ensure the change is successful, as shown in the figure:
picture
At this time, the block volume of the root file system has been expanded, but the file system itself has not yet been resized to adapt to the new volume. First, check the current size of the file system with df -h, and then run the command:
resize2fs /dev/mapper/ubuntu — vg-ubuntu — lv
Adjust the size, and run df -h again to check the available space of the new file system, as shown in the figure:
picture
You can see that the physical disk has been successfully expanded and the available space has been extended up to the LVM abstraction layer. The root file system already has enough space.
The above is the detailed content of How to expand the default LVM space of Linux. For more information, please follow other related articles on the PHP Chinese website!
 解决win11开机未能正确启动的方法Jan 29, 2024 pm 04:45 PM
win11开机未能正确启动怎么办?我们在使用电脑的过程中会遇到电脑不能正常使用的问题出现,一般出现这种情况有很多,下面就让本站来为用户们来仔细的介绍一下win11开机未能正确启动解决方法吧。win11开机未能正确启动解决方法方法一:卸载新的应用程序如果电脑在安装新应用后未正确启动,可进入安全模式卸载它们以修复问题。1、在高级选项窗口中单击启动设置。2、在启动设置窗口中按F4以启用安全模式。3、成功进入安全模式系统之后按照正常流程卸载新安装的应用程序即可。方法二:执行系统还原之前我们提到了可能导致
 win10系统安装卡在海内存知己怎么办Jan 04, 2024 pm 11:50 PM
如果我们准备给自己的电脑安装win10操作系统的话,对于安装的过程中发现安装进度卡在海内存知己显示界面的情况,很多小伙伴不知道应该怎么解决。我们可以在系统设置中找到系统恢复,然后将电脑系统重置再重新升级安装即可。详细步骤就来看下小编是怎么解决的吧~win10系统安装卡在海内存知己怎么办方法一:大部分的时候,我们只需要重启电脑就可以正常进入系统了,非常方便。方法二:1、如果我们重启之后无法解决问题,那么可以进入安全模式下的windows设置当中。2、接着点击windows“更新和安全”选项。3、然
 如何在新的 SSD 上安装 macOSApr 13, 2023 pm 04:01 PM
如何使用 macOS Recovery 在新的 SSD 上安装 macOS在 2009 年之后生产的任何 Mac 上,都有一个内置的恢复系统。这允许您将 Mac 启动到恢复模式。在此模式下,您可以修复内部磁盘、从 Time Machine 备份恢复文件、获取在线帮助或重新安装 macOS。您必须能够连接到互联网才能使用这些工具。您可以使用 macOS 安装工具在计算机中安装的新 SSD 上安装 macOS。要使用 Internet Recovery 在 SSD 上安装 macOS:按照制造商针对
 Linux磁盘管理之LVM磁盘操作命令怎么使用May 23, 2023 pm 01:58 PM
LVM,LogicalVolumeManger,是linux内核提供的一种逻辑卷管理功能,由内核驱动和应用层工具组成,它是在硬盘的分区基础上,创建了一个逻辑层,可以非常灵活且非常方便的管理存储设备。LVM利用Linux内核的device-mapper功能来实现存储系统的虚拟化(系统分区独立于底层硬件)。通过LVM,可以实现存储空间的抽象化并在上面建立虚拟分区(virtualpartitions),可以更简便地扩大和缩小分区,可以增删分区时无需担心某个硬盘上没有足够的连续空间,避免为正在使用的磁盘
 linux用lvm吗Mar 13, 2023 am 11:25 AM
linux用lvm。LVM是指逻辑盘卷管理,是Linux环境下对磁盘分区进行管理的一种机制,LVM是建立在硬盘和分区之上的一个逻辑层,来提高磁盘分区管理的灵活性。LVM最大的特点就是可以对磁盘进行动态管理。因为逻辑卷的大小是可以动态调整的,而且不会丢失现有的数据;如果新增加了硬盘,其也不会改变现有上层的逻辑卷。作为一个动态磁盘管理机制,逻辑卷技术大大提高了磁盘管理的灵活性。
 Windows 7光盘系统的安装指南Dec 28, 2023 pm 08:41 PM
然后win10系统都已经出来很久了,但是win7系统依然是最受用户们喜爱的了,很多的用户们想要将电脑上的系统重装成win7系统,但是不知道怎么去操作,那就快来看看详细的教程吧~光盘系统安装步骤windows7:台式机win764位系统下载>>>台式机win732位系统下载>>>笔记本win764位系统下载>>>笔记本win732位系统下载>>>1.重启电脑,然后在开机界面出来的时候,按下U盘启动快捷键。点击查看你的电脑U盘启动键>
 如何删除联想预装系统重装Jan 29, 2024 pm 05:42 PM
如何删除联想预装系统重装联想电脑是一款备受欢迎的品牌,但很多用户可能对其预装的系统并不满意,希望能够删除预装系统并进行重装。本文将为大家介绍如何删除联想预装系统并进行重装的方法。第一步:备份重要数据在进行系统重装之前,务必备份重要的个人数据。因为重装系统会将硬盘上的所有数据清空,所以在操作之前,将重要的文件、照片、音乐等数据备份到外部存储设备或云盘中,以免丢失。第二步:准备系统安装介质在删除预装系统之前,需要准备一个可用的系统安装介质。可以选择使用官方原版的Windows系统安装盘或者制作一个启
 台式电脑重装系统步骤图文说明Jul 19, 2023 am 11:41 AM
电脑是我们生活中和工作中的好帮手,电脑在使用了一段时间后,系统就会卡顿。此时,就需要重装系统来解决,那么台式电脑怎么安装系统呢?下面小编就和大家分享电脑如何安装系统的步骤吧。1、下后的系统格式ISO文件,将ISO文件和NT6安装器(可自行下载)复制到电脑除C盘以外的其他盘的根目录下,两个文件要在同一目录。2、打开NT6安装器,打开后出现如下图,选择模式2安装。3、重启后进入如下图,在启动选择菜单按下图选择进入。4、点击下一步进入,要全新安装,点击“自定义(高级)”选项。5、点击自定义高级后,出现


Hot AI Tools

Undresser.AI Undress
AI-powered app for creating realistic nude photos

AI Clothes Remover
Online AI tool for removing clothes from photos.

Undress AI Tool
Undress images for free

Clothoff.io
AI clothes remover

AI Hentai Generator
Generate AI Hentai for free.

Hot Article

Hot Tools

SAP NetWeaver Server Adapter for Eclipse
Integrate Eclipse with SAP NetWeaver application server.

PhpStorm Mac version
The latest (2018.2.1) professional PHP integrated development tool

DVWA
Damn Vulnerable Web App (DVWA) is a PHP/MySQL web application that is very vulnerable. Its main goals are to be an aid for security professionals to test their skills and tools in a legal environment, to help web developers better understand the process of securing web applications, and to help teachers/students teach/learn in a classroom environment Web application security. The goal of DVWA is to practice some of the most common web vulnerabilities through a simple and straightforward interface, with varying degrees of difficulty. Please note that this software

SublimeText3 English version
Recommended: Win version, supports code prompts!

ZendStudio 13.5.1 Mac
Powerful PHP integrated development environment


