 Backend Development
 Python Tutorial
 Detailed explanation of how to change the default software source in Conda
Detailed explanation of the deletion steps of Conda source change settings, specific code examples are required
Introduction:
Conda is a commonly used open source software package management system, used in different Install, manage and uninstall various software packages on the operating system. When using Conda, we often need to use mirror sources to speed up the download and installation process of software packages. However, sometimes we may need to delete the previously set source configuration, or change to a different mirror source. This article will introduce in detail how to delete Conda source change settings and give specific code examples.
1. Check the current Conda mirror source settings
Before deleting the Conda source change settings, we need to check the current mirror source settings first. You can use the following command to view:
conda config --show-sources
After running the above command, the currently configured mirror source list will be listed. You can select the mirror source to be deleted based on this list.
2. Delete a single mirror source setting
If you need to delete a single mirror source setting, you can use the following command:
conda config --remove <镜像源名称>
Among them, <mirror source name></mirror> is the name of the mirror source that needs to be deleted, which can be selected from the list of mirror sources viewed in the previous step.
3. Delete all mirror source settings
If you need to delete all mirror source settings, you can use the following command:
conda config --remove-key channels
After running the above command, all mirror sources that have been set will be deleted.
4. Reset to the default image source
If you want to restore the Conda image source settings to the default settings, you can use the following command:
conda config --remove-key channels
conda config --add channels defaults
After running the above command, it will be deleted All mirror sources that have been set are restored to default settings.
5. Specific code examples
The following are some specific code examples, showing how to delete Conda source change settings:
- Delete a single mirror source setting:
conda config --remove conda-forge
The above code will delete the mirror source setting named "conda-forge".
- Delete all mirror source settings:
conda config --remove-key channels
The above code will delete all mirror sources that have been set.
- Reset to default mirror source:
conda config --remove-key channels
conda config --add channels defaults
The above code will delete all mirror sources that have been set and restore to the default settings.
Summary:
When using Conda, we often need to configure the mirror source to speed up the download and installation process of software packages. But sometimes we may need to delete the previously set source switching configuration, or change to a different mirror source. In this article, we introduce in detail how to delete Conda source change settings and give specific code examples. I hope this article will be helpful to friends who use Conda.
The above is the detailed content of Detailed explanation of how to change the default software source in Conda. For more information, please follow other related articles on the PHP Chinese website!
 如何调整Win10文件夹字体大小?Jun 30, 2023 pm 08:02 PM
win10电脑文件夹字体大小怎么设置?win10文件夹字体大小设置方法是首先点击左下角开始,然后选择打开设置。很多小伙伴不知道怎操作,小编下面整理了文件夹字体大小设置方法步骤,如果你感兴趣的话,跟着小编一起往下看看吧!文件夹字体大小设置方法步骤1、首先点击左下角开始,然后选择打开设置。2、之后去点击“系统”。3、点击左侧的“屏幕”。4、在右边找到“更改文本、应用等项目的大小”。5、最后点击下拉,选择100%即可。以上就是【win10电脑文件夹字体大小怎么设置-文件夹字体大小设置方法步骤】全部内容
 怎样设置win11电池充电上限Jul 01, 2023 pm 10:41 PM
怎样设置win11电池充电上限?用户想知道win11电脑中要怎么去设置电池充电上限呢,如果使用的是win11联想电脑,就打开电脑上的电脑管家,然后点击电池充电图标,点击更改电池阈值即可设置啦,若是华为win11电脑,就打开myasus软件,点击电池健康充电选项,选择保养模式即可开始设置电源充电上限啦,不会的话,小编下面整理了win11设置电池充电上限教程,一起往下看看吧!win11设置电池充电上限教程1、联想电脑需要先下载安装联想电脑管家2、打开它,点击底部的电池充电图标,点击上方的更改电池阈值
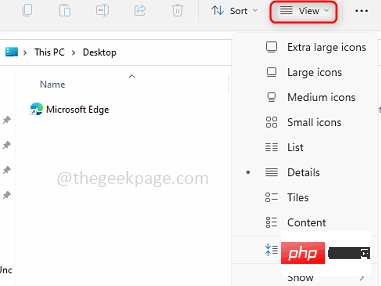 如何为所有文件夹在Windows 11中设置相同的文件夹视图?Apr 26, 2023 pm 10:31 PM
在Windows中,我们可以在文件资源管理器中查看文件夹、文件和其他文档。您可能已经观察到,很少有文件和文件夹具有较小的图标,而很少有较大的图标。因此可以理解,有一个定制选项可用。根据文件的性质,默认设置了不同的文件夹模板。例如,在包含照片的名为Picture的文件夹中,图像具有不同的视图。包含音乐文件的音乐文件夹将具有不同的模板。同样,对于文档、视频等文件夹,每个文件夹根据其类别包含不同的模板。您还可以选择文件夹的模板并将其设置为所有其他相同类型的文件夹。在本文中,我们将学习如何将文件夹视图应
 Win10分屏指南:如何设置分屏显示Jun 29, 2023 pm 10:37 PM
win10如何分屏操作?Win10系统中内置一个多窗口分屏功能,而这个功能很实用,不过有很多用户其实不知道要如何去为电脑进行分屏,其实实际操作起来还是非常简单的,下面就跟着小编一起来看看Win10设置分屏显示的方法,有需要的用户可不要错过。Win10设置分屏显示的指南第1步:同时单击(Windows键+I)打开Windows设置,或者您也可以单击Windows开始按钮,然后单击设置。第2步:单击系统并在左侧窗格中向下滚动,直到看到多任务处理选项。单击多任务处理。第3步:在右侧窗格中,通过单击切换
 如何在 iPhone 上使用多计时器与 iOS 17Jun 21, 2023 am 08:18 AM
什么是iOS17上的多计时器?在iOS17中,Apple现在为用户提供了在iPhone上一次设置多个计时器的能力。这是一个可喜的变化,许多人多年来一直期待的变化。时钟应用程序在iOS16之前只允许用户一次设置一个计时器,现在可用于激活任意数量的计时器,使其成为您一次完成多个任务的理想选择。您可以在计时器屏幕中设置任意数量的计时器。启动计时器后,所有活动计时器都将在锁屏界面和通知中心显示为“实时活动”通知。从这里,您可以查看计时器关闭、暂停或停止计时器的剩余时间,而无需打开时钟应用程序。当您在时钟
![如何为您的 Windows lComputer 设置首选频段 [2023]](https://img.php.cn/upload/article/000/465/014/168773917841923.png) 如何为您的 Windows lComputer 设置首选频段 [2023]Jun 26, 2023 am 08:26 AM
如何为您的 Windows lComputer 设置首选频段 [2023]Jun 26, 2023 am 08:26 AM几乎所有最新品牌的笔记本电脑都配备了双品牌WiFi。您可以将WiFi设置为5GHz或2.4GHz带宽。但是,事情并没有那么简单。笔记本电脑上的此功能很好地隐藏在设备管理器中,您无法从“设置”页面执行此操作。按照我们的指南为您的笔记本电脑、PC设置首选频段。注意–要切换到5GHz带宽WiFi,您需要WiFi路由器和设备都支持双频WiFi。如果它们中的任何一个都没有支持,则无法更改WiFi带宽。如何在设备上设置首选的WiFi频段设置首选频段以充分利用您的WiFi非常容易。方式1–设置首选频段步骤1–
 Win10专业版的鼠标dpi数值如何设置Jun 29, 2023 pm 02:08 PM
Win10专业版的鼠标dpi数值如何设置?鼠标是常用办公硬件之一,我们通常需要对鼠标的灵敏度进行调节,调整到合适我们使用的数值,不过很多用户对鼠标dpi比较陌生,不知鼠标dpi在哪里调,要怎么调,很多小伙伴不知道怎么详细操作,小编下面整理了Win10调鼠标dpi的技巧,如果你感兴趣的话,跟着小编一起往下看看吧! Win10调鼠标dpi的技巧 1、进入Windows设置选择打开备 2、左侧的选项栏切换到鼠标,在右侧的相关设置下选择他鼠标选项 3、在鼠标属性口将上方选项卡切换到针选项在下方的
 PHP入门指南:服务器安全设置May 20, 2023 pm 05:31 PM
PHP是一种广泛应用于Web开发的编程语言,它的应用范围很广,从简单的表单到复杂的电子商务网站都可以使用PHP来实现。然而,与任何其他Web应用程序一样,PHP应用程序也需要保证安全性。本文将介绍PHP入门指南:服务器安全设置。保持服务器程序更新第一步是确保服务器上所有相关程序都是最新版本。这包括操作系统、Web服务器、数据库服务器和PHP本身。经常升级服务


Hot AI Tools

Undresser.AI Undress
AI-powered app for creating realistic nude photos

AI Clothes Remover
Online AI tool for removing clothes from photos.

Undress AI Tool
Undress images for free

Clothoff.io
AI clothes remover

AI Hentai Generator
Generate AI Hentai for free.

Hot Article

Hot Tools

SAP NetWeaver Server Adapter for Eclipse
Integrate Eclipse with SAP NetWeaver application server.

Dreamweaver Mac version
Visual web development tools

ZendStudio 13.5.1 Mac
Powerful PHP integrated development environment

Atom editor mac version download
The most popular open source editor

SublimeText3 Linux new version
SublimeText3 Linux latest version


