Concise and easy-to-understand MyBatis introductory tutorial: write your first program step by step
MyBatis is a popular Java persistence layer framework that simplifies working with The process of database interaction. This tutorial will show you how to use MyBatis to create and perform simple database operations.
Step One: Environment Setup
First, make sure your Java development environment has been installed. Then, download the latest version of MyBatis and add it to your Java project. You can download the latest version from MyBatis’ official website.
Step 2: Create a database table
Create a sample table in your database to store student information. The structure of the table is as follows:
CREATE TABLE students (
    id INT PRIMARY KEY AUTO_INCREMENT,
    name VARCHAR(255),
    age INT,
    grade VARCHAR(255)
);
Step 3: Configure MyBatis
Create a configuration file named mybatis-config.xml in your Java project and add the following content :
<?xml version="1.0" encoding="UTF-8"?>
<!DOCTYPE configuration PUBLIC "-//mybatis.org//DTD Config 3.0//EN"
"http://mybatis.org/dtd/mybatis-3-config.dtd">
<configuration>
    <environments default="development">
        <environment id="development">
            <transactionManager type="JDBC"/>
            <dataSource type="POOLED">
                <property name="driver" value="com.mysql.jdbc.Driver"/>
                <property name="url" value="jdbc:mysql://localhost:3306/mydatabase"/>
                <property name="username" value="root"/>
                <property name="password" value="password"/>
            </dataSource>
        </environment>
    </environments>
    <mappers>
        <mapper resource="mapper/StudentMapper.xml"/>
    </mappers>
</configuration>
Please make sure to change the URL, username and password to the actual values for your database.
Step 4: Create Mapper interface
Create a StudentMapper.java interface in your Java project to define methods for interacting with the database. The following is a sample code:
import java.util.List;

public interface StudentMapper {

    List<Student> getAllStudents();

    void insertStudent(Student student);

}
Step 5: Write Mapper XML file
Create a file named StudentMapper in the resources/mapper directory of your Java project. xml file and add the following:
<?xml version="1.0" encoding="UTF-8"?>
<!DOCTYPE mapper PUBLIC "-//mybatis.org//DTD Mapper 3.0//EN"
"http://mybatis.org/dtd/mybatis-3-mapper.dtd">
<mapper namespace="com.example.mapper.StudentMapper">

    <select id="getAllStudents" resultType="com.example.model.Student">
        SELECT * FROM students
    </select>

    <insert id="insertStudent" parameterType="com.example.model.Student">
        INSERT INTO students (name, age, grade)
        VALUES (#{name}, #{age}, #{grade})
    </insert>

</mapper>
Be sure to change the namespace to the full class name of your Mapper interface.
Step Six: Create Entity Class
Create a Student.java class in your Java project to represent the student's entity. The following is a sample code:
public class Student {

    private int id;
    private String name;
    private int age;
    private String grade;

    // Getters and setters

}
Step 7: Write a test class
Create a test class named Main.java and add the following code:
import com.example.mapper.StudentMapper;
import com.example.model.Student;
import org.apache.ibatis.io.Resources;
import org.apache.ibatis.session.SqlSession;
import org.apache.ibatis.session.SqlSessionFactory;
import org.apache.ibatis.session.SqlSessionFactoryBuilder;

import java.io.InputStream;
import java.util.List;

public class Main {

    public static void main(String[] args) throws Exception {
        // 读取MyBatis配置文件
        InputStream inputStream = Resources.getResourceAsStream("mybatis-config.xml");
        // 创建SqlSessionFactory对象
        SqlSessionFactory sqlSessionFactory = new SqlSessionFactoryBuilder().build(inputStream);
        // 创建SqlSession对象
        try (SqlSession sqlSession = sqlSessionFactory.openSession()) {
            // 获取Mapper接口的实例
            StudentMapper studentMapper = sqlSession.getMapper(StudentMapper.class);

            // 查询所有学生
            List<Student> students = studentMapper.getAllStudents();
            for (Student student : students) {
                System.out.println(student);
            }

            // 插入一个新学生
            Student newStudent = new Student();
            newStudent.setName("张三");
            newStudent.setAge(20);
            newStudent.setGrade("大一");
            studentMapper.insertStudent(newStudent);
            sqlSession.commit();
        }
    }
}
Please make sure to change the package name and class name to the correct values in your actual project.
Step 8: Run the program
Now you can run Main.java and observe the output in the console. You should be able to see the query results and the results of the insert operation.
Summary
Congratulations! You have successfully written your first MyBatis program. In this tutorial, we introduce the basic concepts and usage of MyBatis, and demonstrate how to use MyBatis to perform database operations through a simple sample program. I hope this tutorial will be helpful for you to learn and master MyBatis. Happy coding!
The above is the detailed content of Beginner's Guide: Start from scratch and learn MyBatis step by step. For more information, please follow other related articles on the PHP Chinese website!
 Java之Mybatis的二级缓存怎么使用May 24, 2023 pm 06:16 PM
缓存的概述和分类概述缓存就是一块内存空间.保存临时数据为什么使用缓存将数据源(数据库或者文件)中的数据读取出来存放到缓存中,再次获取的时候,直接从缓存中获取,可以减少和数据库交互的次数,这样可以提升程序的性能!缓存的适用情况适用于缓存的:经常查询但不经常修改的(eg:省市,类别数据),数据的正确与否对最终结果影响不大的不适用缓存的:经常改变的数据,敏感数据(例如:股市的牌价,银行的汇率,银行卡里面的钱)等等MyBatis缓存类别一级缓存:它是sqlSession对象的缓存,自带的(不需要配置)不
 怎么使用springboot+mybatis拦截器实现水平分表May 14, 2023 pm 06:43 PM
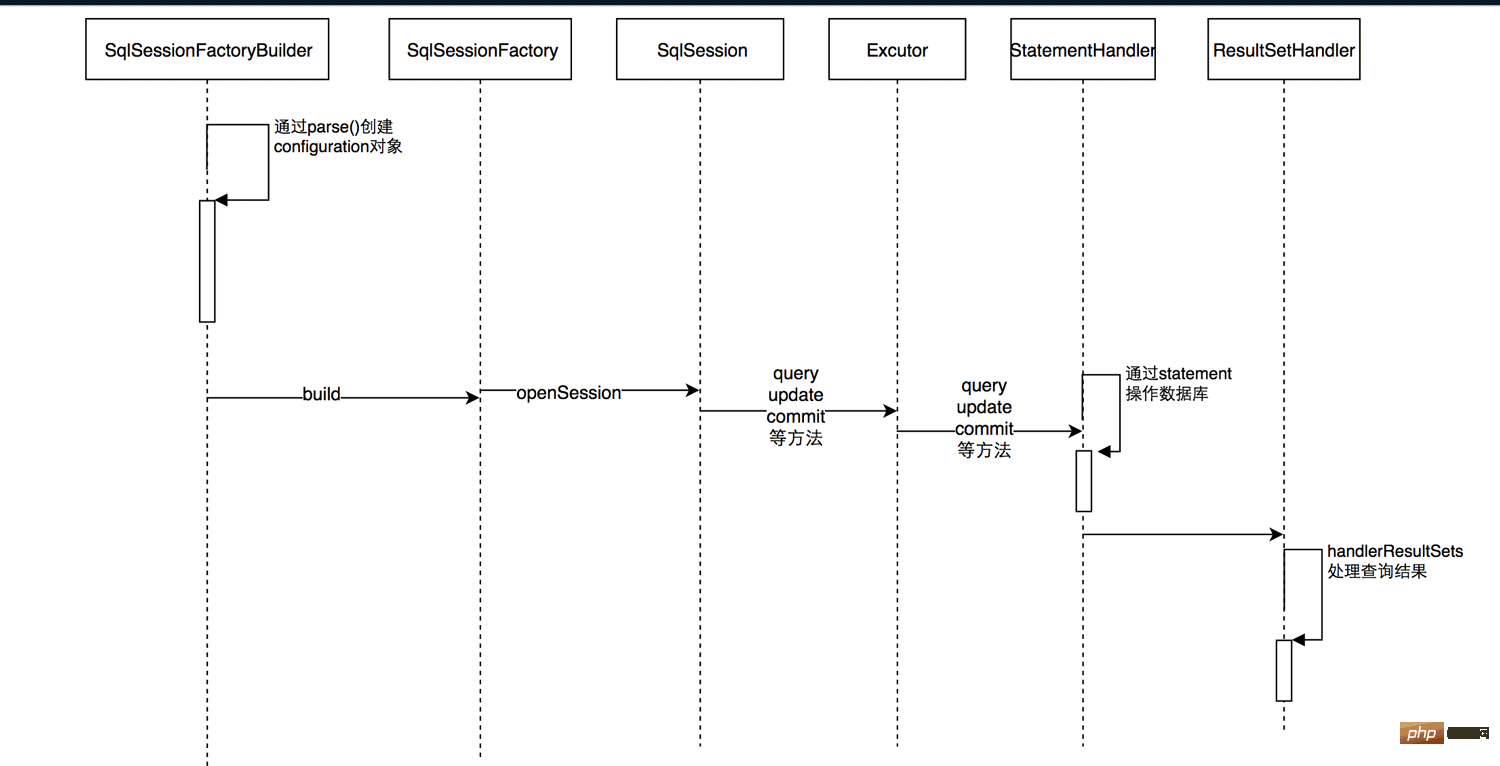
MyBatis允许使用插件来拦截的方法Executor(update,query,flushStatements,commit,rollback,getTransaction,close,isClosed)ParameterHandler(getParameterObject,setParameters)ResultSetHandler(handleResultSets,handleOutputParameters)StatementHandler(prepare,parameterize,ba
 mybatis分页的几种方式Jan 04, 2023 pm 04:23 PM
mybatis分页的方式:1、借助数组进行分页,首先查询出全部数据,然后再list中截取需要的部分。2、借助Sql语句进行分页,在sql语句后面添加limit分页语句即可。3、利用拦截器分页,通过拦截器给sql语句末尾加上limit语句来分页查询。4、利用RowBounds实现分页,需要一次获取所有符合条件的数据,然后在内存中对大数据进行操作即可实现分页效果。
 springboot怎么整合mybatis分页拦截器May 13, 2023 pm 04:31 PM
简介今天开发时想将自己写好的代码拿来优化,因为不想在开发服弄,怕搞坏了到时候GIT到生产服一大堆问题,然后把它分离到我轮子(工具)项目上,最后运行后发现我获取List的时候很卡至少10秒,我惊了平时也就我的正常版本是800ms左右(不要看它很久,因为数据量很大,也很正常。),前提是我也知道很慢,就等的确需要优化时,我在放出我优化的plus版本,回到10秒哪里,最开始我刚刚接到这个app项目时,在我用PageHelper.startPage(page,num);(分页),还没等查到的数据封装(Pa
 springboot配置mybatis的sql执行超时时间怎么解决May 15, 2023 pm 06:10 PM
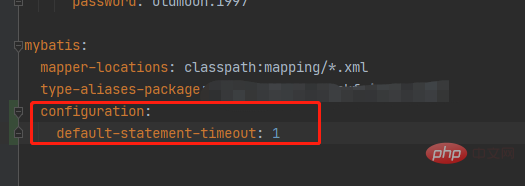
当某些sql因为不知名原因堵塞时,为了不影响后台服务运行,想要给sql增加执行时间限制,超时后就抛异常,保证后台线程不会因为sql堵塞而堵塞。一、yml全局配置单数据源可以,多数据源时会失效二、java配置类配置成功抛出超时异常。importcom.alibaba.druid.pool.DruidDataSource;importcom.alibaba.druid.spring.boot.autoconfigure.DruidDataSourceBuilder;importorg.apache.
 mybatis怎么调用mysql存储过程并获取返回值May 27, 2023 am 09:01 AM
mybatis调用mysql存储过程并获取返回值1、mysql创建存储过程#结束符号默认;,delimiter$$语句表示结束符号变更为$$delimiter$$CREATEPROCEDURE`demo`(INinStrVARCHAR(100),outourStrVARCHAR(4000))BEGINSETourStr='01';if(inStr=='02')thensetourStr='02';en
 Java Mybatis一级缓存和二级缓存是什么Apr 25, 2023 pm 02:10 PM
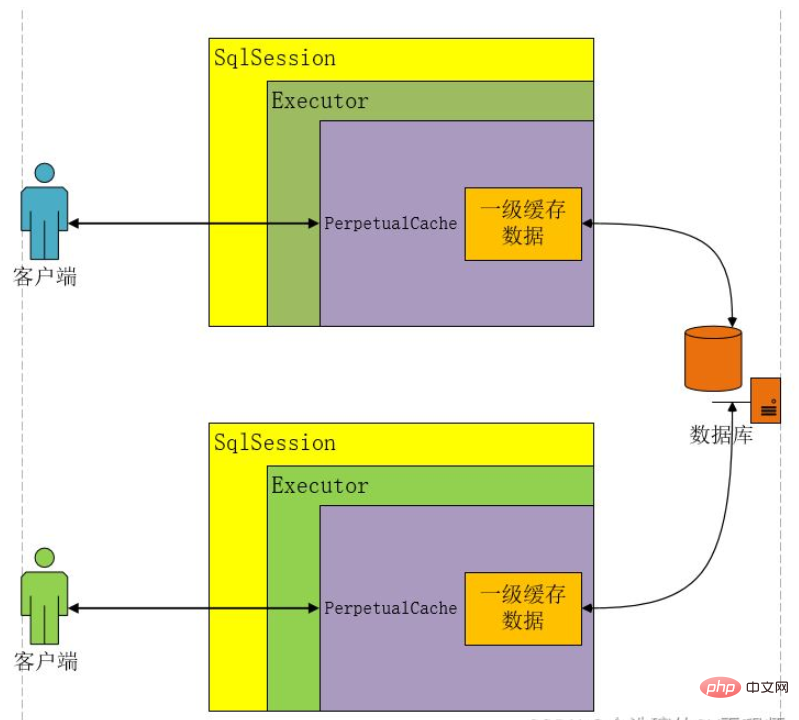
一、什么是缓存缓存是内存当中一块存储数据的区域,目的是提高查询效率。MyBatis会将查询结果存储在缓存当中,当下次执行相同的SQL时不访问数据库,而是直接从缓存中获取结果,从而减少服务器的压力。什么是缓存?存在于内存中的一块数据。缓存有什么作用?减少程序和数据库的交互,提高查询效率,降低服务器和数据库的压力。什么样的数据使用缓存?经常查询但不常改变的,改变后对结果影响不大的数据。MyBatis缓存分为哪几类?一级缓存和二级缓存如何判断两次Sql是相同的?查询的Sql语句相同传递的参数值相同对结
 SpringBoot怎么打印mybatis的执行sql问题May 15, 2023 pm 10:55 PM
SpringBoot打印mybatis的执行sql1、使用场景应为在开发过程之中跟踪后端SQL语句,因什么原因导致的错误。需要在Debug过程之中打印出执行的SQL语句。所以需要配置一下SpringBoot之中,Mybatis打印SQL语句。2、具体实现application.properties(yml)中配置的两种方式:1.logging.level.dao包名(daopackage)=debug2.mybatis.configuration.log-impl=org.apache.ibat


Hot AI Tools

Undresser.AI Undress
AI-powered app for creating realistic nude photos

AI Clothes Remover
Online AI tool for removing clothes from photos.

Undress AI Tool
Undress images for free

Clothoff.io
AI clothes remover

AI Hentai Generator
Generate AI Hentai for free.

Hot Article

Hot Tools

EditPlus Chinese cracked version
Small size, syntax highlighting, does not support code prompt function

Safe Exam Browser
Safe Exam Browser is a secure browser environment for taking online exams securely. This software turns any computer into a secure workstation. It controls access to any utility and prevents students from using unauthorized resources.

Dreamweaver CS6
Visual web development tools

SublimeText3 Linux new version
SublimeText3 Linux latest version

mPDF
mPDF is a PHP library that can generate PDF files from UTF-8 encoded HTML. The original author, Ian Back, wrote mPDF to output PDF files "on the fly" from his website and handle different languages. It is slower than original scripts like HTML2FPDF and produces larger files when using Unicode fonts, but supports CSS styles etc. and has a lot of enhancements. Supports almost all languages, including RTL (Arabic and Hebrew) and CJK (Chinese, Japanese and Korean). Supports nested block-level elements (such as P, DIV),


