


php editor Xinyi introduces you two methods to set the "read-only mode" of Excel tables to make your data safer. At work, it is particularly important to protect the security of data. By setting read-only mode, you can prevent others from modifying the table content and ensure the integrity and accuracy of the data. Next, we will introduce the operation steps of these two methods in detail, allowing you to easily deal with various data protection needs.
1. Passwordless “read-only mode”
If you mainly want to prevent yourself from accidentally modifying the table, you can set a "read-only mode" without a password.
After opening the Excel table, click [File]-[Information]-[Protect Workbook]-[Always open as read-only].
Then close the form and save it, and Excel's "read-only mode" will be set.

When you open the form again, a dialog box will pop up, prompting "Do you want to open it in read-only mode?"
If you select [Yes] to open it in read-only mode, even if the Excel table is modified, the original file cannot be saved. If you select [No], the opened Excel table is not in "read-only mode" and can be modified and saved normally.

"Passwordless read-only mode" is no longer needed in the future and can be cancelled.
First of all, we must operate in "non-read-only mode", that is, after opening the Excel table, when the prompt box "Do you want to open it in read-only mode" appears, select [No].
Then follow the set operation path and click [File]-[Information]-[Protect Workbook]-[Always open as read-only] again. After saving the table, Excel's "passwordless read-only mode" is released.

2. "Read-only mode" with password
If we want to prevent others from modifying the Excel table, or specify that people can modify it, we can set a password-protected "read-only mode" for the Excel table.
This mode needs to be set through "Save As". After opening the Excel table, click [Save As] under the [File] option, and then select the save path after saving on the right.

After the dialog box pops up, click [General Options] in the [Tools] list below. The file name can be modified to save it as a new file, or the original file can be directly overwritten without modification.

After the dialog box pops up again, enter the password you want to set in the [Modify permission password] column, click [OK] and enter it again. The "Read-only mode with password" of the Excel table will be set.

Open the Excel table again, and a dialog box will pop up, prompting "Enter the password to obtain read and write permissions, or open it in read-only mode."
If you select [Read-only], it is the same as the first method. You can open the Excel table, but after the table is modified, the original file cannot be saved; if you want to edit the file and save it, you need to enter a password before it can work normally. Edit and save.

How to remove the "read-only mode with password"?
After opening the Excel table, we enter the "editable mode" through the password, then follow the set operation path, click [File] - [Save As] again, select the save path after saving, and then click [Tools] - [General] Options].
Finally, the dialog box below will pop up. You can see that the [Modify Permission Password] column already contains a password. Delete this line of password, turn it into a blank space, and then save it. The "password read-only mode" of the original Excel table has been removed.

If you forget your password, you can actually remove the "read-only mode" of the Excel table. You only need to save the table as a new table in the "read-only" state without setting a password.
Of course, if we don’t remember the password, we can also use other tools, such as the Pepsi Niu Excel Password Recovery Tool, which can directly remove the "read-only mode" of the Excel table or the "restricted editing" that cannot be lifted without a password.
After selecting the [Unrestriction] module in the tool, then import the Excel table.
Tool link: Pepsi Niu Excel Password Recovery Tool

After selecting the [Unrestriction] module in the tool, then import the Excel table.

The above is the detailed content of Two methods to set the 'read-only mode' of an Excel table. For more information, please follow other related articles on the PHP Chinese website!

 I Always Name Ranges in Excel, and You Should TooApr 19, 2025 am 12:56 AM
Improve Excel efficiency: Make good use of named regions By default, Microsoft Excel cells are named after column-row coordinates, such as A1 or B2. However, you can assign more specific names to a cell or cell range, improving navigation, making formulas clearer, and ultimately saving time. Why always name regions in Excel? You may be familiar with bookmarks in Microsoft Word, which are invisible signposts for the specified locations in your document, and you can jump to where you want at any time. Microsoft Excel has a bit of a unimaginative alternative to this time-saving tool called "names" and is accessible via the name box in the upper left corner of the workbook. Related content #
 Insert checkbox in Excel: create interactive checklist or to-do listApr 18, 2025 am 10:21 AM
This tutorial shows you how to create interactive Excel checklists, to-do lists, reports, and charts using checkboxes. Checkboxes, also known as tick boxes or selection boxes, are small squares you click to select or deselect options. Adding them to
 Excel Advanced Filter – how to create and useApr 18, 2025 am 10:05 AM
This tutorial unveils the power of Excel's Advanced Filter, guiding you through its use in retrieving records based on complex criteria. Unlike the standard AutoFilter, which handles simpler filtering tasks, the Advanced Filter offers precise contro
 How to use Advanced Filter in Excel - criteria range examples with formulasApr 18, 2025 am 09:05 AM
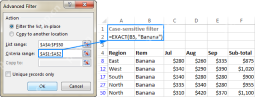
The tutorial shows how to use Advanced Filter in Excel and provides a number of non-trivial criteria range examples to create a case-sensitive filter, find matches and differences between two columns, extract records that match a smaller
 Excel Filter: How to add, use and removeApr 18, 2025 am 09:04 AM
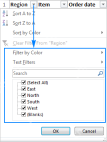
This tutorial shows you how to effectively filter data in Excel. We'll cover filtering text, numbers, and dates, using search functions, and filtering by color or cell value. We'll also show you how to remove filters and troubleshoot common issues.
 How to Make Your Excel Spreadsheet Accessible to AllApr 18, 2025 am 01:06 AM
Improve the accessibility of Excel tables: A practical guide When creating a Microsoft Excel workbook, be sure to take the necessary steps to make sure everyone has access to it, especially if you plan to share the workbook with others. This guide will share some practical tips to help you achieve this. Use a descriptive worksheet name One way to improve accessibility of Excel workbooks is to change the name of the worksheet. By default, Excel worksheets are named Sheet1, Sheet2, Sheet3, etc. This non-descriptive numbering system will continue when you click " " to add a new worksheet. There are multiple benefits to changing the worksheet name to make it more accurate to describe the worksheet content: carry
 Excel Paste Special: shortcuts to copy values, comments, column width, etc.Apr 17, 2025 am 11:54 AM
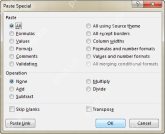
This tutorial unlocks the power of Excel's Paste Special feature, showing you how to significantly boost your efficiency with paste special shortcuts. Learn to paste values, formulas, comments, formats, column widths, and more, all while avoiding co
 How to add, copy and delete multiple checkboxes in ExcelApr 17, 2025 am 11:01 AM
This tutorial shows you how to efficiently add, modify, and delete multiple checkboxes in Excel. Last week, we explored using checkboxes for checklists, conditional formatting, interactive reports, and dynamic charts. This week, we'll focus on the


Hot AI Tools

Undresser.AI Undress
AI-powered app for creating realistic nude photos

AI Clothes Remover
Online AI tool for removing clothes from photos.

Undress AI Tool
Undress images for free

Clothoff.io
AI clothes remover

AI Hentai Generator
Generate AI Hentai for free.

Hot Article
Hot Tools

MantisBT
Mantis is an easy-to-deploy web-based defect tracking tool designed to aid in product defect tracking. It requires PHP, MySQL and a web server. Check out our demo and hosting services.

SublimeText3 Linux new version
SublimeText3 Linux latest version

SublimeText3 Chinese version
Chinese version, very easy to use

Atom editor mac version download
The most popular open source editor

SublimeText3 Mac version
God-level code editing software (SublimeText3)

