


How to edit PDFs on iPhone using the Files app

Apple provides the function of directly editing PDF on iPhone to improve users' work efficiency. By using the built-in editing tools on the Files app, you can easily rotate pages, add new pages, delete existing pages, and insert documents, photos, signatures, text, and other elements into PDFs. This feature makes editing and modifying PDF files very convenient and flexible. Whether at work or in daily life, this feature can help users complete tasks more efficiently.
In this article, we will help you explain all the ways to edit PDF using the Files app on iPhone.
How to enter editing mode for PDF files on iPhone
- Open the Files app on iPhone and select the PDF file you want to edit.

- When the PDF file opens in full screen, quickly swipe right from the left edge of the phone.
- This should open the PDF file's edit mode, displaying all pages available in the document in thumbnail view in the left sidebar.
NOTE: The gesture of swiping from the left edge sometimes has issues. If it doesn't finish quickly, it will open the previous document/file in the Files app. - Once you enter edit mode, you can follow the guide below to start making changes to your PDF.

How to Edit PDF on iPhone
Once you enter edit mode, you can start making changes to the file.
1. Rearrange pages of PDF files
The new editing mode allows you to move pages in the same file from one position to another so that you can rearrange them according to your preference they.
- Long press the page in the left sidebar and start dragging it until the overflow menu disappears.
- Once the page is draggable, move the page to where you want it to appear in the PDF file.
- After dragging the page to your preferred position, lift your finger to rearrange it.
- Repeat the above steps to rearrange other pages in the PDF.
2. Rotate pages in a PDF document
You can rotate individual pages in a PDF to make them seamless when reading or viewing them in the future. This is important for scanned documents that you save on the Files app without formatting.
- To rotate a page in a PDF, enter edit mode and find the page from the thumbnails on the left sidebar.
- You can bring up the rotation method options:
Long press on the page
or select the page and click on the 3-dot icon - This will open a An overflow menu with options for editing PDFs. Depending on how you want to rotate the page, select Rotate Left or Rotate Right from this overflow menu.
- You can rotate it 180 degrees by clicking "Rotate Left" or "Rotate Right" twice.
- If you make no further changes to the PDF file, you can save your edits by clicking "Done" in the upper left corner.


3. Add a blank page to a PDF
When working with a PDF with multiple pages, you may sometimes feel the need to add a blank page. to use as a separator or to add more details to the document.
- To add a blank page to a PDF file, you need to enter edit mode and then find the page you want to add a blank page from the left sidebar.
- To add a blank page after it, tap and hold on the selected page for additional options. You can also get them by selecting this page and clicking on the 3 dot icon within it.
- In the overflow menu that appears, select Insert Blank Page.
- After selecting this option, you should now see a blank page immediately following the selected page in the PDF file.
- When you create a blank page, the Markup tool in the Files app loads automatically to add more details to the document as needed. If you'd like the blank page to remain as is, you can save your changes by clicking "Done" in the upper left corner.


4. Add images to PDF
In addition to creating blank pages, you can also add pictures from the gallery as pages in the PDF document. Before you do this, you need to make sure you have the image you want to add on your iPhone.
- Open the file and enter edit mode.
- From the sidebar that appears on the left, find the page where you want to add the image.
- To add an image to a PDF, long-press on the selected page for additional options, or click on the 3-dot icon inside the thumbnail after selecting the page. When the overflow menu appears, click Insert from File.
- On the next screen, browse your library and click on it to open the image you want to add.
- The image will now be added as a page to the PDF file.
- If you make no further changes to the PDF file, you can save your edits by clicking "Done" in the upper left corner.


5. Scan the page to add
If you don’t have an image in your gallery, but have a physical copy of the page or document you want to add to the PDF, you can also add it to in the file.
- First, enter edit mode and select the page to which you want to add a scanned copy of the document.
- To add scanned documents to PDF, long press on the selected page and select Scan page.
- This will load the built-in camera in the Files app. You can now physically scan the document at hand by pointing your camera at it and clicking the shutter button.
- If you are satisfied with the scan results, click "Keep Scan" in the lower right corner. You can repeat this step to add more scanned pages to the PDF.
- After scanning and saving all pages, click Save in the lower right corner.
- The scanned pages will now appear in your PDF file.
- To save the PDF file, you can click Done in the upper left corner.


6. Delete Pages
- To delete unwanted pages from a PDF file, enter edit mode in the PDF file.
- When edit mode is active, long press on the page you want to delete.
- From the overflow menu that appears, select Delete.
- The page will now be removed from the document and you can save changes by clicking "Done" in the upper left corner.


7. Undo/Redo Changes
We are all human. Sometimes, errors can occur while making changes to PDF files. Edit mode allows you to undo and redo the changes you make one by one, as long as they are not completed before you click Done.
- When editing a PDF file, you can undo or redo changes by clicking the markup icon in the upper right corner of the screen.
- You can click the left curled arrow icon to undo your changes, or the right curled arrow icon to redo your changes.
- Once you have done this, you can exit marking mode by tapping the marking icon again.


8. Add text, signatures, shapes, and other elements
The markup tool has been around on iOS for a long time, and it doesn’t just let you undo /Redo changes to the document and much more. You can use Markup to add text or signatures to PDFs, draw and doodle on the page, annotate content using shapes and arrows, and add a magnifying glass to highlight content. You can use markup tools in PDF files without entering edit mode.
- To bring up markup, simply open the PDF in the Files app and tap the Markup icon in the upper right corner.
When Markup mode is active, you can make the following changes to the document. - Draw with pen, highlighter, or pencil: Choose one of the six tools at the bottom to scribble on the page to give it a personal touch. You can also use the erase tool to undo specific changes and the ruler to draw a straight line at the desired angle.
- Add a signature or text to the page: You can do this by clicking the button in the lower right corner and selecting text or signature.
What it might look like:
- Add a magnifying glass: If you want to highlight or enlarge a specific part of the text, you can do so by clicking the button and selecting from Select Magnifying Glass from the menu to add a magnifying glass.
What it might look like:
- Annotate using shapes and arrows: You can use the Markup tool to annotate PDF files with boxes and arrows Annotate items in the boxes and arrows available by clicking the icon in the lower right corner.
Here's an example:


#How to lock a PDF file with a password
In addition to allowing you to use the Files app In addition to editing PDFs, Apple offers a way to password-protect PDF files using the Files app.
The above is the detailed content of How to edit PDFs on iPhone using the Files app. For more information, please follow other related articles on the PHP Chinese website!

 I Love My AirPods, but I'm Not Sure I'll Buy Another PairMay 15, 2025 pm 12:05 PM
My AirPods have been experiencing various issues after five years of heavy use, including buzzing, power drain, microphone problems, and ineffective active noise cancellation (ANC). The design of the AirPods feels flawed, as they don't stay in place
 iOS 17.6.1 & iPad 17.6.1 Released with Bug FixesMay 15, 2025 am 10:34 AM
Another day, another round of system software updates, such is the life of a modern Apple device user in this particular era of the two thousand and twenty fourth summer on planet Earth, Anno Domini. As the globe rotates to register a new day, you wi
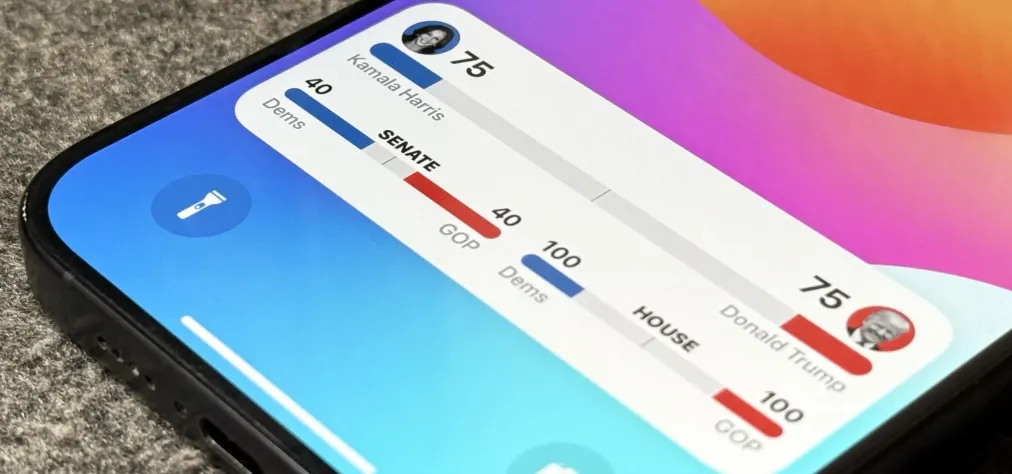 Follow the 2024 Election Results in Real Time with Apple News' Live Activity for iPhone, iPad, and Apple Watch May 15, 2025 am 10:27 AM
Today marks Election Day, and Apple News is simplifying the process of staying updated with real-time results for the 2024 presidential election through its innovative Live Activity feature available on your iPhone, iPad, or Apple Watch.The 2024 elec
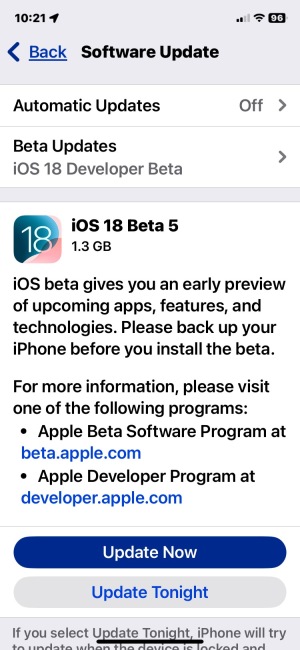 iOS 18 Beta 5 & iPadOS 18 Beta 5 Released for TestingMay 15, 2025 am 10:22 AM
iOS 18 beta 5 and iPadOS 18 beta 5 are now open for testing. These beta 5 updates are currently only for registered developers beta testers. Usually, shortly after the developer beta is released, public betas of the same build will be released, in which case it will be marked as public beta 3. iOS 18 is for iPhone, while iPadOS 18 is for iPad, both of which include a number of new features and capabilities, including a new password app, dark mode icons and widget options, color shading of icons and widgets, customization of control center, redesigned photo app, Apple Intelligence AI capabilities
 iOS 17.6 & iPad 17.6 Released for iPhone & iPadMay 15, 2025 am 09:34 AM
Apple has recently released software updates for both iPhone and iPad, specifically iOS 17.6 and iPadOS 17.6.These updates focus primarily on fixing bugs and enhancing security, without introducing any new functionalities or modifications to the syst
 Updated Beta 4 of iOS 18 & iPadOS 18 ReleasedMay 15, 2025 am 09:25 AM
Apple has released the updated 4th beta versions for iOS 18 and iPadOS 18, with the build number being 22A5316k.The exact purpose behind the release of this new 4th beta build remains unspecified. However, considering its modest size and swift rollou
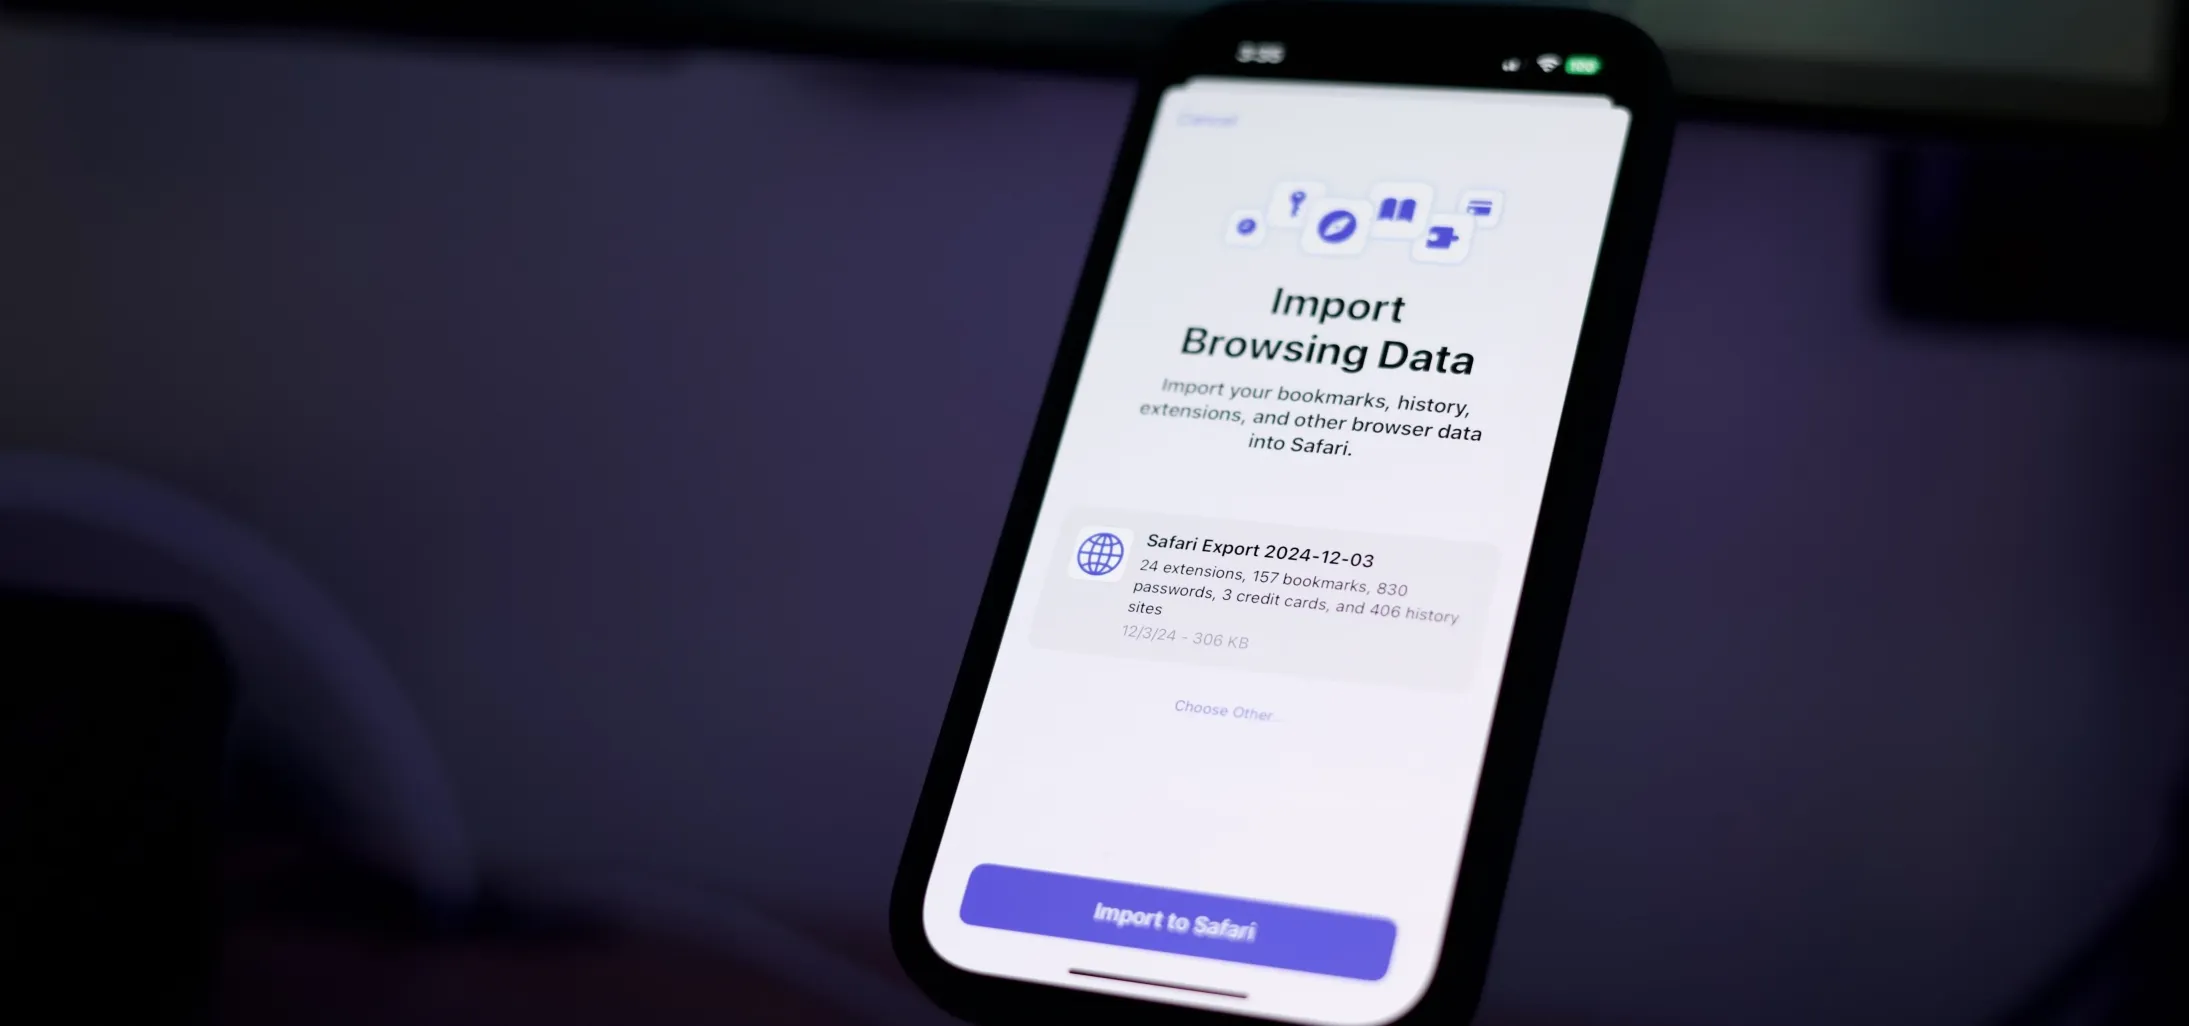 How to Export or Import Your Safari Browsing Data Between Browsers on iPhone, iPad, and Mac May 15, 2025 am 09:11 AM
Apple has unveiled a new and useful tool for Safari that allows users to export or import browsing data, including bookmarks, history, extensions, credit card details, and usernames and passwords. This feature facilitates transferring data between Sa
 You Could Get $100 in Siri Class Action SettlementMay 14, 2025 am 05:13 AM
Summary Apple settlement offers up to $100 for Siri privacy violations in the US from 2014-2024.


Hot AI Tools

Undresser.AI Undress
AI-powered app for creating realistic nude photos

AI Clothes Remover
Online AI tool for removing clothes from photos.

Undress AI Tool
Undress images for free

Clothoff.io
AI clothes remover

Video Face Swap
Swap faces in any video effortlessly with our completely free AI face swap tool!

Hot Article
Hot Tools

SecLists
SecLists is the ultimate security tester's companion. It is a collection of various types of lists that are frequently used during security assessments, all in one place. SecLists helps make security testing more efficient and productive by conveniently providing all the lists a security tester might need. List types include usernames, passwords, URLs, fuzzing payloads, sensitive data patterns, web shells, and more. The tester can simply pull this repository onto a new test machine and he will have access to every type of list he needs.

SublimeText3 English version
Recommended: Win version, supports code prompts!

SublimeText3 Linux new version
SublimeText3 Linux latest version

VSCode Windows 64-bit Download
A free and powerful IDE editor launched by Microsoft

SublimeText3 Mac version
God-level code editing software (SublimeText3)

