


php editor Xiaoxin brings you an article about "Lenovo E431 Windows Error". When using Lenovo E431 laptop, you sometimes encounter some Windows error problems, such as blue screen, system crash, etc. These errors may cause users to be unable to use the computer normally, causing trouble in work and life. This article will introduce how to solve Windows errors on Lenovo E431 laptop and help users quickly resume normal use. Whether you are a novice or a user with some computer knowledge, you can get practical solutions from this article.
Preparation tools SSD memory module optical drive position removable bracket screwdriverNote: I will not consider the purchase issue here, because the editor will write an article about the purchase of accessories in the future. At the same time, we do not consider whether the notebook supports hardware additions, because many notebooks do not have two memory slots or optical drives. Assume that we have prepared the appropriate accessories and the laptop meets the requirements for replacement.
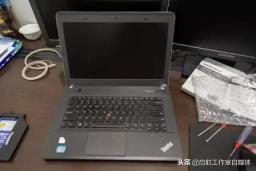
Replacement StepsThe computer to be replaced this time is Lenovo E431
The next step is very critical. Before disassembling the machine, please go online to find the disassembly tutorial for the corresponding model. Each model will have its own special disassembly method. This time, Lenovo E431 only needs to disassemble part of the D side to complete the replacement task. More importantly, looking for online disassembly tutorials is to find hidden screws, because often There are screws often behind the cooling pad or behind some stickers. Oh, by the way, speaking of stickers, if you don’t know anything about laptops, please be careful not to dismantle them by yourself, because if the warranty paper is damaged, the warranty will basically not be free. The laptops we disassembled this time have basically passed the free warranty. Warranty expired.
There is also a concept that needs to be popularized here. The front of the notebook is called side A, the display screen is called side B, the keyboard side is called side C, and the back of the notebook is called side D.

Turn to side D. The first thing to do when disassembling the computer is to remove the battery. Of course, if the battery is built into the computer, there is nothing you can do.
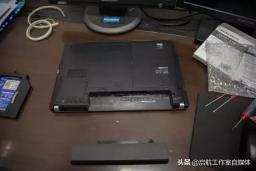
When removing screws, you can refer to online tutorials or do it yourself. If necessary, you only need to remove the three screws below, but in order to ensure the operation, I removed all the removable screws on the D side (marked by red circles).

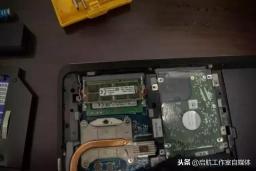
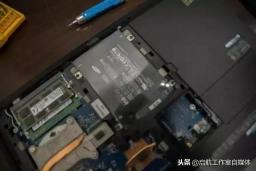
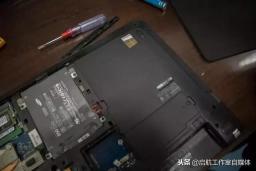
Open the cover and you can see the accessories inside. What needs to be replaced are the green things on the upper left. The one on the far left is the memory, and the one in the middle is the mechanical hard drive. We need to replace the mechanical hard drive with a solid state drive.

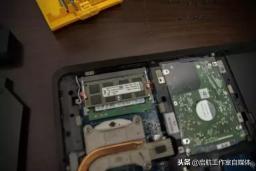
When installing, first align the card slot and put the memory in from the side.
Press the new memory module down until the iron buckles on both sides lock the memory module. In this way, the memory module is installed.
Before disassembling the hard drive, you need to remove the four screws related to the hard drive in the picture. After doing this, the hard drive can be slowly removed. In addition, there is a screw in the lower right corner, which is used to fix the optical drive. Because we need to uninstall the optical drive later, we also removed it. Sometimes, the optical drive screws may be covered by a soft pad, so look for them.

Note that it is best to find a small storage box to store the screws;
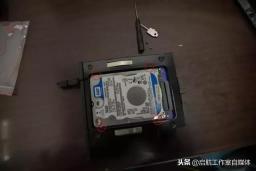
After taking out the hard drive, uninstall the four screws on both sides, which are used to fix the hard drive rack and the mechanical hard drive. Pay attention to the position of the interface at this time. The interface will look like this when the solid state drive is installed later.

Carefully separate the hard drive bracket and mechanical hard drive.

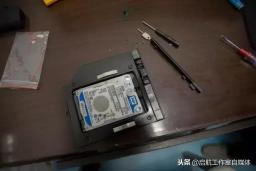
Pay attention to the position of the interface and insert the solid state drive, then reinstall the four screws on the side and place a picture of the old and new alternating.

Put the solid state drive and the bracket back to their original positions and tighten the four screws.
Next we will replace the optical drive, because CDs and DVDs have gradually withdrawn from the stage of history. If the mechanical hard drive we uninstall is not used, the capacity of the solid-state drive alone is definitely not enough, so It is necessary to replace the optical disk with a mechanical hard disk in the optical drive position. First remove the two screws on the back of the original optical drive.

Now use the plastic bracket on the front, both of which will be used on the new optical drive bracket in a while.
Take out the accessories provided with the optical drive bracket, and you can see that there are quite a few, but here we only need to use four of the red screws, which are soft screws to reduce the mechanical The hard drive is vibrating. The white ones are hard nails, which are used to fix the solid-state drive, because some people also put the solid-state drive in the optical drive position.

Insert the four red screws directly onto the side of the mechanical hard drive.

Align the interface, first insert the mechanical hard drive from the back, and then push the mechanical hard drive forward until the interface is tightly locked.
After pushing it, put the soft pad on the optical drive position into it, so that the mechanical hard drive can be completely locked so that it will not move too much when running.

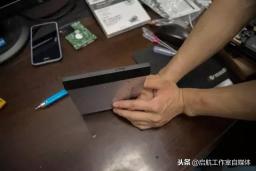
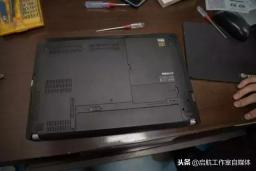
Attach the front panel and back panel just mentioned to form the finished product.

After installing the screws of the optical drive position, our replacement is complete, and the next step is to install the screws.
Close the cover and power supply, tighten the screws, and connect the power.
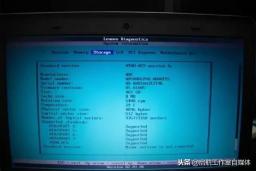
After booting into the BIOS, you can see the information about the two memory modules.
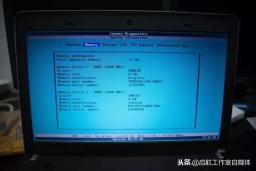
Switch different tabs to see SSD and HDD information.

Prepare an installation USB disk (I won’t go into the production process, just check it online)
Insert the USB flash drive and turn on the computer. Lenovo needs to press Enter to interrupt the normal boot. Different brands are different, but most of them need to be adjusted in the BIOS. Note that if it is booted from UEFI, it cannot be set to Legacy mode.
Press F12 as prompted

Select our U disk to boot

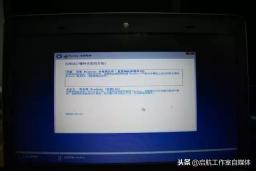
You will be able to enter the installation interface after a while. It is still more humane here I will talk about it in specific places.

Choose to install Windows 10 Professional Edition

Choose Customize here
Go to this interface to see our solid-state drive and previous machinery The hard drive is out. We are going to install the system on a fixed hard drive, so select drive 0 and click New.

The biggest difference between solid-state drives and mechanical hard drives is that they do not require partitioning, because solid-state drives are only used for the installation of systems and large software, not for storing data. , click Apply directly.

Select OK

You can see that Windows 10 automatically separates the reserved partition and the system partition on the solid-state drive. This is included in EFI, ESP partition and MSR partition. .

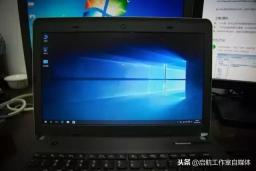
Click Next and the installation will begin. The installation will be completed very quickly with the speed of the solid state drive. Next is some simple graphical interface settings, and then you can enter the desktop.
 Summary
It is very necessary to increase the memory capacity in the current laptop computer. The average laptop computer has 4G memory. Basically, the memory usage will reach 40% when the system is opened, so add more The memory capacity is definitely affordable.
As for replacing the solid-state drive, this is a matter of improving work efficiency. I believe everyone wants to experience the boot time of less than ten seconds, and the solid-state drive has excellent advantages in opening large software. As for replacement As for the optical drive position, it depends on personal preference. If you really need an optical drive, you don't need to replace it.
Warm reminder: If your personal skills are not good, it is not recommended to replace it by yourself, please find a professional to handle it! ! !
The above is the detailed content of Lenovo e431windows error. For more information, please follow other related articles on the PHP Chinese website!

 Linux vs Mac: How to Install Linux on Mac - MiniToolMay 14, 2025 am 01:21 AM
What’s the difference between Linux and Mac? Do you want to install Linux on Mac? This post from php.cn will show you all. You can refer to this guide to dual boot Linux and macOS.
 What Is MHTML & What Are the Differences Between It and HTML - MiniToolMay 14, 2025 am 01:20 AM
What is MHTML? How to open or view it? What are the differences between it and HTML? How to convert MHTML to HTML? If you are looking for the answers to the above questions, you can refer to this post from php.cn.
 Solve Deleted Files Keep Reappearing in Windows 10 - MiniToolMay 14, 2025 am 01:19 AM
This article focuses on the topic that deleted files keep reappearing in Windows 10, introducing the responsible reasons and feasible solutions.
 How to Deactivate Windows 10/11 by Uninstalling Product Key - MiniToolMay 14, 2025 am 01:18 AM
This post teaches you how to deactivate Windows 10/11 by removing product key or license. You can use that product key to activate another computer later if you want. For more computer tips and tricks, you can visit php.cn Software official website.
 Instant Fixes for Error 0164: Memory Size DecreasedMay 14, 2025 am 01:15 AM
Some Windows users report that they are prompted by the error 0164 memory size decreased screen every time they boot the computer. What’s wrong with it? If you are in the same boat, congratulations! You’ve come to the right place! In this post from p
 Best Fixes: This Page Isn't Available Right Now on Facebook - MiniToolMay 14, 2025 am 01:11 AM
This Page Isn’t Available Right Now is an error message you may encounter when you visit Facebook using your web browser. In this php.cn post, we will list some effective methods you can try to get rid of this error.
 Windows 11 KB5010414 Was Released with Many New Features - MiniToolMay 14, 2025 am 01:09 AM
Windows 11 KB5010414, a new optional update for Windows 11, is available now. Do you know what’s new and fixes in it? php.cn Software will show you this information in this post. Besides, it also tells you how to download and install it on your compu
 How to Change Windows Update Settings in Windows 11? - MiniToolMay 14, 2025 am 01:08 AM
Want to pause Windows Update on your Windows 11 computer? Want to set active hours to arrange a computer restart to complete the update process? You need to know how to change Windows Update settings in Windows 11. This php.cn post will show you the


Hot AI Tools

Undresser.AI Undress
AI-powered app for creating realistic nude photos

AI Clothes Remover
Online AI tool for removing clothes from photos.

Undress AI Tool
Undress images for free

Clothoff.io
AI clothes remover

Video Face Swap
Swap faces in any video effortlessly with our completely free AI face swap tool!

Hot Article
Hot Tools

MinGW - Minimalist GNU for Windows
This project is in the process of being migrated to osdn.net/projects/mingw, you can continue to follow us there. MinGW: A native Windows port of the GNU Compiler Collection (GCC), freely distributable import libraries and header files for building native Windows applications; includes extensions to the MSVC runtime to support C99 functionality. All MinGW software can run on 64-bit Windows platforms.

SublimeText3 Chinese version
Chinese version, very easy to use

DVWA
Damn Vulnerable Web App (DVWA) is a PHP/MySQL web application that is very vulnerable. Its main goals are to be an aid for security professionals to test their skills and tools in a legal environment, to help web developers better understand the process of securing web applications, and to help teachers/students teach/learn in a classroom environment Web application security. The goal of DVWA is to practice some of the most common web vulnerabilities through a simple and straightforward interface, with varying degrees of difficulty. Please note that this software

Zend Studio 13.0.1
Powerful PHP integrated development environment

PhpStorm Mac version
The latest (2018.2.1) professional PHP integrated development tool

