


mac extract efi file (macos efi partition)

php editor Apple today brings you a tutorial on extracting efi files (macOS efi partition) on mac. In the process of using Mac computers, sometimes we need to extract efi files in order to make some system adjustments or repairs. However, for some newbies, they may not know how to extract efi files correctly. This article will detail the steps to extract efi files to help you solve this problem. Following the guidance of this article, you will easily master the techniques of extracting efi files, making you more comfortable when using a Mac computer!
What to do after downloading the mac system installation package
The steps to install the software are briefly as follows: 1. Double-click to open the downloaded software. 2. Add the software to the Applications folder. 3. Double-click the software installer to start the installation. 4. Wait for the installation to complete.
After downloading the .dmg installation package of Java For Mac 7, open the .dmg file and you can see the .pkg file. Double-click the "JDK 7 Update 0pkg" icon to install JDK 7. After the installation icon is double-clicked, the formal installation interface will pop up, and an introduction to the software will be displayed at the beginning.
First, download the dmg image file of the new version of the system from the website and connect the USB flash drive to the computer. Before installation, please be sure to back up all data in the system, because after the installation is completed, all data in the system will be cleared.
After inserting the boot USB disk, press and hold the option key when turning on the computer to enter the startup item interface. Select the language of your operating system and click the right arrow. Select Disk Utility, and then select the hard drive on which the system needs to be installed. The default is the first hard drive. Click "Partition".
Before reinstalling the system, please be sure to back up important data to avoid loss. At the same time, make sure your Mac is connected to a stable internet in order to download and install the system.
The specific method is as follows: With the MacBook Air turned off, hold down the Command and R keys. Then click the switch key in the upper right corner at the same time (remember to continue to hold the Command R key at this time). After entering this interface, you can release all keys.
Help, Clover is installed on mac, but there is no startup item
First, set SATA to AHCI. Secondly, old BIOS compatibility can be provided by emulating the BIOS environment. Finally, optional ROMClover and OC booting can be used to solve the problem of missing boot items. These boot tools all support UEFI boot, which can solve the problem of not supporting old operating systems and UEFI.
2. The first is to enter the mac to install the pkg of clover. Then choose to install to the EFI partition. It will automatically add startup items to bios.
When the computer does not have a startup disk option, it may be because the hard disk startup item was mistakenly deleted. To resolve this issue, you can follow these steps: 1. Restart the computer and press the "Delete" key during the startup process to enter the BIOS interface. 2. In the BIOS interface, find "SATAMode" or similar options, which can usually be found in "STAT Configuration" or similar items. 3. Open the "SATAMode" option and select "AHCIMode" or "IDEMode", depending on your system and hardware configuration. 4. Finally, save and exit the BIOS interface, and then restart the computer. By following the steps above, you should be able to re-enable the hard drive's startup options, thereby solving the problem of no startup disk options. Please make sure to download the flash package before making any BIOS setting changes
MacA1989How to flash efi without disassembling the machine
. The firmware number of the downloaded Apple A1589 wired flash ROM package is higher than the firmware number of your phone (some phones display the baseband number/baseband version, which can be viewed in "Settings" - "About Device"/"About Phone") , otherwise after successful flashing, system instability may occur.
First download the latest version of CloverConfigurator and open it. Next, click MountEFI in the list on the left, find the EFI partition of the hard disk you want to mount, and click MountPatition. Finally, click OpenPartition to open the EFI partition.
Question 1: How to flash Apple laptop? Does this need to be flashed? Download the new system directly from the software store and install it according to the prompts. Or download the system and install it on a USB disk, or install it directly online. There are many methods.
Black Apple cannot load efi
First download the latest version of CloverConfigurator and open it. Next, click MountEFI in the list on the left, find the EFI partition of the hard disk you want to mount, and click MountPatition. Finally, click OpenPartition to open the EFI partition.
The driver is not enabled. The reason why Black Apple has no startup option after replacing efi is because its driver is not enabled, so you only need to start the driver. The Black Apple is simply a non-Apple computer. efi is an upgrade solution launched by Intel to replace BIOS in future computer systems.
First make sure that your clover file has been placed on the efi disk. As long as the new uefi boot item is displayed when booting, it means that the boot installation is successful.
If it is a USB boot disk, the files are hidden and you cannot see them. It is the file system (microsystem) like the startup interface. System installation files can be seen. Unless the file is lost or you forcefully remove the USB flash drive when it is halfway copied (downloaded). The file is automatically lost. So there is no file.
Dual system of black apple and win, if the black apple boot is lost: open the tool Bootice.exe. Select the boot disk you want to repair and click Partition Management. Click to assign a drive letter, and then you can see the efi disk in my computer. Click Modify startup sequence.
Why is there no folder for installing Black Apple's EFL when I open my U disk with disk?
③After completion, open the partition tool and find the U disk (if it is not detected, re-insert and unplug the U disk, maybe You will be prompted to format the U disk, ignore it), open the EFI partition (boot partition) on the U disk, delete the EFI folder, paste the EFI folder suitable for your computer using the shortcut keys, and then copy the CLOVER driver file.
Let’s take a look at how the editor did it for the detailed steps~ How to install and download the U boot software on a black Apple system U disk, and then it is best to prepare a 10GB U disk for production. U-boot download address Open the U-boot software, select the U disk you inserted, and then click [Start Making].
Insert the mac USB disk to start, enter the installation interface, enter Disk Utility, click on the hard disk, erase, select APFS, and then install. Set up the computer to start: In the PE system, place the entire EFI folder under the ESP folder of the computer.
list, if you find that the EFI partition has been deleted, then use diskutil list to check that all partitions of disk disk3 have been deleted. Then you can format it again. You can use whatever format you want. Don’t worry about reporting an error. . You can safely open Apple's own disk utility and select the format you want to format it.
Insert the U disk, preferably in the USB2.0 port, and boot it up. Come to the boot interface, see installmacOS here, and press Enter to enter. Then there is a bootstrapping process. If everything goes well, we will come to the interface below and select Simplified Chinese. Next select Disk Utility.
However, this will not affect our use of black Apple computers at all. Whether it is stability or the smoothness of application installation and use, 99% perfect compatibility is also achievable. Of course, if you want to pursue perfection , then it’s OK to just buy an Apple computer.

How to copy files to the EFI partition under Mac system
Mac right-click menu "Copy to" Step 1: Select the file and open the Mac right-click menu (After installing the Mac right-click menu tool), right-click "Copy to"; the second step of the Mac right-click menu tool: select a path (file saving location). In this way, you can copy files on your Mac to other locations.
First, you can modify the format of the hard disk to a format that Mac supports writing; second, you can use software to write files through NTFS plug-in software. Both of the above methods can be achieved using Txuera NTFS for Mac software.
In the dock bar, click Launchpad - Others - Automator as shown in the figure. Click File - New in the Automator menu bar, and then select "Workflow".
Open your Mac laptop and connect the mobile hard drive via USB cable. You can see a hard drive icon appear on the desktop. Right-click the icon. There is no copy option at this time, which means that the mobile hard disk is formatted by default under the Windows system and is read-only under MacOS.
Conclusion: The above is a summary of the answers related to extracting efi files on mac compiled by this site. I hope it will be helpful to you! If your problem is solved, please share it with more friends who care about this problem~
The above is the detailed content of mac extract efi file (macos efi partition). For more information, please follow other related articles on the PHP Chinese website!

 Second Release Candidate of MacOS Sequoia 15.4 Available for TestingApr 30, 2025 am 10:26 AM
Apple has released a second Release Candidate (RC) build of macOS Sequoia 15.4 for its beta testing program. This follows the initial release candidate builds of Sequoia 15.4, iOS 18.4, and iPadOS 18.4, released just days prior. Release Candidates a
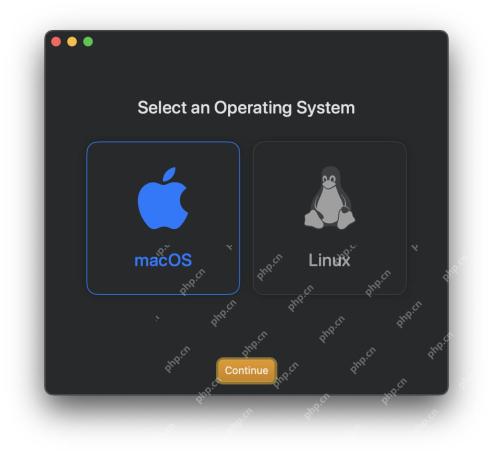 Easily Create MacOS Virtual Machines with VirtualBuddyApr 30, 2025 am 10:14 AM
VirtualBuddy: Easily virtualize macOS and Linux on Apple Silicon Mac VirtualBuddy provides a simple and fast way to virtualize macOS (and Linux) on any Apple Silicon Mac, providing developers, enthusiasts, and curious users with a way to easily run multiple instances of macOS. VirtualBuddy is fast, performs well, and it is free and open source, so you can easily explore the virtual machine world without any commitment, just prepare enough disk storage and bandwidth to set up a macOS or Linux virtual machine. Whether it is testing different versions
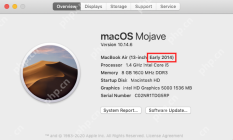 12 Things to Check Before Buying Second-hand MacBookApr 30, 2025 am 10:01 AM
Buying a used Mac on a budget? This guide ensures you avoid a lemon. We'll cover essential checks before you buy, including diagnostics you can perform on the spot. Remember to bring a bootable macOS USB drive and headphones. Step 1: Physical Insp
 How Long Does Updating MacOS Take? Why Is MacOS Update Taking So Long?Apr 30, 2025 am 09:53 AM
How long does it take to update the MacOS system software? Why does it take so long to update? Many Mac users will have this question when they see the software update of the new MacOS system. Both of these questions are very reasonable, and it is important to remember that the answers may vary. However, with modern MacOS, you can make a fairly accurate estimate of the time it takes to install updates to your MacOS system. Let's dive into this topic so you can better understand and prepare to install MacOS updates on your Mac. How long does it take for MacOS updates to be downloaded, installed and completed? MacOS updates can take between 15-20 minutes to several hours to complete, especially if you are considering downloading updates and installing updates to completion
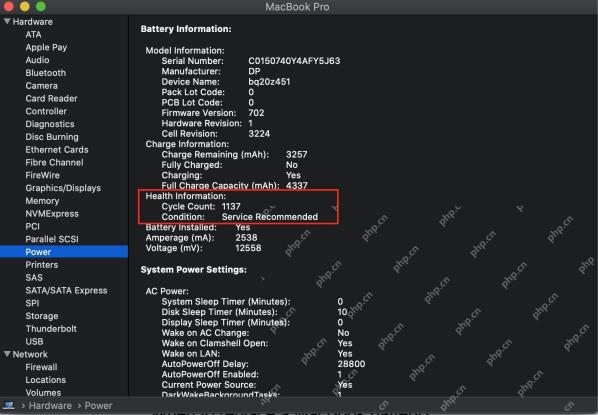 How Long Do MacBook Batteries Last? Here's How You Can Check ItApr 30, 2025 am 09:50 AM
Understanding MacBook Battery Life: Maximizing Your Mac's Power Concerned about your MacBook's battery performance, or planning a purchase? This guide clarifies MacBook battery lifespan and offers tips for extending it. Most Mac batteries endure appr
 Fixing Safari for Mac Error “This webpage was reloaded because a problem occurred”Apr 30, 2025 am 09:45 AM
Although the Safari browser under the Mac system is excellent, it is not perfect. Safari users occasionally encounter situations where the page refreshes and displays an error message "This page has reloaded because of a problem". You may also see variant information like "repeated problems". Since the error message is quite general, you may be wondering the root cause of the error in Safari and how to fix this on your Mac. Causes causing Safari for Mac to have a "This web page reloaded because a problem occurred" error Usually, if there is a memory problem, a website crash, or an incompatible with Safari, a software error, or other similar issues, you will see this error message in Safari on your Mac
 Get Googly Eyes in Your Mac Menu Bar to Follow Your Cursor AroundApr 30, 2025 am 09:42 AM
Nostalgic Mac users may remember an interesting application in the classic Mac OS system: it will place a pair of moving eyes in the Mac menu bar and move with your cursor. While classic Mac OS is long gone, you can still experience this fun on a modern Mac, just use an app called "Googly Eyes". Google Eyes resides in your Mac menu bar, and its pupils will follow your cursor like an older version of the app. When clicking on the mouse/trackpad, the little eyes will blink. Will this revolutionize your computing experience? Probably not. But is it interesting? Absolutely fun! Sometimes, just being fun is enough, right? So, enjoy it, in your Ma
 MacOS Sonoma 14.7.5 & MacOS Ventura 13.7.5 Security Updates ReleasedApr 30, 2025 am 09:40 AM
Apple has released macOS Sonoma 14.7.5 and macOS Ventura 13.7.5 security updates for Mac users running Sonoma and Ventura operating systems. These updates focus on security patches and do not include other new features available in the latest macOS Sequoia 15.4 update (sequoia 15.4 update is released simultaneously). Additionally, you'll find software updates for new and older iPhones and iPads, as well as updates for Apple TV, Apple Watch, and Apple Vision Pro


Hot AI Tools

Undresser.AI Undress
AI-powered app for creating realistic nude photos

AI Clothes Remover
Online AI tool for removing clothes from photos.

Undress AI Tool
Undress images for free

Clothoff.io
AI clothes remover

Video Face Swap
Swap faces in any video effortlessly with our completely free AI face swap tool!

Hot Article
Hot Tools

SublimeText3 Chinese version
Chinese version, very easy to use

EditPlus Chinese cracked version
Small size, syntax highlighting, does not support code prompt function

Safe Exam Browser
Safe Exam Browser is a secure browser environment for taking online exams securely. This software turns any computer into a secure workstation. It controls access to any utility and prevents students from using unauthorized resources.

WebStorm Mac version
Useful JavaScript development tools

PhpStorm Mac version
The latest (2018.2.1) professional PHP integrated development tool

