php editor Xiaoxin brings you a solution for obtaining administrator rights in Win11 23H2. Win11 23H2 is Microsoft's latest operating system version. For some specific operations, administrator rights may be required to complete. In this article, we will introduce several methods to obtain administrator rights to help users successfully complete various operations. Whether through Control Panel, Command Prompt or Group Policy Editor, we will explain the steps in detail so that you can easily gain administrator rights and enjoy the powerful features of Win11 23H2.
How to add administrator rights to Win11 23H2 account
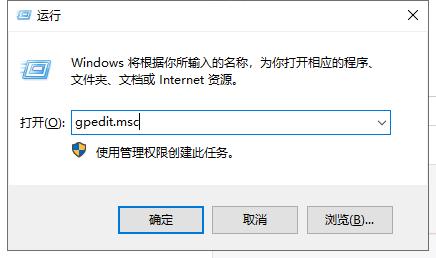
1. First press [win R] to open the run (as shown in the picture).
2. After entering [gpedit.msc], click [OK] (as shown in the picture).

#3. Click [Computer Configuration] → [Windows Settings] (as shown in the picture).

#4. Click [Security Settings] (as shown in the picture).

5. Click [Local Policy] (as shown in the picture).

#6. Click [Security Options] (as shown in the picture).

7. Open [Administrator Account Status] (as shown in the picture).

8. Select [Enabled] and click [OK] to enable it (as shown in the picture).

The above is the detailed content of How to obtain administrator rights in Win11 23H2?. For more information, please follow other related articles on the PHP Chinese website!
 解决win11无法安装打印机驱动的方法Jan 30, 2024 pm 03:57 PM
打印机是我们日常生活中都会使用到的,如果我们的电脑没有打印机驱动就不能直接诶的使用打印机,也有很多的win11用户们找不到打印机驱动程序怎么办?
 如何解决Win11 23H2更新速度慢的问题?如何解决Win11 23H2更新卡顿的问题?Jan 30, 2024 pm 04:54 PM
近期很多的用户们都想给自己的电脑升级到Win1123H2版本,可也有不少的用户们在升级的过程中发现速度很慢,甚至是卡死的情况,那么这要怎么办?下面就让本站来为用户们来仔细的介绍一些Win1123H2更新卡死的解决方法吧。Win1123H2更新卡死解决方法由于版本升级较大,升级文件较大。建议在网络较好的环境下进行在线检查和下载,以确保升级速度更快。如果你想要快一点升级到Win1123H2,小编建议你可以直接下载系统升级,速度相对来说快很多。推荐系统1、Windows1123H220in1镜像纯净版
 win10系统如何设置管理员权限Jan 11, 2024 pm 09:00 PM
近来有不少网友询问win10系统怎么设置以管理员身份运行。大家都知道,超级管理员权限具有最高权限,如果我们没有开启管理员权限就会处处碰壁。接下来,我就给大家分享一下win10管理员权限的设置方法。跟多win10教程,尽在小白系统官网。win10系统是微软2015年发布的一款可以跨平台和设备的操作系统,随着win10系统的完善,很多小伙伴都将升级了win10系统,但是有些新手朋友对于win10系统设置管理员权限不怎么了解。下面,我们就来瞧瞧设置方法win10系统管理员权限设置的详细步骤1、win+
 Win11系统如何禁用通知Jan 30, 2024 pm 04:54 PM
Win11系统如何关闭消息提醒在使用Win11系统时,我们经常会收到各种消息提醒,比如系统更新、软件安装、邮件通知等。虽然这些消息提醒对于我们及时了解信息很有帮助,但有时候也会给我们带来一些干扰。如果你希望在特定情况下关闭Win11系统的消息提醒,下面是一些方法供你参考。方法一:使用系统设置关闭消息提醒1.点击Win11系统的“开始”按钮,然后点击“设置”图标。2.在设置窗口中,点击“系统”选项。3.在系统设置页面中,点击“通知和动作”选项。4.在通知和动作页面中,你可以看到各种消息提醒的开关。
 win11家庭版和专业版的区别是什么May 16, 2023 pm 03:36 PM
win11家庭版和专业版的区别是:1、win11家庭版适合普通家庭使用,win11专业版适合企业用户、专业开发者用户使用;2、家庭版的win11会内置很多实用的软件,而win11专业版有着大量的专业功能软件;3、win11家庭版没有复杂和进阶的操作,都是可以轻松上手学习的,win11专业版都是需要根据工作操作的功能性软件,有一定的操作和规范。
 如何在 Windows 11 ,10 上安装任何没有管理员权限的软件Apr 28, 2023 am 11:52 AM
要在Windows机器上安装大部分软件,您需要管理员权限,这是非常标准的安全要求。但您可能不是您使用的每台PC上的管理员用户。虽然作为管理员用户安装软件的要求是增强安全性的一个非常了不起的功能,但当您非常想安装软件时无法安装软件可能会令人沮丧。那么,有没有解决方法?肯定有一种解决方法,我们在这里为您提供帮助。尽管这似乎是一个艰难的过程,但解决方案却出人意料地简单明了。在本文中,我们将指导您完成如何在没有Windows计算机管理员权限的情况下轻松安装任何软件的步骤。希望你喜欢!解决方案第1步
 如何在 windows 11 上设置共享文件夹?Jan 30, 2024 pm 04:09 PM
很多用户在将电脑升级为Win11系统后,发现之前设置的共享文件夹被关闭了,并且在新系统中不清楚如何重新设置启动。为了帮助广大用户解决这个问题,本站小编特意整理了最新的共享文件夹设置步骤,并在今天的Win11教程中与大家分享操作方法。如果您需要重新设置共享文件夹,请按照以下步骤进行操作。win11怎么设置共享文件夹为了安全起见,建议设置一个特殊共享账户。右键单击电脑图标,打开设置。3、打开创建新用户窗口,自己设置一个用户名与密码,把用户下次登录时须更改密码给取消。选择高级共享选项,勾选共享此文件夹
 win11管理员身份运行没反应怎么办?Feb 12, 2024 am 10:00 AM
我们在使用电脑进行一些操作的时候都会需要使用到管理员身份运行,近期也有不少的win11用户们表示自己在以管理员身份运行的时候没有反应要怎么办?用户们可以直接的进入都windowos终端,然后来进行操作设置就可以了。下面就让本站来为用户们来仔细的介绍一下win11管理员身份运行没反应详解吧。win11管理员身份运行没反应详解方法一、1、首先鼠标右键单击windows开始菜单,左键点击windows终端、windows终端(管理员)打不开无任何反馈;2、在文件资源管理器地址栏输入:%USERPROF


Hot AI Tools

Undresser.AI Undress
AI-powered app for creating realistic nude photos

AI Clothes Remover
Online AI tool for removing clothes from photos.

Undress AI Tool
Undress images for free

Clothoff.io
AI clothes remover

AI Hentai Generator
Generate AI Hentai for free.

Hot Article

Hot Tools

MinGW - Minimalist GNU for Windows
This project is in the process of being migrated to osdn.net/projects/mingw, you can continue to follow us there. MinGW: A native Windows port of the GNU Compiler Collection (GCC), freely distributable import libraries and header files for building native Windows applications; includes extensions to the MSVC runtime to support C99 functionality. All MinGW software can run on 64-bit Windows platforms.

mPDF
mPDF is a PHP library that can generate PDF files from UTF-8 encoded HTML. The original author, Ian Back, wrote mPDF to output PDF files "on the fly" from his website and handle different languages. It is slower than original scripts like HTML2FPDF and produces larger files when using Unicode fonts, but supports CSS styles etc. and has a lot of enhancements. Supports almost all languages, including RTL (Arabic and Hebrew) and CJK (Chinese, Japanese and Korean). Supports nested block-level elements (such as P, DIV),

WebStorm Mac version
Useful JavaScript development tools

Atom editor mac version download
The most popular open source editor

ZendStudio 13.5.1 Mac
Powerful PHP integrated development environment


