

 System TutorialLINUXDeepin Linux Deepin System Installation Tutorial: The Road to Advancement from Novice to Expert
php editor Xinyi brings you an in-depth Linux tutorial on deep-in system installation. Whether you are a novice or an expert, this tutorial can help you start from scratch and move towards the advanced level. In this tutorial, we will introduce the installation process of Deepin System in detail, and provide some practical tips and precautions to help you successfully complete the installation and use the system proficiently. Whether you are a newbie or an experienced user, this tutorial can provide you with valuable information and help. Let’s start exploring the deep system together!

Preparation work
Before installing Deepin system, you need to make the following preparations:
1. Download the Deepin system image file;
2. Prepare a usable USB flash drive or CD;
3. Make sure the computer meets the hardware requirements of Deepin system.
Installation steps
1. Make a boot disk
Use a U disk or CD to make a boot disk, and write the downloaded deepin system image file into the boot disk.
2. Set the computer startup mode
Insert the prepared startup disk into the computer, restart the computer and enter the BIOS settings, and set the startup mode to boot from a U disk or CD.
3. Enter the installation interface
After restarting the computer, you will enter the deepin system installation interface. Select the "Install Deepin System" option to enter the installation process.
4. Partitioning and formatting
During the installation process, you need to partition and format the hard disk. Select "Manual Partition" to partition and format the hard disk according to your needs. The partition is an ext4 file system.
5. Configure the system
Set the system's language, time zone, keyboard layout and other options, and select the installed software packages according to your needs.
6. Install the system
Click the "Start Installation" button and wait for the system installation to be completed. After the installation is completed, restart the computer and enter the deepin system.
Usage Tips
1. Quickly familiarize yourself with the system
The desktop environment of Deepin System is very friendly. You can quickly become familiar with various functions of the system through the right-click menu and setting center.
2. Software management
Deepin system comes with a software manager through which you can install, uninstall and manage software.
3. Command line operation
Deepin system also supports command line operation. Various commands can be executed through the terminal for more advanced operations.
Common problems and solutions
1. Unable to enter the system
If you cannot enter the system, you can try to enter recovery mode to repair it, or reinstall the system.
2. The software cannot run normally
If the software cannot run normally, you can try to update the software or reinstall the software.
小四LINUX shares
Little knowledge of LINUX: LINUX is an open source operating system. Due to its openness and freedom, it is widely used in servers, embedded devices and other fields. Deepin Linux is a distribution based on the LINUX kernel. It has the advantages of stability, security, and ease of use. It is suitable for individual users and corporate users. I hope this little knowledge can help everyone have a deeper understanding of LINUX and Deepin systems.
Deepin Linux is a very excellent operating system. Through the installation tutorial and usage tips in this article, I believe that everyone can quickly master the use of Deepin system and enjoy the stability, security and ease of use it brings.
The above is the detailed content of Deepin Linux Deepin System Installation Tutorial: The Road to Advancement from Novice to Expert. For more information, please follow other related articles on the PHP Chinese website!

 解决win11开机未能正确启动的方法Jan 29, 2024 pm 04:45 PM
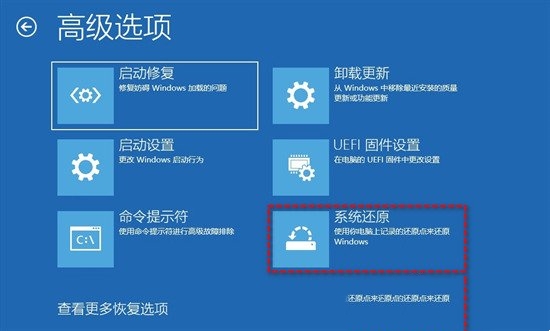
win11开机未能正确启动怎么办?我们在使用电脑的过程中会遇到电脑不能正常使用的问题出现,一般出现这种情况有很多,下面就让本站来为用户们来仔细的介绍一下win11开机未能正确启动解决方法吧。win11开机未能正确启动解决方法方法一:卸载新的应用程序如果电脑在安装新应用后未正确启动,可进入安全模式卸载它们以修复问题。1、在高级选项窗口中单击启动设置。2、在启动设置窗口中按F4以启用安全模式。3、成功进入安全模式系统之后按照正常流程卸载新安装的应用程序即可。方法二:执行系统还原之前我们提到了可能导致
 先装显卡还是先装驱动Jan 29, 2024 pm 10:51 PM
一台新组装的电脑,从安装系统到安装各个硬件驱动的顺序是怎么样的...首先是准备组装的零组件:CPU,CPU散热器,内存,主板,显卡,硬盘,光驱,电源,机箱,除了上述这些东西,你还需要一把大小长短适中且好转的十字螺丝起子,还有平坦的桌面。安装操作系统:首先需要安装操作系统,例如Windows、Linux等。可以使用安装光盘或者U盘进行安装。安装驱动程序:安装操作系统后,需要安装电脑硬件的驱动程序,例如主板驱动、显卡驱动、声卡驱动等。安装向导正在安装驱动程序中,请等待安装完成。部分驱动程序可能会需要
 win10系统安装卡在海内存知己怎么办Jan 04, 2024 pm 11:50 PM
如果我们准备给自己的电脑安装win10操作系统的话,对于安装的过程中发现安装进度卡在海内存知己显示界面的情况,很多小伙伴不知道应该怎么解决。我们可以在系统设置中找到系统恢复,然后将电脑系统重置再重新升级安装即可。详细步骤就来看下小编是怎么解决的吧~win10系统安装卡在海内存知己怎么办方法一:大部分的时候,我们只需要重启电脑就可以正常进入系统了,非常方便。方法二:1、如果我们重启之后无法解决问题,那么可以进入安全模式下的windows设置当中。2、接着点击windows“更新和安全”选项。3、然
 华为笔记本win11如何降级为win10系统?华为笔记本win11回退到win10的步骤Jan 30, 2024 am 08:33 AM
华为笔记本win11怎么回退到win10系统?不少的用户们在购买完华为笔记本后用不习惯win11系统就想着能不能更改为win10系统,其实是可以的,下面就让本站来为用户们来仔细的介绍一下华为笔记本win11改win10方法教程吧。华为笔记本win11改win10方法教程创建Windows10安装媒体的步骤如下:首先,你需要准备一个可引导的Windows10安装媒体。可以使用官方的Windows10安装媒体创建工具,也可以下载Windows10ISO镜像文件并制作USB安装盘。2、进入BIOS设置
 无需U盘,如何在全新电脑上安装操作系统Jan 30, 2024 pm 01:39 PM
在现代社会,电脑已经成为我们生活中不可或缺的一部分。然而,当我们购买了一台全新的电脑时,我们通常需要使用U盘来安装操作系统。但是,有没有一种方法可以在新电脑上安装系统,而无需使用U盘呢?本文将介绍一种简单而有趣的方法,让您轻松在新电脑上安装系统。工具原料:系统版本:Windows10品牌型号:HPPavilion15软件版本:Windows10安装镜像文件一、使用网络共享安装系统1、首先,确保您的新电脑和另一台已经安装好系统的电脑连接在同一个局域网中。2、在已安装好系统的电脑上,打开文件资源管理
 在Win11系统中如何安装打印机驱动程序Jan 30, 2024 am 08:39 AM
Win11系统如何安装打印机驱动在Win11系统中安装打印机驱动可能会有一些新的步骤和注意事项。下面我将为大家介绍一种简单的方法来安装打印机驱动。首先,我们需要确保打印机与电脑连接正常。可以使用USB线缆将打印机与电脑连接,或者通过无线网络连接打印机和电脑。确保打印机已经打开,并且处于可用状态。接下来,我们需要找到打印机的驱动程序。通常情况下,打印机会随附一张光盘,里面包含了驱动程序和其他必要的软件。如果你没有光盘,可以尝试在打印机制造商的官方网站上下载最新的驱动程序。一旦你找到了驱动程序,双击
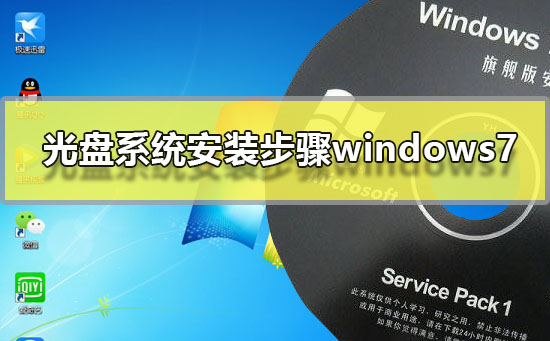 Windows 7光盘系统的安装指南Dec 28, 2023 pm 08:41 PM
然后win10系统都已经出来很久了,但是win7系统依然是最受用户们喜爱的了,很多的用户们想要将电脑上的系统重装成win7系统,但是不知道怎么去操作,那就快来看看详细的教程吧~光盘系统安装步骤windows7:台式机win764位系统下载>>>台式机win732位系统下载>>>笔记本win764位系统下载>>>笔记本win732位系统下载>>>1.重启电脑,然后在开机界面出来的时候,按下U盘启动快捷键。点击查看你的电脑U盘启动键>
 台式电脑重装系统步骤图文说明Jul 19, 2023 am 11:41 AM
电脑是我们生活中和工作中的好帮手,电脑在使用了一段时间后,系统就会卡顿。此时,就需要重装系统来解决,那么台式电脑怎么安装系统呢?下面小编就和大家分享电脑如何安装系统的步骤吧。1、下后的系统格式ISO文件,将ISO文件和NT6安装器(可自行下载)复制到电脑除C盘以外的其他盘的根目录下,两个文件要在同一目录。2、打开NT6安装器,打开后出现如下图,选择模式2安装。3、重启后进入如下图,在启动选择菜单按下图选择进入。4、点击下一步进入,要全新安装,点击“自定义(高级)”选项。5、点击自定义高级后,出现


Hot AI Tools

Undresser.AI Undress
AI-powered app for creating realistic nude photos

AI Clothes Remover
Online AI tool for removing clothes from photos.

Undress AI Tool
Undress images for free

Clothoff.io
AI clothes remover

AI Hentai Generator
Generate AI Hentai for free.

Hot Article
Hot Tools

WebStorm Mac version
Useful JavaScript development tools

SublimeText3 Mac version
God-level code editing software (SublimeText3)

SublimeText3 Chinese version
Chinese version, very easy to use

Safe Exam Browser
Safe Exam Browser is a secure browser environment for taking online exams securely. This software turns any computer into a secure workstation. It controls access to any utility and prevents students from using unauthorized resources.

Dreamweaver Mac version
Visual web development tools

