


php editor Zimo will introduce to you how to set up U disk boot on the old MSI motherboard. USB boot is a convenient and fast way to install the operating system, repair system problems, etc. Setting up USB boot on old MSI motherboards is also very simple, just follow the steps below. First, enter the BIOS setting interface of the motherboard, which can generally be entered by pressing the DEL or F2 key. In the BIOS setup interface, find the "Boot" or "Boot" option, and then select "Boot Device Priority" or "Boot Device Priority". In the boot device priority, move the USB flash drive device to first place, then save the settings and exit the BIOS. In this way, the motherboard will automatically boot from the USB flash drive the next time you turn it on. With such a simple setting, you can easily use a USB flash drive to boot on an old MSI motherboard.

The earliest installation of the Windows system was done through the original CD, which requires a CD-ROM drive and CD, as well as certain computer technical knowledge. However, installation is very slow. Once the installation is completed, the system is blank and drivers and commonly used software need to be installed one by one. Therefore, a complete system installation takes approximately more than an hour.

The core of the second generation system installation is Ghost technology, including the earliest "Ghost one-click installation DOS version" and the later WinPE system. Ghost technology has completely changed the limitations of using CD-ROM installation systems. It packages customized native systems, commonly used application software and hardware drivers to achieve quick installation. The entire installation process is fully automatic and unattended and very fast. It only takes about 10 minutes to complete the entire system installation, including drivers and commonly used software. However, it also has some problems. Most of the downloaded systems are not original, and many images contain promotional software, so the security of the system cannot be guaranteed.
Today, Xiaoyu will introduce to you the latest U disk installation system tutorial. The tutorial is very simple, just follow the steps to install the software. What's more, you don't need to download Windows images everywhere, because this tutorial allows you to download the system image directly from Microsoft's official website. After the download is complete, you only need to insert the USB flash drive into your computer and it will immediately be converted into the latest version of Windows 10 system disk.
1. PreparationBefore installing the system, you need to prepare a USB flash drive with a capacity of no less than 5G and a Windows computer that can access the Internet normally. It is recommended to use Windows 7 or Windows 10 system to improve installation efficiency.
 2. Preparation before installation - making system USB disk tool
To start installing Windows 10, you need to go to the "Download Windows 10" page of Microsoft's official website. On this page, you will find a USB flash drive creation tool that can help you with the installation process. Just click the "Download Tool Now" button at the bottom of the page to download the official USB flash drive creation tool.
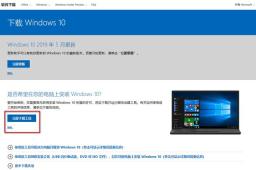
Download Windows 10 page
After the download is completed, please run the tool immediately and make sure that the USB flash drive is correctly inserted into the USB interface of the computer. Please back up the contents of the USB flash drive in advance because the next operation will automatically format the USB flash drive. Remember! Remember!

Run the Windows creation tool you just downloaded and follow the prompts to select "Create installation media (U disk, DVD or ISO file) for another computer.

Then, Select the system language and version you want to install. If there are no special requirements, just use the default options here.

In this step, select the media to be used as a U disk. Then click Next Start creating Windows 10 media.

During this process, the program will automatically download the latest Windows 10 system version. Depending on your network environment and the performance of the USB disk, it will take about half an hour. At this time , you can drink a cup of coffee or browse Douyin, and wait patiently.
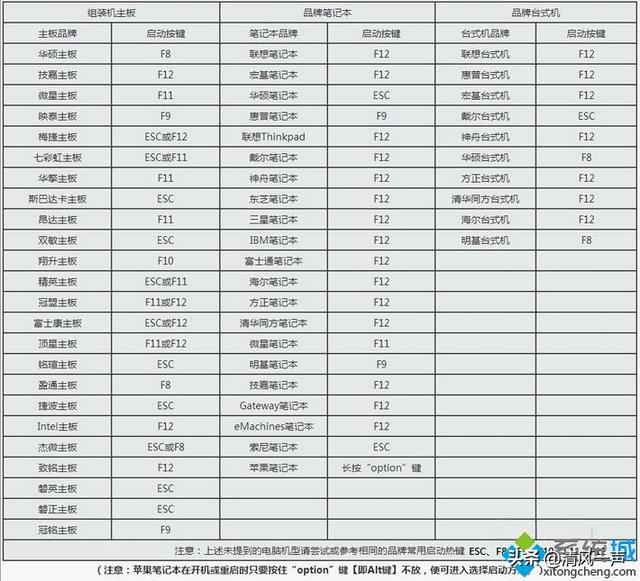
3. Boot the USB diskThis step is not difficult, but many people get stuck at this step when installing the system The reason is that I don’t know which key to press to enter the USB boot interface. However, there is no fixed key for this. Different computer brands and different motherboard models have different keys. You can customize it according to your own needs. Search for the computer model in detail. Generally speaking, there are F2, F12, F11, ESC and other keys. After finding the key to enter the shortcut startup of your computer, you can enter the U disk by continuously pressing that key when inserting the U disk to boot. in the system.
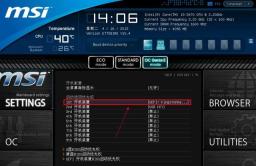
If you really can’t find it, you can also directly enter the BIOS and change the first place in the system startup sequence to a U disk, and then start again. The picture above is the interface for setting the system startup sequence for the msi motherboard. It is similar for other motherboards.
4. Install Windows systemAfter the system starts from the USB disk, the next operation is very simple, just like installing ordinary software. The whole process only requires clicking on Agree, Next and other operations. The process is also very simple.
Summary:
The Windows systems installed through this method are the latest official original systems, ensuring the security of the system. And only one USB flash drive is needed in the whole process, which is a fool-proof installation process. As long as you can install the software, you can install the system.
Have you learned it?
The above is the detailed content of msi old motherboard sets u disk boot. For more information, please follow other related articles on the PHP Chinese website!

 华硕电脑怎么进入bios设置u盘启动Jul 12, 2023 am 09:22 AM
在我们使用电脑遇到故障时,很多时候我们可以使用u盘来重装系统解决。这个时候我们就需要进入bios设置u盘启动,不过很多小伙伴不知道华硕电脑怎么进入bios设置u盘启动,那么今天小编就来教教大家华硕电脑bios设置u盘启动怎么操作。下面就让我们一起来看看吧!华硕电脑bios设置u盘启动的方法:1、开机时长按F2键就可以进入bios。2、按方向键移动光标并选择到BOOT(工具)设置选项。3、当我们把光标移动到boot后再按上下方向键移动光标到“HarddriveBBSPriorities”选项,然后
 东芝如何u盘启动设置u盘启动项Feb 11, 2024 am 09:27 AM
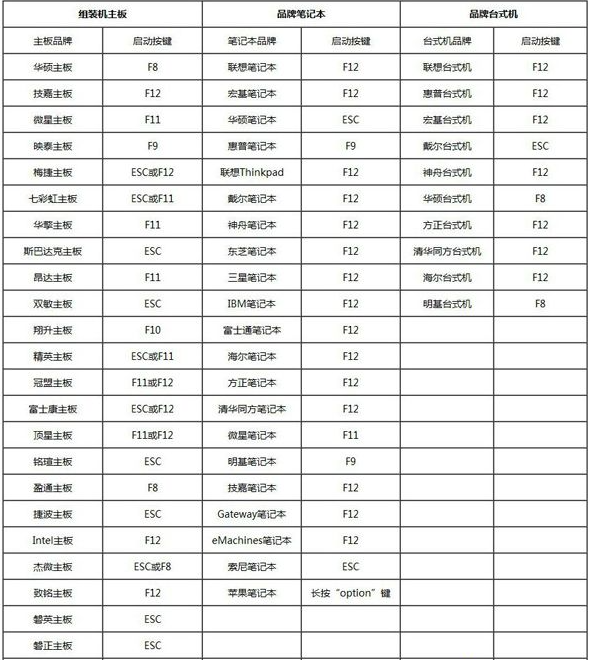
使用光盘安装系统已经越来越少,现在取而代之的是更加方便快速的U盘装机方式,要使用U盘装系统,除了制作U教授U盘启动盘之外,还需设置电脑开机从U盘引导启动进入系统安装界面。现在大多数电脑都支持U盘快速启动,只需在开机启动时按下热键选择从U盘启动,下面为大家整理了不同主板以及不同品牌电脑的开机启动项设置快捷键。所需工具:U盘启动盘一、各品牌主板台式机、品牌一体机、笔记本电脑开机启动热键一览表:二、使用启动热键一键设置U盘启动的方法:1、将制作好的U教授启动U盘插入电脑USB接口,开机或重新启动,按下
 如何把系统镜像装到u盘启动Feb 11, 2024 pm 06:00 PM
微星主板bios怎么进u盘装系统,具体方法如下一、工具下载原版windows10系统镜像,微星电脑一台,8g及8g以上的空u盘一个及下载一个u盘启动盘制作工具二、操作方法1、在电脑上下载安装老白菜u盘装系统工具插入一个八g以上的空白u盘,选择我们插入的u盘,点击开始制作启动盘2、待软件制作好u盘启动盘后,下载一个win10系统镜像文件,放入u盘内提示,制作成功后,把下载好的系统镜像文件拷贝到u盘内3、将u盘启动盘插入到需要安装的电脑中,开机不断按启动快捷键【微星主板的快捷启动键是F11】进启动界
 acer怎么进入置u盘启动不系统吗Feb 11, 2024 am 11:33 AM
有不少acer宏碁笔记本电脑用户不知道要按什么键进入U盘启动,其实方法并不难,本教程就给大家分享一下宏碁电脑进入u盘启动的详细步骤准备工具:新毛桃u盘启动盘,宏碁笔记本一台首先呢我们把这个u盘呢插入这个电脑网上这台电脑是蓝屏了然后呢我们重启这台宏基的笔记本电脑的u盘启动快捷键是F2重新开机然后按F2按向右方向键选中boot然后按向下方向键把这个usb选中他原来是在下面的我看一下你可以iff5或f六它这里有提示然后呢来移动usb设备网上我看见这这一个呢就是我的u盘然后选中它之后呢if12f十以后的
 bios设置u盘启动的方法图文展示Jul 17, 2023 pm 12:09 PM
u盘重装系统的过程中,是需要将u盘启动盘插入到电脑上设置u盘启动进入pe内重装系统的。不过很多网友不清楚电脑bios如何设置u盘启动,今天小编就给大家演示下bios设置u盘启动的方法。具体的步骤如下:1、在电脑上插入制作好的启动U盘,重启电脑时不停按F12或F11或Esc或F7等快捷键,下面是各种品牌主板、台式一体机的u启动热键一览表,根据不同的电脑品牌,选择对应的按键即可调出启动菜单选择界面。(目前大部分电脑都支持快捷键选择启动项,如果没有的话我们可以进bios界面选择。)2、弹出启动菜单选择
 ibm电脑如何进入u盘启动顺序Feb 09, 2024 pm 03:18 PM
今天小编给大家详解设置U盘为第一启动项教程,由于BIOS系统语言一般都是英文的,很多朋友设置起来不知道怎么操作,其实设置U盘启动的方法并不难,有需要的用户,请来看看版面的详细介绍吧。电脑系统偶尔会出现问题,特别是一些比较复杂的问题可能需要通过重装系统来解决。在这种情况下,使用U盘重装系统是一种常见的方法。但是,首先需要将电脑的启动项设置为U盘启动。对于不知道如何进行U盘启动盘设置的用户,我来给你提供简单的教程。首先,将U盘插入电脑的USB接口。然后,重启电脑。在电脑启动的过程中,按下相应的按键(
 惠普bios设置U盘启动的教程Jul 16, 2023 pm 02:21 PM
在使用惠普的用户却不少,很多人要进入快启动pe系统进行维护的时候却不知道该怎么设置U盘启动,主要是惠普bios设置U盘启动的方法和平常的方法略有不同,那么,惠普电脑如何U盘启动呢,下面我们来看看惠普bios设置U盘启动的教程,大家快来看看吧。1、首先,将u盘插入hp台式机的USB接口处。2、开机快速断续的按F10键进入BIOS设置界面。3、进入BIOS设置后,将界面切换到“Boot”选项,将光标移到“BootDevicePriority”选项按回车键进入。4、选择“HDDGroupBootPri
 MSI\'s new X870 motherboards tackle the next-gen power crunch with supplemental PCIe connectorSep 12, 2024 pm 06:08 PM
MSI has officially announced its next-generation AM5 motherboards, the X870 series, which are compliant with the ATX 3.1 standard. The standout feature here is the “Supplemental PCIe Power” feature – it’s a neat new power connector that'll pump extra


Hot AI Tools

Undresser.AI Undress
AI-powered app for creating realistic nude photos

AI Clothes Remover
Online AI tool for removing clothes from photos.

Undress AI Tool
Undress images for free

Clothoff.io
AI clothes remover

AI Hentai Generator
Generate AI Hentai for free.

Hot Article
Hot Tools

mPDF
mPDF is a PHP library that can generate PDF files from UTF-8 encoded HTML. The original author, Ian Back, wrote mPDF to output PDF files "on the fly" from his website and handle different languages. It is slower than original scripts like HTML2FPDF and produces larger files when using Unicode fonts, but supports CSS styles etc. and has a lot of enhancements. Supports almost all languages, including RTL (Arabic and Hebrew) and CJK (Chinese, Japanese and Korean). Supports nested block-level elements (such as P, DIV),

SublimeText3 Chinese version
Chinese version, very easy to use

Dreamweaver Mac version
Visual web development tools

EditPlus Chinese cracked version
Small size, syntax highlighting, does not support code prompt function

Safe Exam Browser
Safe Exam Browser is a secure browser environment for taking online exams securely. This software turns any computer into a secure workstation. It controls access to any utility and prevents students from using unauthorized resources.

