


php editor Xigua will answer the question of how to change the mac file format. When using Mac computers, we sometimes need to convert files to different formats to suit different applications or devices. Changing the file format makes it easier for us to share, edit or play files. Whether you're converting pictures, audio, videos, or document files, Mac provides easy-to-use methods for format conversion. Below we will introduce several common methods to help you quickly change file formats.
How to change the png image format to jpg format on Apple mac system?
The first step is to click on the jpeg image pointed by the arrow below. In the second step, right-click the image and select it, and an option box will pop up. Step 3: Click the arrow next to [Open with] in the options box, and then select the [Preview] option.
First, put the picture that needs to be converted into a format on the desktop, then right-click the picture and select "Open with". In the pop-up options, select "Preview".
First, turn on your computer and find the picture you want to convert, then open the picture. Next, click the File menu at the top of the page and select the export option. In the export page that pops up, click the drop-down box to the right of Format. Select the JPEG option in the drop-down menu.
Next, enter the following command in the terminal window: defaults write com.apple.screencapture type jpg. This command changes the screenshot profile to JPG format. If no error message is received, the setup is successful.
Method 1: Change format on iPhone. Open the iPhone's "Settings" - "Camera" - "Format" option. Select "Best Compatibility" and the photo will be saved in JPEG format. Find the image you want to modify in the folder and click the "Tools" option in the red box. Then select and open Folder Options.
After opening PS, we can see the menu bar on the left. We need to click the [File] option and then select [Open] in the pop-up menu. Next, we need to find the png format image we want to edit in the file browser and click the [Open] button. The image will be displayed in the PS workspace. Next, we need to click the [File] option on the top menu bar and select [Export] from the drop-down menu. In the export options, we need to select the [Save As] option. This will open a pop-up window where we can choose the format and save path of the exported image. Through the above steps, we can open and export the png format image of our choice in PS.
How to set batch modification suffix names for files on Mac computers
Right-click on the file and select "Show Introduction". Modify the suffix name in the text box below "Name and extension". Click "Confirm changes" to complete.
First, open your Mac computer, click on the stacked files on the desktop, and select the document. Next, tap the trackpad once to select the file whose suffix you want to change. Then, press the [Return] key on the keyboard. After the [.] in the file suffix, enter the new suffix you want, such as psd. After completion, press the [Return] key to confirm the changes.
First, select the files you want to batch modify in Finder (preferably they have common naming characteristics). Then, right-click the selected file and select "Rename x items...", where "x" represents the number of selected files. This will open a dialog box that allows you to batch modify the file names. Make sure to back up your files before making bulk modifications to avoid accidental data loss.
When you open the image file, you can see that the extension of the image file is hidden in the MAC system. Open the Finder on the menu bar and click Preferences in the drop-down menu.
How to change the file suffix on mac?
1. Step 1: Find the file whose extension you want to change and right-click it. Then select "Get Info." Step 2: In the "Name and Extension" section, find the extension and click on it. Then move your cursor to the end of the extension, delete it and enter a new one. Step 3: Press "Enter" key to save changes.
2. Right-click on the file and select "Show Introduction". Modify the suffix name in the text box below "Name and extension". Click "Confirm changes" to complete.
3. First, open your Mac computer, click on the stacked files on the desktop, and select the document. Next, tap the trackpad once to select the file whose suffix you want to change. Then, press the [Return] key on the keyboard. After the [.] in the file suffix, enter the new suffix you want, such as psd. After completion, press the [Return] key to confirm the changes.
How to change macbook mov format to mp4
1. Method/steps: First download the application software Total Video Converter Lite through Baidu or Apple software market. After installation, go to the MacBook application homepage Find Total Video Converter Lite and click to open.
2. First prepare a mov file, then copy the following dmg file to your Mac and install it. After installation, click Start, open the software in Startup, as shown in the figure. Then click on the output folder on the software to browse, select a folder, for example, after selecting the desktop, click Choose.
3. If you use Format Factory to convert, you need to install quicktime player on your computer. In fact, after installing quicktime player, it can convert MOV to MP4 format.
4. Step one: We first open the video converter on the computer. After entering the homepage of the tool, we directly click on the first function [Video Conversion]. Step 2: Then we click [Add File] to add the video to be converted to the tool. Of course, you can also choose to drag the video in directly.

How to change the format of mac screenshots? Introduction to the method of modifying the format of Mac screenshots
The first method: Use "Beautiful Picture Look" to open a png pictures. Then, click "Edit" and then click the drop-down triangle. Select "Batch Convert Format" to convert the format to JPG format. The second method: Open the "Drawing Tool" that comes with your computer, and then click "Save As" to save it in JPG format.
Method/Steps We can directly find the "Terminal" application through the Spotlight search function on the Mac computer, as shown in the picture. If you don't know how to use Spotlight search, you can also find it in other areas of LaunchPad. .
The first step is to find and open the terminal in other folders in Launchpad.
The first step is to find and click the [Terminal] icon as pointed by the arrow in the picture below. In the second step, after opening the terminal, enter [default wrtie com.apple.screencapture type jpg] in the command line according to the arrow in the figure below, and set the default format of the screenshot to [jpg].
Conclusion: The above is all the content on how to change mac file format compiled by this site for you. Thank you for taking the time to read the content of this site. I hope it will be helpful to you. Don’t forget more related content. Find it on this site.
The above is the detailed content of How to change mac file format?. For more information, please follow other related articles on the PHP Chinese website!

 ip与mac绑定什么意思Mar 09, 2023 pm 04:44 PM
ip与mac绑定是指将特定的IP地址与特定的MAC地址关联起来,使得只有使用该MAC地址的设备才能够使用该IP地址进行网络通信。ip与mac绑定可以防止被绑定的主机的IP地址不被假冒,前提条件:1、MAC地址是唯一的,并且不可假冒;只能绑定与路由器直接相连的网络上的主机(也就是主机的网关在路由器上)。
 mac版下载是什么意思Mar 06, 2023 am 09:52 AM
mac版下载的意思是当软件在选择安装时,选择MAC版下载;Windows版和MAC版是两个不同的操作系统,所以大多数软件在选择安装的同时需要选择Windows版还是MAC版。
 mac鼠标滚轮相反怎么办Mar 16, 2023 pm 05:44 PM
mac鼠标滚轮相反的解决办法:1、打开mac电脑,点击屏幕的苹果标志,然后选择“系统偏好设置”;2、在“系统偏好设置”窗口中,选择“鼠标”;3、在“鼠标”窗口中,将“滚动方向:自然”前面的勾去掉即可。
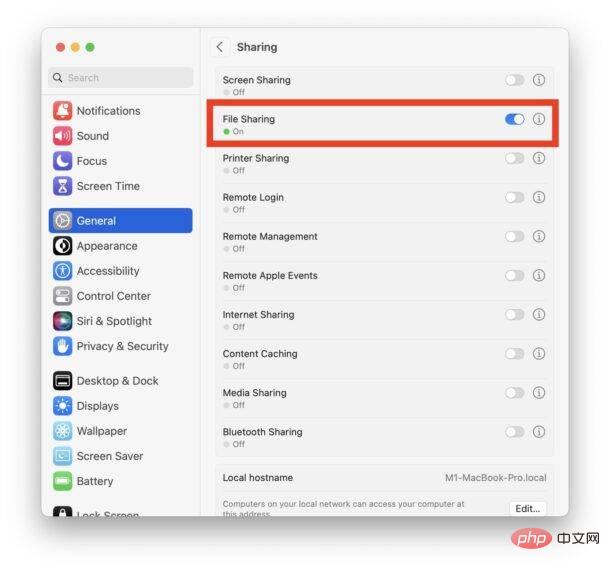 修复文件共享在 MacOS Ventura 中不起作用Apr 13, 2023 am 11:34 AM
修复 SMB 文件共享在 MacOS Ventura 中不起作用的问题从 Apple 菜单打开 Mac 上的“系统设置”应用程序转到“常规”,然后转到“共享”找到“文件共享”的开关并将其关闭通过转到 Apple 菜单并选择重新启动来重新启动 Mac重新启动后,返回共享系统设置面板并将“文件共享”重新设置为打开位置像往常一样恢复文件共享,它应该按预期工作如果 MacOS Ventura Mac 与另一台 Mac 或设备之间的文件共享突然再次停止工作,您可能需要在几天后或随机重复此过程。
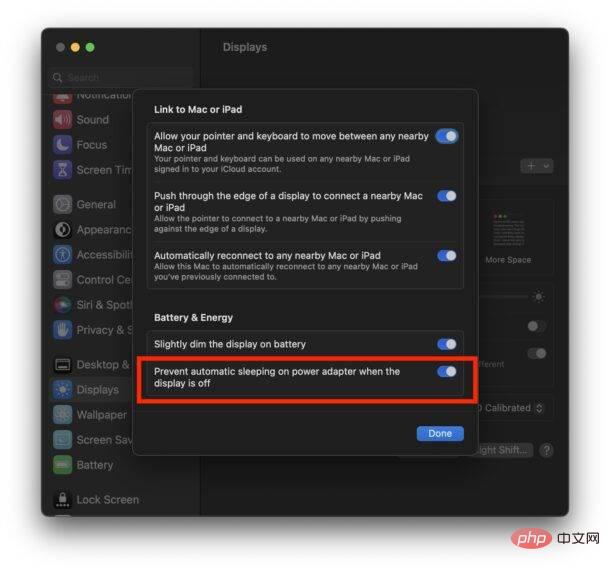 如何防止 Mac 在显示器关闭时进入睡眠状态 (MacOS Ventura)Apr 13, 2023 pm 12:31 PM
显示器关闭时如何防止 Mac 休眠如果您希望 Mac 显示器能够在整个计算机不进入睡眠状态的情况下关闭,请在此处进行适当的设置调整:下拉 Apple 菜单并转到“系统设置”转到“显示”点击“高级...”切换“防止显示器关闭时电源适配器自动休眠”的开关现在 Mac 显示屏可以关闭,同时防止 Mac 本身进入睡眠状态。这可能主要与 Mac 笔记本电脑用户相关,但即使是那些没有 MacBook 的用户也可能会发现该功能很有用。
 mac克隆是什么意思Jan 31, 2023 am 10:33 AM
mac克隆全称mac地址克隆,是固化在网卡上串行EEPROM中的物理地址,通常有48位长。mac克隆一般应用在路由器上,用户在用电脑直接拨号上网,后来又加了个路由器,通过路由器来实现多台电脑同时上网,这时要用到mac地址克隆了,就是把当前的电脑的mac地址克隆到路由器中去,因为运营商是把你的电脑mac地址绑定你的账号的,所以得克隆以后才能用。
 mac的shift键是哪个键Mar 13, 2023 pm 02:20 PM
mac的shift键是fn键上方、caps lock键下方的一个键,该键在键盘最左侧,由右下往上数第2个键;shift键是键盘中的上档转换键,可以通过“Ctrl+Shift”组合键来切换输入法。
 mac解压rar用什么软件Mar 03, 2023 pm 04:18 PM
mac解压rar的软件:1、The Unarchiver,是一款完全免费、小巧,而且非常易于使用的压缩、解压缩小工具;2、Keka,是一款免费、实用的压缩、解压缩工具,支持解压缩RAR格式的压缩包;3、360压缩大师,是一款免费的压缩、解压缩软件,完全支持RAR文件解压;4、MacZip,支持包括RAR在内的超过20种压缩格式的解压;5、BetterZip;6、FastZip。


Hot AI Tools

Undresser.AI Undress
AI-powered app for creating realistic nude photos

AI Clothes Remover
Online AI tool for removing clothes from photos.

Undress AI Tool
Undress images for free

Clothoff.io
AI clothes remover

AI Hentai Generator
Generate AI Hentai for free.

Hot Article
Hot Tools

EditPlus Chinese cracked version
Small size, syntax highlighting, does not support code prompt function

SublimeText3 Linux new version
SublimeText3 Linux latest version

ZendStudio 13.5.1 Mac
Powerful PHP integrated development environment

Notepad++7.3.1
Easy-to-use and free code editor

SublimeText3 English version
Recommended: Win version, supports code prompts!

