


php editor Xinyi has brought you a Dell computer USB disk system installation tutorial video, allowing you to easily learn how to use a USB disk to install the operating system. The video details the preparation work, making a boot disk, setting up the BIOS and installing the system. By following the video tutorial, you can quickly master the skills of installing the USB disk system, eliminating the tedious CD installation process and improving the installation speed. Both novices and users with certain computer skills can easily get started and enjoy a quick system installation experience.
Beginners should first learn the basics:
System source files usually have two formats and installation methods: ISO image installation and Ghost installation. In addition, there is an independent system called PE, which can be installed on a USB flash drive or CD. The PE system has a variety of functions, such as installing the system, disk partitioning, and cracking Windows startup passwords.
1. Preparation work:
U disk 4GB,
Dabaicai PE U disk boot disk creation tool 4.6
windows 7 ultimate version ISO
Driver Wizard offline package (you can keep this in the future).
Download address:
大白菜Download address:
http://down.winbaicai.com:88/大白菜 USB boot creation tool V4.6.exe
Website: http://www.winbaicai.com
windows7 32-bit Thunder or eMule download address: ed2k://|file|cn_windows_7_ultimate_x86_dvd_x15-65907.iso|2604238848|D6F139D7A45E81B76199DDCCDDC4B509|/
Website: http://msdn.itelleyou.cn/?lang=zh-cn
Offline package download address:
http://file.mydrivers.com /DriverGeniusLite_win7x32.exe
Website: http://www.drivergenius.com/
Note, back up the U disk data before making.
2. Make PE tools.
1. Install Chinese cabbage.


2. After the installation is completed, open the Chinese cabbage software.
Interface:


Please select your U disk, don’t make the wrong choice. Create a USB boot disk with one click.


Click OK to format.
wait. ...It will be ready in a while, you can do the test.

OK, we have finished using the U disk as the boot disk. The next step is to copy the ISO file we downloaded to the U disk, or copy it to the computer disk.
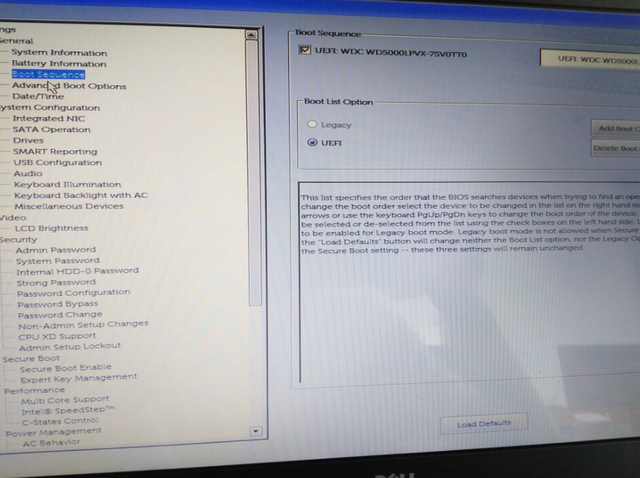
3. Set the U disk as the first boot.
1. After copying the downloaded ISO image to a U disk or computer, we insert the U disk into the computer, turn it on, and set the U disk in the BIOS as the first boot. Here we need to emphasize that setting the BIOS boot The setting method of each computer is different, because the motherboard is different, and the way to open the bios is also different. Here I am the motherboard of the desktop Onda H61. In fact, the settings are pretty much the same. We need to write more here. For novices, English may be a hindrance.
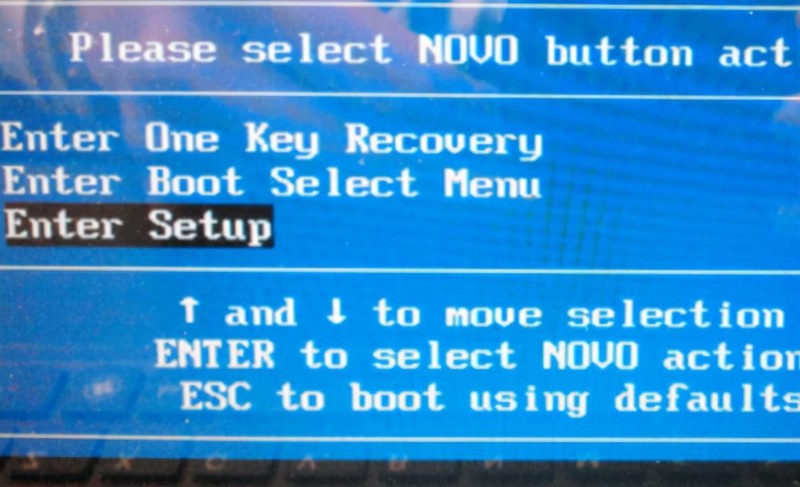
Press and hold F11 when booting, the hardware settings quick boot menu will appear.

The BIOS quick start menu of laptops like Lenovo Acer all starts by pressing F12. The most commonly used ones are F12 and F10.
The following is for reference: My Baidu.
Motherboard brand startup button Laptop brand startup button Desktop brand startup button
Asus motherboard F8 Lenovo notebook F12 Lenovo desktop F12
Gigabyte motherboard F12 Acer notebook F12 HP desktop F12
MSI motherboard F11 ASUS notebook ESC Acer desktop F12
Biostar motherboard F9 HP notebook F9 Dell desktop ESC
Meijie motherboard ESC or F12 Lenovo Thinkpad F12 Shenzhou desktop Machine F12
Colorful motherboard ESC or F11 Dell notebook F12 ASUS desktop F8
ASRock motherboard F11 Shenzhou notebook F12 Founder desktop F12
Spartak motherboard ESC Toshiba notebook F12 Tsinghua Tongfang desktop F12
Onda motherboard F11 Samsung notebook F12 Haier desktop F12
Shuangming motherboard ESC IBM notebook F12 BenQ desktop F8
ASL motherboard F10 Fujitsu notebook F12
Elite motherboard ESC or F11 Haier notebook F12
Guanmeng motherboard F11 or F12 Founder notebook F12
Foxconn motherboard ESC or F12 Tsinghua Tongfang notebook F12
Topstar motherboard F11 or F12 MSI notebook F11
Mingxuan motherboard ESC BenQ notebook F9
Yeston motherboard F8 Gigabyte notebook F12
Jetway motherboard ESC Gateway notebook F12
Intel motherboard F6 or F12 eMachines notebook F12
Jiewei motherboard ESC or F8 Sony notebook ESC or F2
Zhiming motherboard F12
Panying motherboardESC
Panzheng motherboard ESC
Guanming motherboard F9
Attachment:
BIOS entry shortcut key:
Notebook:
IBM (press F1 during cold boot, some new models can be started by pressing F1 when restarting)
HP HP (press F2, F9, F10 when starting and restarting)
ASUS ASUS (start up Press F2 when the ASUS LOGO appears)
SONY (Press F2 when starting and restarting)
Dell (Press F2 when starting and restarting)
Acer Acer (Press F2 when starting and restarting)
Toshiba (Press ESC and then F1 when booting coldly)
Compaq (Press F10 when the flashing cursor appears in the upper right corner after booting, or Press F10 when booting)
Fujitsu Fujitsu (press F2 when starting and restarting)
Most domestic and Taiwanese brands (press F2 when starting and restarting)
Continue Select your own USB flash drive and press Enter.

Our Chinese cabbage Qidong menu will appear. If it does not appear, you need to reinstall it. Just open Chinese cabbage and rewrite the boot and PE files. See the steps: "2. Make PE tools."

Select 2 here, press key 2 directly. Press Enter to enter PE. If there is a blue screen when you enter, come back and enter 04. Press key 4, and then Enter.
4. PE installs Windows 7 system.
1. After entering the PE system, run the virtual optical drive Virtual DriverManager.

Click "Load" and select the ISO image file just now. I've changed the name here.

Sure. Do not close Virtual DriverManager. We minimize it in the taskbar.
Then click Start-Programs-System Installation-WinNT6 Quick Installer in the lower left corner.

3. Open the NT6 quick installer. There are many quick installers, we will only talk about this one.
Open a single computer and enter the virtual optical drive we just loaded.

Enter the sources file and double-click the install.wim file.

We have opened it. Please note that you must select the flagship version above. The default is the home version. All home versions have fewer functions. It is recommended to install the ultimate version.

OK, we opened it, select the system drive letter where you installed it, the default is C drive, of course you can also choose other, it is recommended to choose C, because C drive is theoretically smaller than other drives , if you don’t understand, take a look at the principle of the hard disk.

Then click to start the installation. You will be prompted to format in the middle, select quick format, and then the format will start automatically

Then the system will copy the files to the C drive by itself and wait for about 3 minutes. A pop-up will pop up asking you to restart. When you click Restart, quickly pull out the USB flash drive. Otherwise, the USB flash drive will boot automatically, and then the system will be installed automatically.
Next step,
Next step,
are all in Chinese, and then choose not to update, which is the bottom one.
Next, you will be asked to enter the activation code. Just go to the next step. Ignore it and enter your user name. I won’t explain it in detail here. Because I haven’t installed it yet, I’m relatively new to it later. The whole process takes about 15 minutes.
Next we need to install the driver. If the machine has a driver, we can install it directly. If not, use our driver wizard offline package. Otherwise, some machines cannot access the Internet without installing the network card driver, so you should just look at them and look for the driver elsewhere.
Let’s learn more about illiteracy here: To access the Internet, you need to install the network card driver, otherwise you will not be able to access the Internet. To play games, you need to install the graphics card driver. Otherwise, many games cannot be played, videos cannot be opened, the system starts slowly, etc. The meaning of drive is like lubricating oil, everyone understands.
The above is the detailed content of Dell computer USB disk system installation tutorial video. For more information, please follow other related articles on the PHP Chinese website!

 戴尔电脑bios界面设置u盘启动项Feb 10, 2024 pm 10:09 PM
如果您的计算机是戴尔笔记本电脑,如何设置USB驱动器?很多朋友发现,戴尔笔记本电脑不会通过按下启动热键来显示U盘选项,所以他们需要进入BIOS来设置U盘启动,所以如果他们不知道如何操作它呢?现在按照小编的步骤来演示如何设置戴尔笔记本的USB闪存驱动器。很多朋友组装戴尔电脑,但不知道如何进入USBPE接口后,使USB启动工具。许多朋友不知道他们需要进入BIOS界面来设置USB引导,所以按引导热键不会出现。我们该怎么办?让我们看看戴尔是如何设置U盘启动的!设置Dell笔记本电脑重新安装系统u盘启动的
 戴尔电脑怎么设置硬盘启动Mar 16, 2024 am 11:55 AM
戴尔的台式电脑怎么设置成硬盘为第一启动项1、戴尔电脑从硬盘启动的方法是:首先,在电脑启动时使用快捷键设置,开机进入到LOGO标志画面时,马上按下键盘左上角的F2键,就能进入到BIOS主界面,一般在标志画面出现时。然后,在屏幕的右下方都会有进入BIOS按键提示。2、第一步,重启电脑,在看到delllogo时,按下Dell键进入BIOS。第二步,进入BIOS界面后,找到并点击选择SystemSummary后按enter键。第三步,找到Satadrive012查看自己加装的固态硬盘是否已经被电脑识别。
 联想笔记本按f2进入不了bios 最新笔记本和主板进bios的方法Feb 06, 2024 pm 09:22 PM
联想您可以通过【F1】或【Fn】+【F1】快捷键进入BIOS;也可以通过【F2】或【Fn】+【F2】进入BIOS;还可以通过启动菜单选择进入;最后一种方法是通过NOVO键进入一键恢复菜单进入BIOS界面大多数联想笔记本电脑可通过按下F2键进入BIOS。有些型号需要同时按下Fn和F2键。不同型号的联想笔记本电脑BIOS界面各不相同。如果电源键旁边有一个NOVO键,通常是带有箭头符号的按键。有的联想笔记本电脑将其放置在左侧,有的则放在电源键旁边。在关机状态下按下NOVO键,电脑启动后会进入NovoB
 笔记本电脑换内存条多少钱Mar 10, 2024 pm 01:01 PM
联想笔记本2G内存条多少钱1、目前1g的内存在你那个机器上可能在200元左右因为。你那个机器是ddr400的内存吧另外做系统一般收费在30--50左右前提是不找联想的售后。。2、您好:cpU8核大概500元左右,硬盘1TB大约500元左右,内存单条8G600元左右,独立显卡2G300左右,主板英特尔600左右,加在一起4000多足够了。希望以上信息能帮到您。3、拿着hp笔记本到联想店装内存,自然要收费的。30元的安装费本来也无所谓,其实自己安装就行了。正确的做法是:拿到hp店安装就好了。4、如果
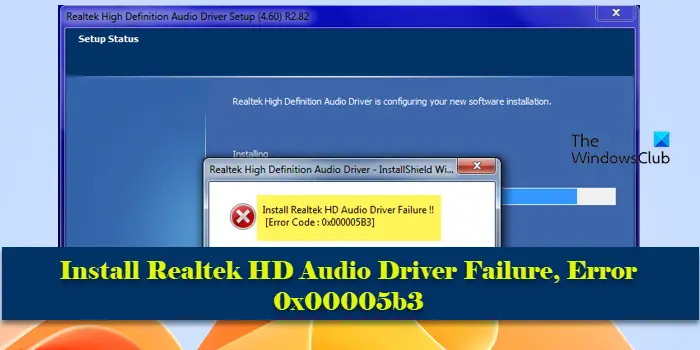 安装Realtek HD音频驱动程序失败,错误0x00005b3Feb 19, 2024 am 10:42 AM
如果您在Windows11/10PC上遇到RealtekHD音频驱动程序失败错误代码0x00005b3,请参考以下步骤以解决问题。我们将指导您进行故障排除并解决该错误。错误代码0x00005b3可能是由于音频驱动程序的安装问题导致的。可能是当前的驱动程序损坏或部分卸载,从而影响新驱动程序的安装。此问题还可能由磁盘空间不足或与Windows版本不兼容的音频驱动程序引起。安装RealtekHD音频驱动程序失败!![错误代码:0x00005B3]如果Realtek音频驱动程序安装向导出现问题,继续阅读
 笔记本电脑cpu频率Feb 17, 2024 pm 04:06 PM
戴尔5540笔记本电脑CPU频率一直都是0.78GHz检查是不是设置了省电模式,自动降频到0.78GHz。如果不是建议去对应售后网点检测维修。戴尔电脑cpu锁频0.78,检查是不是设置了省电模式,自动降频到0.78GHz。如果不是建议去对应售后网点检测维修。现在的CPU为了降低功耗,都会自动降频。只有CPU在高负载状态下才会提高频率。检查是不是设置了省电模式,自动降频到0.78GHz。如果不是建议去对应售后网点检测维修。从参数来看,你的CPU是正常的,本来CPU频率就是可变的,CPU-Z上也提示
 电脑屏幕字小怎样调大Mar 16, 2024 pm 01:10 PM
怎样调节电脑屏幕字体的大小1、改变特定软件的字体大小:有些软件可以自定义字体大小,您可以在该软件的设置选项中找到相关设置项,并进行设置。调整显示器分辨率:在更改显卡分辨率后也会影响字体大小。2、以苹果iMac,MacOSX系统为例,电脑字体大小的设置方法如下:显示器:打开系统偏好设置,选择显示器,缩放,调节分辨率即可。(有一个弊端是字体会变模糊)。3、在电脑桌面右键点击鼠标。选择屏幕分辨率选项。选择图中标注的放大或缩小文本和其他项目。在接下来的界面中选择较大。然后点击应用就可以了,这时屏幕和网页
 戴尔和惠普笔记本哪个好Mar 07, 2024 am 08:58 AM
惠普和戴尔哪个好知乎1、戴尔产品精致,性能更好,售后服务完善,笔记本推荐。如果你想买一台轻薄的笔记本,推荐戴尔岳翎7400。戴尔岳翎7400采用15英寸的大屏幕,屏幕比例为91%,黄金比例为16:10,但机身只有14英寸笔记本大小。2、但是唯有一点,戴尔公司的笔记本主要销售渠厂是网销,实体店比较少,维修站也少的可怜,个人感觉售后这块的话不是那么完美,所以建议选择惠普。问题二:惠普和戴尔哪个好您好,感谢您选择惠普产品。3、惠普和戴尔比最大的优势就是便宜,如果两台配置差不多的本相比,绝对惠普的便宜。


Hot AI Tools

Undresser.AI Undress
AI-powered app for creating realistic nude photos

AI Clothes Remover
Online AI tool for removing clothes from photos.

Undress AI Tool
Undress images for free

Clothoff.io
AI clothes remover

AI Hentai Generator
Generate AI Hentai for free.

Hot Article
Hot Tools

Atom editor mac version download
The most popular open source editor

Dreamweaver CS6
Visual web development tools

Dreamweaver Mac version
Visual web development tools

Notepad++7.3.1
Easy-to-use and free code editor

MinGW - Minimalist GNU for Windows
This project is in the process of being migrated to osdn.net/projects/mingw, you can continue to follow us there. MinGW: A native Windows port of the GNU Compiler Collection (GCC), freely distributable import libraries and header files for building native Windows applications; includes extensions to the MSVC runtime to support C99 functionality. All MinGW software can run on 64-bit Windows platforms.

