


php editor Youzi introduces a solution to a common problem - using a USB flash drive to create a Dell boot. In daily use, sometimes we need to reinstall the operating system or repair system failures, and the USB flash drive is a convenient tool. This article will introduce in detail how to use a USB flash drive to create a Dell boot to quickly start and install the system. Whether you are a beginner or a user with some computer experience, you can easily get started and make your Dell computer come alive again. Next, let’s learn about the specific steps.

Analysis reason: The motherboard BIOS setting does not open the U disk boot item, so it will not be recognized.
Method steps:
Restart the computer and keep pressing the F2 key to enter the BIOS. The buttons may be different depending on the brand, take Dell as an example.

?
2. Then enter the bios interface, use the left and right arrow keys to select the boot option in the title option, which is the boot option.

?
In the boot interface, you can see the usb boot option, and the following option is disabled, which is the closed state. You need to enable it first, just press Enter to select.

?
4. Then a small selection window will pop up. Select the enabled option in the options, which means enabled.

?
5. Then the usb boot option will change to the enabled option. At this time, the usb boot function will be successfully enabled and the U disk will be recognized.

?
6. Finally, the computer will restart and the USB disk will be recognized and booted.

The above is the detailed content of U disk for dell boot. For more information, please follow other related articles on the PHP Chinese website!

 文件怎么保存到u盘Aug 29, 2023 pm 03:18 PM
文件保存到u盘的方法:1、准备好一台计算机和一个U盘;2、将U盘插入计算机的USB接口;3、在计算机的任务栏上,找到资源管理器图标单击打开;4、选择要保存的文件;5、右键单击文件,然后选择“复制”选项;6、粘贴文件到U盘;7、等待文件复制完成;8、确认文件已成功保存到U盘;9、安全拔出U盘即可。
 电脑u盘装系统按什么键进入u盘启动Jul 14, 2023 pm 05:37 PM
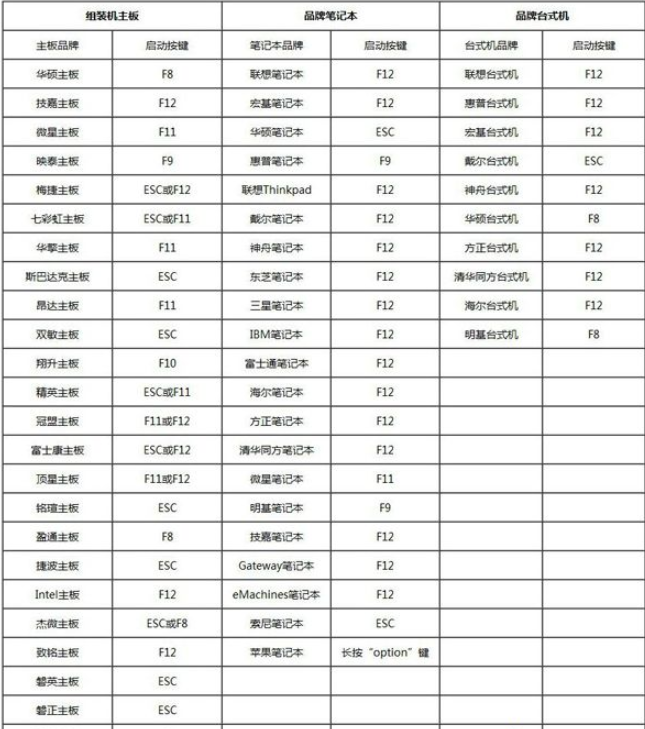
当电脑出现系统故障问题无法进入系统的时候,我们可以通过制作u盘启动盘重装系统解决。但是u盘装系统时需要设置u盘启动进pe才能重装。那么电脑u盘装系统按什么键进入u盘启动呢?下面小编就教下大家电脑开机按什么键进入u盘启动。方法一:开机按启动快捷键1、在电脑上插入启动U盘,重启电脑时不停按F12、F11、Esc或F8快捷键,不同品牌电脑启动热键如图所示。2、弹出启动菜单,KingstonDataTravelerG21.00或GeneralUDisk5.00或USB选项都是U盘启动项,DVD-RAM则
 u盘发烫是什么原因Oct 28, 2022 pm 02:54 PM
u盘发烫是属于正常的现象,u盘的内部是由许多电子元件所组成,需要通过电脑主机箱上的usb插口处进行通电,并通过系统的读取方能使用;使用u盘的时间有所不同,它内部的电子元件也会随着u盘运转持续时间的变长而慢慢发热。
 u盘是什么Jan 31, 2023 am 11:45 AM
u盘是指“USB闪存盘”;U盘是闪存的一种,故有时也称作闪盘;U盘集磁盘存储技术、闪存技术及通用串行总线技术于一体;其与硬盘的最大不同是,它不需物理驱动器,即插即用,且其存储容量远超过软盘,极便于携带。
 u盘是哪个国家发明的Oct 09, 2022 pm 02:26 PM
u盘是中国发明的,朗科公司是U盘的全球发明者。2002年7月,朗科公司的“用于数据处理系统的快闪电子式外存储方法及其装置”获得国家知识产权局正式授权,该专利填补了中国计算机存储领域20年来发明专利的空白;2004年12月7日,朗科获得美国国家专利局正式授权的闪存盘基础发明专利。
 大白菜U盘重装win7教程Jul 19, 2023 pm 06:09 PM
win7系统界面美观,系统性能好,用户多。然而,无论计算机系统有多好,都不可避免地会遇到无法修复的故障。因此,我们可以重新安装计算机系统。如果您不知道w7系统的重新安装步骤,可以参考下面介绍的大白菜u盘重新安装win7教程。大白菜U盘重装win7教程。1.制作uefipe启动U盘后,将win764位系统iso镜像直接复制到U盘gho目录下;2.将U盘插入UEFI计算机,启动后不断按F12.F11.Esc等快捷键,在弹出的启动项选择框中,选择识别的U盘启动项,如有UEFI启动项,则选择UEFI前缀
 u盘是硬盘还是软盘Aug 23, 2022 am 11:29 AM
u盘既不是硬盘,也不是软盘。U盘是一种使用USB接口的无须物理驱动器的微型高容量移动存储产品,它是闪存的一种,集磁盘存储技术、闪存技术及通用串行总线技术于一体。U盘与硬盘的最大不同是:它不需物理驱动器,即插即用;且U盘的存储容量远超过软盘,极便于携带。
 格式化u盘有什么后果Jan 13, 2021 pm 05:32 PM
格式化u盘的后果:1、清空U盘,会将u盘中的文件全部删除;2、可以消除U盘上的一些逻辑性的错误和非顽固性病毒或流氓程序;3、如果经常性反复格式化u盘,会降低U盘的使用寿命。


Hot AI Tools

Undresser.AI Undress
AI-powered app for creating realistic nude photos

AI Clothes Remover
Online AI tool for removing clothes from photos.

Undress AI Tool
Undress images for free

Clothoff.io
AI clothes remover

AI Hentai Generator
Generate AI Hentai for free.

Hot Article
Hot Tools

SublimeText3 Mac version
God-level code editing software (SublimeText3)

SAP NetWeaver Server Adapter for Eclipse
Integrate Eclipse with SAP NetWeaver application server.

ZendStudio 13.5.1 Mac
Powerful PHP integrated development environment

mPDF
mPDF is a PHP library that can generate PDF files from UTF-8 encoded HTML. The original author, Ian Back, wrote mPDF to output PDF files "on the fly" from his website and handle different languages. It is slower than original scripts like HTML2FPDF and produces larger files when using Unicode fonts, but supports CSS styles etc. and has a lot of enhancements. Supports almost all languages, including RTL (Arabic and Hebrew) and CJK (Chinese, Japanese and Korean). Supports nested block-level elements (such as P, DIV),

SublimeText3 English version
Recommended: Win version, supports code prompts!

