

 System TutorialMACHow to review photos on Apple Mac (how to use the mac photo review tool after downloading it)
php editor Yuzi will explain to you how to review photos on Apple Mac and use mac photo review tools. Apple's system provides a powerful photo review tool that can automatically detect and block objectionable or sensitive content. Users simply need to download and install the tool, then enable the photo review feature in system settings. Next, users can personalize settings in the Photos app, such as selecting review levels, custom blocking words, and more. After the review is completed, the tool will automatically review the photos and block them when necessary to protect the user's privacy and security.
How to adjust civil service examination photos on Apple computers
After selecting the photo file, the photos that meet the requirements will be displayed in the photo display area. Click the save button to save the photo file. The saved photo size is approximately 10K. If the photo does not meet the requirements, you need to follow the prompts to reselect a photo file that meets the requirements.
Open the national examination photo processing tool mac and enter the compilation interface. Click the file on the upper left to import the photos you want to use. Finally, click on the toolbox above in the compilation interface to perform photo processing.
Open your photo in Photoshop and click the crop tool on the right. In the cropping parameter settings above, fill in the parameters required in the recruitment brochure (the size of the civil servant registration photo is 2 inches and less than 20k). Place the mouse on the photo, select a suitable area, and then double-click to confirm to complete the cropping.
"Verified" proves identification. You can download the registration photo processing tool from the official national examination registration website. This software is only suitable for desktop and laptop computers and needs to run on Windows system. Apple computers, tablets and mobile phones are not supported.
The following are the specific steps: 1. Open the website homepage. 2. Click the "Browse" button in the middle of the web page. 3. Select the picture you want to modify from your computer or USB flash drive. 4. Click OK to close the file selection dialog box.
If the photo is too large and needs to be cropped, set it according to the required size and crop it. The most important thing to reduce the size of the photo is to save it, select "Save for web and devices". Freely adjust according to display size.
The National Qualification Examination Network photo review and processing tool does not have a mac version
The official photo review tool does not have a mac version, so what you download is the Windows version of the EXE file, which cannot be opened on Apple computers is normal.
You can use the official version of the ID photo review and processing tool of the National Qualification Examination Online Application Platform. This software is a photo self-review tool launched to facilitate the registration of the National Qualification Examination.
The photo review processing tool only has a Windows version, so it cannot be installed on Mac systems. This is because the tool is not compatible with Mac systems. You can use the photo review tool by downloading the link to the tool, extracting it to a specified directory, and running the Photoprocess.exe file directly. This tool is green software and can be run without installation.

How to upload iphone photos to mac computer
The first step is to turn on the Bluetooth of the phone, then find and click the [Finder] icon on the Mac computer , and then click the [AirDrop-Turn on Bluetooth] option in sequence according to the arrow in the picture below, and the attached Bluetooth device will be automatically searched.
Preparation equipment: iPhone1MacBookAir Operating system: ios1macOSCatalina15 The steps for uploading photos from Apple phones to Apple computers are as follows: After entering the settings page of Apple phones, click to enter the Bluetooth settings. On the redirected Bluetooth page, click the button behind Turn on Bluetooth.
Connect your iPhone to your Mac using a USB cable, then open the Photos app. The Photos app on Mac displays an import screen with all the photos and videos in the iPhone Photos app. If the Import screen doesn't appear, select the iPhone name in the Photos sidebar.
Connect the mobile phone data cable to the computer, open the desktop of the computer mac, and click on the photo. Then after entering, click Open Photos at the top and Import All Projects in the upper left corner. After all the photos come out, click on the photo you want to import into your computer, and click on the upper right corner to import the selected words.
Open your mac and click the finder icon, the first icon at the bottom of the desktop. Click airdrop in the upper left corner of the screen to turn on the airdrop function. Click "Allow these people to discover me" in the lower right corner and select "Anyone". Then also turn on the airdrop function on the iPhone, as shown below.
How to upload photos from Apple phone to mac?
Method 1: Wireless transfer In the iCloud settings of Apple phone, turn on the cloud backup function and back up the files to the cloud. Click the Apple Computer Finder icon to enter the Finder page. On the Finder page, enter "iCloud Drive" and select the files you want to transfer.
Use a USB cable to import photos to Mac If you are not using iCloud Photo Library or AirDrop, you can also use a USB cable to import photos from iPhone to Mac. Just connect your iPhone to your Mac and open the Pictures app.
Preparation equipment: iPhone1MacBookAir Operating system: ios1macOSCatalina15 The steps for uploading photos from Apple phones to Apple computers are as follows: After entering the settings page of Apple phones, click to enter the Bluetooth settings. On the redirected Bluetooth page, click the button behind Turn on Bluetooth.
The details are as follows: First, the first step is to turn on the Bluetooth of the mobile phone, then find and click the [Finder] icon on the Mac computer, and then click the [AirDrop-Turn on Bluetooth] option according to the arrow in the picture below, and then Automatically search for attached Bluetooth devices.
Here we use the USB data cable to connect the phone and the computer, and then in the phone, click "Settings" --- "Photos" --- "Transfer to mac or pc" --- "Keep original "Picture" option, as shown in the figure.
Open the Files app on your iPhone. If you're on another screen, click the Browse tab. Click the ellipsis icon in the upper right corner. Click Edit. Under Locations, toggle and enable a third-party service or application from the list. Click Done.
Conclusion: The above is all the content about how to review photos on Apple Mac compiled by this site. Thank you for taking the time to read the content of this site. I hope it will be helpful to you. Don’t forget to learn more related content. Find it on this site.
The above is the detailed content of How to review photos on Apple Mac (how to use the mac photo review tool after downloading it). For more information, please follow other related articles on the PHP Chinese website!

 ip与mac绑定什么意思Mar 09, 2023 pm 04:44 PM
ip与mac绑定是指将特定的IP地址与特定的MAC地址关联起来,使得只有使用该MAC地址的设备才能够使用该IP地址进行网络通信。ip与mac绑定可以防止被绑定的主机的IP地址不被假冒,前提条件:1、MAC地址是唯一的,并且不可假冒;只能绑定与路由器直接相连的网络上的主机(也就是主机的网关在路由器上)。
 mac版下载是什么意思Mar 06, 2023 am 09:52 AM
mac版下载的意思是当软件在选择安装时,选择MAC版下载;Windows版和MAC版是两个不同的操作系统,所以大多数软件在选择安装的同时需要选择Windows版还是MAC版。
 mac鼠标滚轮相反怎么办Mar 16, 2023 pm 05:44 PM
mac鼠标滚轮相反的解决办法:1、打开mac电脑,点击屏幕的苹果标志,然后选择“系统偏好设置”;2、在“系统偏好设置”窗口中,选择“鼠标”;3、在“鼠标”窗口中,将“滚动方向:自然”前面的勾去掉即可。
 修复文件共享在 MacOS Ventura 中不起作用Apr 13, 2023 am 11:34 AM
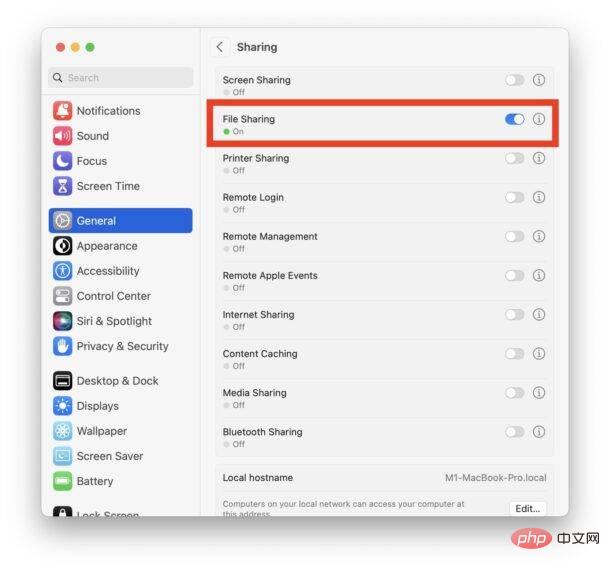
修复 SMB 文件共享在 MacOS Ventura 中不起作用的问题从 Apple 菜单打开 Mac 上的“系统设置”应用程序转到“常规”,然后转到“共享”找到“文件共享”的开关并将其关闭通过转到 Apple 菜单并选择重新启动来重新启动 Mac重新启动后,返回共享系统设置面板并将“文件共享”重新设置为打开位置像往常一样恢复文件共享,它应该按预期工作如果 MacOS Ventura Mac 与另一台 Mac 或设备之间的文件共享突然再次停止工作,您可能需要在几天后或随机重复此过程。
 如何防止 Mac 在显示器关闭时进入睡眠状态 (MacOS Ventura)Apr 13, 2023 pm 12:31 PM
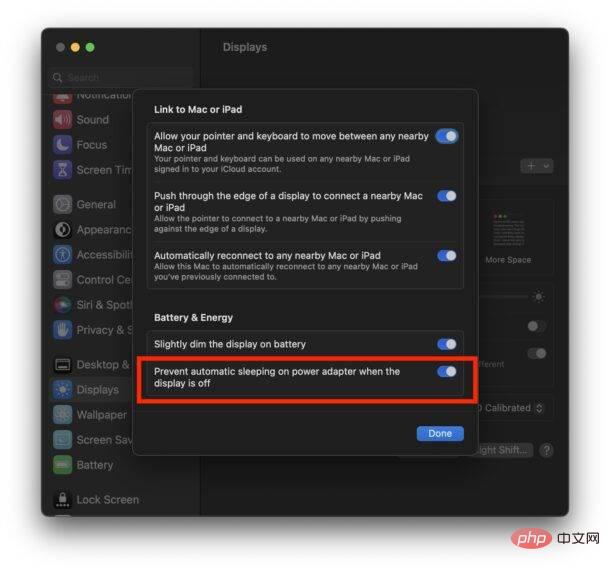
显示器关闭时如何防止 Mac 休眠如果您希望 Mac 显示器能够在整个计算机不进入睡眠状态的情况下关闭,请在此处进行适当的设置调整:下拉 Apple 菜单并转到“系统设置”转到“显示”点击“高级...”切换“防止显示器关闭时电源适配器自动休眠”的开关现在 Mac 显示屏可以关闭,同时防止 Mac 本身进入睡眠状态。这可能主要与 Mac 笔记本电脑用户相关,但即使是那些没有 MacBook 的用户也可能会发现该功能很有用。
 mac克隆是什么意思Jan 31, 2023 am 10:33 AM
mac克隆全称mac地址克隆,是固化在网卡上串行EEPROM中的物理地址,通常有48位长。mac克隆一般应用在路由器上,用户在用电脑直接拨号上网,后来又加了个路由器,通过路由器来实现多台电脑同时上网,这时要用到mac地址克隆了,就是把当前的电脑的mac地址克隆到路由器中去,因为运营商是把你的电脑mac地址绑定你的账号的,所以得克隆以后才能用。
 mac的shift键是哪个键Mar 13, 2023 pm 02:20 PM
mac的shift键是fn键上方、caps lock键下方的一个键,该键在键盘最左侧,由右下往上数第2个键;shift键是键盘中的上档转换键,可以通过“Ctrl+Shift”组合键来切换输入法。
 mac解压rar用什么软件Mar 03, 2023 pm 04:18 PM
mac解压rar的软件:1、The Unarchiver,是一款完全免费、小巧,而且非常易于使用的压缩、解压缩小工具;2、Keka,是一款免费、实用的压缩、解压缩工具,支持解压缩RAR格式的压缩包;3、360压缩大师,是一款免费的压缩、解压缩软件,完全支持RAR文件解压;4、MacZip,支持包括RAR在内的超过20种压缩格式的解压;5、BetterZip;6、FastZip。


Hot AI Tools

Undresser.AI Undress
AI-powered app for creating realistic nude photos

AI Clothes Remover
Online AI tool for removing clothes from photos.

Undress AI Tool
Undress images for free

Clothoff.io
AI clothes remover

AI Hentai Generator
Generate AI Hentai for free.

Hot Article
Hot Tools

mPDF
mPDF is a PHP library that can generate PDF files from UTF-8 encoded HTML. The original author, Ian Back, wrote mPDF to output PDF files "on the fly" from his website and handle different languages. It is slower than original scripts like HTML2FPDF and produces larger files when using Unicode fonts, but supports CSS styles etc. and has a lot of enhancements. Supports almost all languages, including RTL (Arabic and Hebrew) and CJK (Chinese, Japanese and Korean). Supports nested block-level elements (such as P, DIV),

SublimeText3 Linux new version
SublimeText3 Linux latest version

Notepad++7.3.1
Easy-to-use and free code editor

PhpStorm Mac version
The latest (2018.2.1) professional PHP integrated development tool

Dreamweaver CS6
Visual web development tools

