
Home >System Tutorial >LINUX >How to use TC to elegantly implement network current limiting under Linux
How to use TC to elegantly implement network current limiting under Linux

- WBOYWBOYWBOYWBOYWBOYWBOYWBOYWBOYWBOYWBOYWBOYWBOYWBforward
- 2024-02-11 11:21:451267browse
1. Flow control principle under Linux
By queuing packets, we can control how data packets are sent. This kind of control is called data shaping, shaping the data, including the following operations on the data:
- Increase delay
- Packet loss
- rearrange
- Duplicate, damaged
- Rate control
Under the qdisc-class-filter structure, three steps are required to control traffic:
- Create qdisc queue
As mentioned above, Linux controls traffic through packet queuing, so first there must be a queue.
- Create class classification
class In fact, it is to divide the traffic policy into categories. For example, the traffic speed limit is divided into two levels: 10MBps and 20MBbs.
- Create filter filter
Although the class classification is created, no IP or Port is bound to the class, and there is no control effect at this time. You also need to create a filter to bind the specified IP and Port to the class so that the flow control class can take effect on the resource.
TC is a traffic control tool provided under Linux and one of the core infrastructures of network components such as Cilium/eBPF.
2. Limit the access speed of the specified IP and Port to this machine
2.1 Check the network card
ifconfig

eth0: flags=4163  mtu 1500
        inet 1.1.1.1  netmask 255.255.254.0  broadcast 1.1.1.1
        inet6 1::1:1:1:1  prefixlen 64  scopeid 0x20
        ether 1:1:1:1:1:1  txqueuelen 1000  (Ethernet)
        RX packets 2980910  bytes 2662352343 (2.4 GiB)
        RX errors 0  dropped 0  overruns 0  frame 0
        TX packets 1475969  bytes 122254809 (116.5 MiB)
        TX errors 0  dropped 0 overruns 0  carrier 0  collisions 0
2.2 Configuration qdisc-class-filter
- Create qdisc root queue
tc qdisc add dev eth0 root handle 1: htb default 1
- Create a first-level class to bind all bandwidth resources
Note that the unit here is 6 MBps, which is 48 Mbps.
tc class add dev eth0 parent 1:0 classid 1:1 htb rate 6MBps burst 15k
- Create subcategory class
You can create multiple subcategories to conduct refined management of resource traffic.
tc class add dev eth0 parent 1:1 classid 1:10 htb rate 6MBps ceil 10MBps burst 15k
Here ceil sets the upper limit. Under normal circumstances, the speed limit is 6MBps, but when the network is idle, it can reach 10 MBps.
- Create filter filter, restrict IP
tc filter add dev eth0 protocol ip parent 1:0 prio 1 u32 match ip dst 1.2.3.3 flowid 1:10
Here, the bandwidth of 1.2.3.4 is limited to 1:10, which is 6MBps. Of course, you can also directly add a class policy to the network segment 1.2.0.0/16.
2.3 查看并清理配置
- 查看 class 配置
tc class show dev eth0

class htb 1:10 parent 1:1 leaf 10: prio 0 rate 48Mbit ceil 80Mbit burst 15Kb cburst 1600b
class htb 1:1 root rate 48Mbit ceil 48Mbit burst 15Kb cburst 1590b
- 查看 filter 配置
tc filter show dev eth0

filter parent 1: protocol ip pref 1 u32 chain 0
filter parent 1: protocol ip pref 1 u32 chain 0 fh 800: ht divisor 1
filter parent 1: protocol ip pref 1 u32 chain 0 fh 800::800 order 2048 key ht 800 bkt 0 flowid 1:10 not_in_hw
  match 01020303/ffffffff at 16
- 清理全部配置
tc qdisc del dev eth0 root
3. 限制本机对指定 IP、Port 的访问速度
由于排队规则主要是基于出口方向,不能对入口方向的流量(Ingress)进行限制。因此,我们需要将流量重定向到 ifb 设备上,再对 ifb 的出口流量(Egress)进行限制,以最终达到控制的目的。
3.1 启用虚拟网卡
- 将在 ifb 设备
modprobe ifb numifbs=1
- 启用 ifb0 虚拟设备
ip link set dev ifb0 up
3.2 配置 qdisc-class-filter
- 添加 qdisc
tc qdisc add dev eth0 handle ffff: ingress
- 重定向网卡流量到 ifb0
tc filter add dev eth0 parent ffff: protocol ip u32 match u32 0 0 action mirred egress redirect dev ifb0
- 添加 class 和 filter
tc qdisc add dev ifb0 root handle 1: htb default 10
tc class add dev ifb0 parent 1:0 classid 1:1 htb rate 6Mbps
tc class add dev ifb0 parent 1:1 classid 1:10 htb rate 6Mbps
tc filter add dev ifb0 parent 1:0 protocol ip prio 16 u32 match ip dst 1.2.3.4  flowid 1:10
3.3 查看并清理配置
- 下面是限速本机对指定 IP 访问的监控图
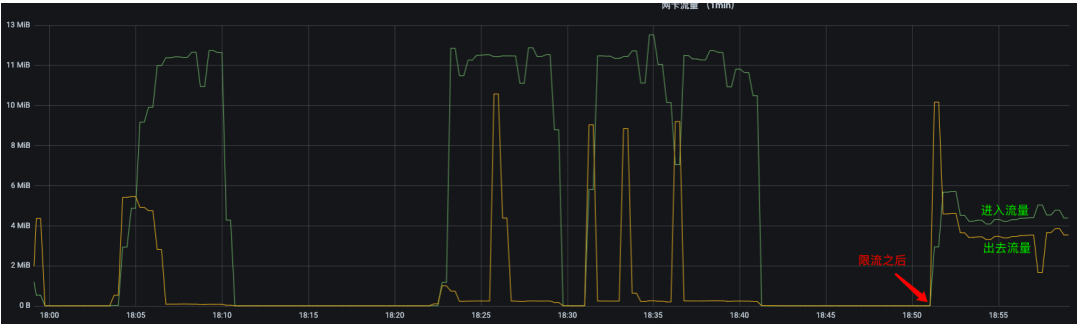
进入的流量被限制在 6 MBps 以下,而出去的流量不被限制。
- 查看 class 配置
tc class show dev ifb0

class htb 1:10 parent 1:1 prio 0 rate 48Mbit ceil 48Mbit burst 1590b cburst 1590b
class htb 1:1 root rate 48Mbit ceil 48Mbit burst 1590b cburst 1590b
- 查看 filter 配置
tc filter show dev ifb0

filter parent 1: protocol ip pref 16 u32 chain 0
filter parent 1: protocol ip pref 16 u32 chain 0 fh 800: ht divisor 1
filter parent 1: protocol ip pref 16 u32 chain 0 fh 800::800 order 2048 key ht 800 bkt 0 flowid 1:10 not_in_hw
  match 01020304/ffffffff at 16
- 清理全部配置
tc qdisc del dev eth0 ingress
tc qdisc del dev ifb0 root
modprobe -r ifb
The above is the detailed content of How to use TC to elegantly implement network current limiting under Linux. For more information, please follow other related articles on the PHP Chinese website!