


php editor Baicao will introduce to you how to install win7 system on MSI notebooks. In this fast-paced era, sometimes we need to go back in time and experience the classic operating system again. As one of Microsoft's classic systems, win7 is very popular among users. This article will introduce you in detail how to install win7 system on MSI notebook, so that you can easily return to the familiar interface and enjoy the old comfort. Next, let’s take a look!
《一》Preparation work
1. U disk of 8GB or above, format it in advance
2. PE system
3. System Image file
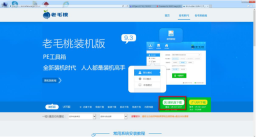
《二》How to download and install the PE system (Laomaotaoupan is listed)
1. Download address: http://www.laomaotaoupan.cn/imtpe/
2. Select the installation board to download and click Save Desktop

3. Insert the U disk, double-click the Laomaotao software on the desktop, and click One-Click Production

4. When the following screen appears, click OK

5. When the following screen appears, under production

6. When the following screen appears, click No, close the Laomaotao software, and unplug the U disk , the PE system was successfully produced

《二》How to download and install the system image file
1. Download URL: http://www.xitongzhijia.net/

2. Click the link above to select and click the system version you need, click to download
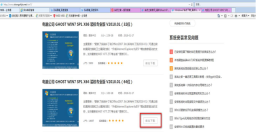
3. Click to download now

4. Click to download Method

5. When the following screen appears, click 'Download Now' to the desktop

6. Right-click the downloaded image file and click Open with WinRAR

7. Click the return arrow as follows

. First click on the image file, then click Extract to
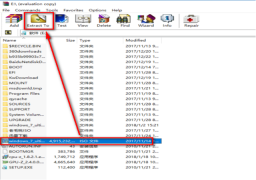
. Select to extract to a USB flash drive and click OK You need to wait for 5-10 minutes. After the decompression is completed, it will automatically close and unplug the U
disk from the USB interface of the computer.

《四》.System installation
1. BIOS settings
1. After restarting or booting, when the MSI logo appears, click the Delete button on the keyboard to enter the BIOS and set the hard drive mode
A. If your motherboard only has one solid state or no solid state hard drive The mode can be directly set to AHCI.
B. If your motherboard has 2 or more solid states, it is recommended to select Raid mode (the solid states are formed into super disk arrays
columns)


2. The next step is to set the startup mode: install win7 and select LEGACY UEFI

3. After the setting is completed, press F10 to save, confirm to restart the computer, and the MSI logo will appear after booting Here, hit Delete on the keyboard and press the
key to enter bios. An additional option will automatically appear in the advanced options, that’s right! You read it right, this option is the option to set up the disk array. Click this option to enter the Raid setting interface
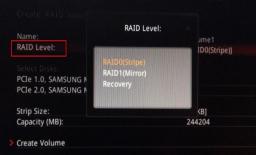
4. Click to enter the setting RAID 5. You can freely change the following names
  6. Select the RAID mode after RAID Level. For 3 or more solid states, you can select RAID5 mode. The default is
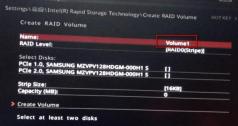
RAID 0
7. Check the solid states you want to group together
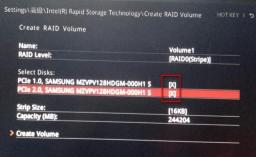
8. In STRIP Size, you can choose the default or other sizes
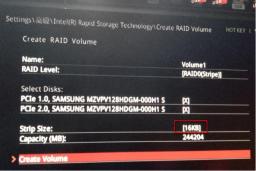
9. After the setting is completed, click the following

10. The following screen appears to indicate that the RAID is successfully established. The total capacity of the solid state grouped together is

2. Installing the system
1. Everything is ready. Now is the time to start the process of installing the system. The first choice is to insert the USB disk that you have done before to install the system. After the MSI logo appears when booting, hit the F11 key on the keyboard. , the following interface appears and click to enter (select your U
disk, the model and brand of the U disk are different, the displayed name will be different)
2. Select 'Laomaotao WIN8 PE Standard Edition (new machine)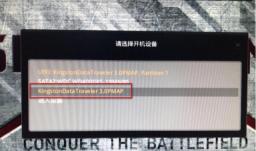 3. Enter the PE system and click 'Partition Tool' on the desktop
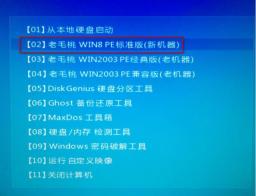 4. Select your hard drive and click 'Quick Partition'
5. Select the number of partitions you need under the number of partitions (three are taken as an example)
6. Modify the size of the primary partition and click OK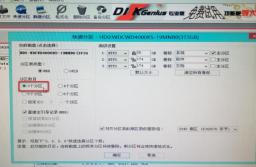
7. The partition is successful as shown below, just close it
 8. Click 'Manually run GHOST' on the desktop
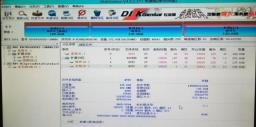 10. When the following screen appears, click 'OK' '
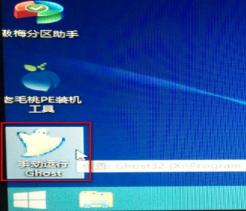 11.Select as follows
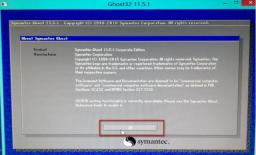 12.Click '▽' and select your U disk
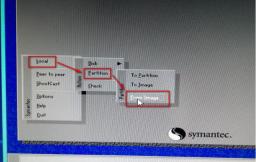 13.Click GHOST File
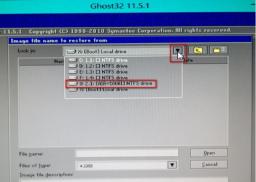 14.Click 'OK'
 15.Select your hard drive
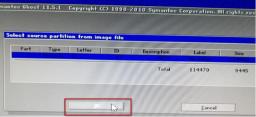 16.Select the drive letter C you want to install Disk
 17. Click 'YES'
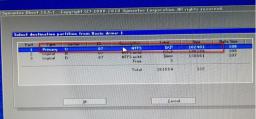 18. Under production
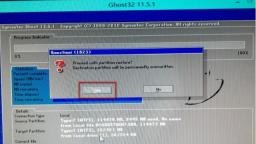 19. The following screen appears to indicate that the production is successful, click' reset
 20. After reset, the system automatically enters the installation interface
 21. After successful installation, it automatically enters the desktop
 If msi smart is not used tool software, it is recommended that you install the ghost version. If you have a mouse or keyboard with a ps2 jack, you can directly install the genuine Windows 7.
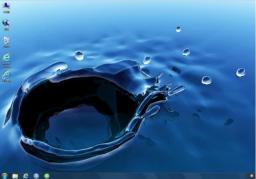
The above is the detailed content of MSI laptop installed win7 system. For more information, please follow other related articles on the PHP Chinese website!

 win7旗舰版永久激活密钥哪里找 附:Windows 7系统激活序列号大全Feb 06, 2024 pm 03:36 PM
虽然微软大力推广Win10系统,但就目前来说,依旧有非常多的用户还是使用Win7系统。对于Win10系统对于很多小白用户来说更是难适应。我们知道Win7系统目前有很多Ghost版和OEM版,小白建议安装OEM版,纯净无广告。而网上下载的那些Ghost都是经过系统封装的,内置的广告非常多,而且不稳定,容易感染病毒,小白不建议安装这类型系统。而安装OEM版遇到的问题就是安装之后需要激活。下面秦壮为大家带来了Win7激活序列号大全。Win7激活序列号大全MVBCQ-B3VPW-CT369-VM9TB-
 win10截屏快捷键保存位置「秒懂:Windows7/10截图快捷键截取图片储存位置」Feb 06, 2024 pm 05:22 PM
前言:屏幕截图是保存可视图像的方式,用于保存文字或浏览网页等需求。除了输入法、浏览器截图等外,系统自带的截图快捷键也可实现快速截图,无需其他软件。①系统自带截图快捷键是什么?②截下来的图片保存在哪里?如果你还不知道系统截图快捷键是什么,可以学习下面的几种截屏方法:测试功能:Windows系统自带截屏测试系统:Win7、Win10(Win11适用)招式一:“PriSc”全屏截图法(不保存)台式机键盘按“PrintScreen”键;笔记本电脑按“PrtScSysRq”或“PrtSc”键。相关说明:“
 mac的lrf文件?Feb 07, 2024 am 11:36 AM
前言:今天本站来给各位分享关于mac的lrf文件的相关内容,如果能正好解决你现在面临的问题,别忘了关注本站,现在开始吧!LRF格式文件怎么打开?怎么制作??在任务面板中,定位到需要处理的LRF图像文件,右键单击并选择导出。在弹出的对话框中,选择要保存的文件夹和选项,然后点击“确定”按钮开始导出。如果需要查看图像内容,可以先将其导出,然后使用图像处理软件进行查看。在电脑左下角的开始菜单中,点击“程序”选项,然后选择“附件”文件夹,找到并点击“记事本”打开。接着,将之前复制的文件内容粘贴到记事本中。
 富士数码相机不读sd卡怎么办 附:相机内存卡电脑读不出来解决方法Feb 06, 2024 pm 10:42 PM
如果我无法阅读相机存储卡,我该怎么办?以下是Win7系统作为一个例子,如何解决它。使用数码相机格式化存储卡很简单。只需按下相机操作面板上的“菜单”按钮,然后选择“设置”选项卡。在设置选项卡中,找到“格式存储卡”项,并按下相机操作面板上的“确定”按钮即可完成格式化。2,“格式存储卡”提示窗口将弹出,选择“确定”按钮在相机存储卡上执行低级格式操作;如果以上方法无法解决存储卡识别问题,建议将相机SD卡取下来。具体操作因相机型号而异。4,然后使用读卡器将此SD卡连接到计算机,当然,笔记本电脑插入SD卡的
 查看内存条频率的命令Feb 06, 2024 pm 03:40 PM
内存频率在哪里查看看内存条频率方法一:看内存表表面标注内存上一般都会标注内存容量以及频率等,如果您是新购买的内存,或者台式电脑,那么就可以拿出来看看,我们可以通过看内存表面铭牌标注即可知道。首先进入电脑系统,鼠标右键任务栏,点击“任务管理器”。然后在“任务管理器”中点击“性能”选项卡中的“内存”。最后在“内存”界面下方查看“速度:1600MHz”这就是内存条的频率。打开机箱看标签,拆开机箱,就能看到内存条,一般的内存产品,表面都会有标签标明品牌、产地、型号、容量、类型、工作频率、工作电压等信息。
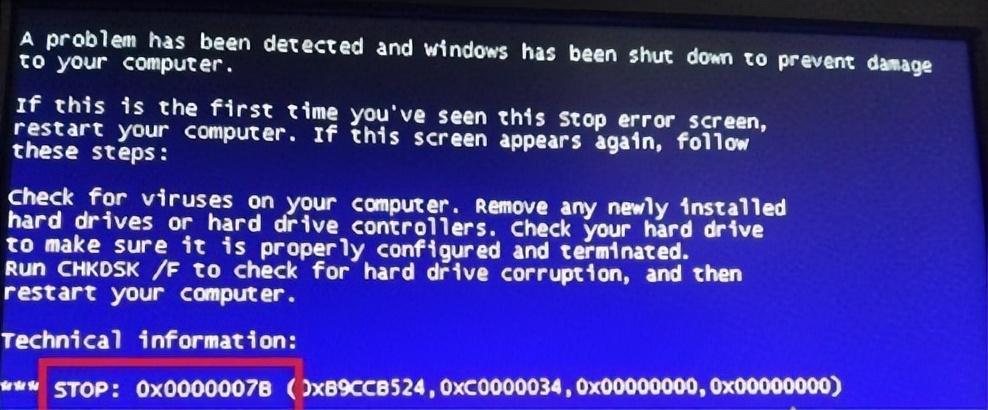 win7开机0x0000007b修复不了怎么办「详细讲解:电脑蓝屏0x0000007b代码解决办法」Feb 06, 2024 pm 06:31 PM
电脑蓝屏0x0000007b代码解决办法2022年7月11日,星期一上午,一台装有win7系统的电脑,在开机是出现Windows图标,一会就会蓝屏,我也没看蓝屏代码,就直接按照老经验,把内存条拔下来,用纸擦干净金手指,再插回去,试了几次,还是蓝屏,我又把机械硬盘拔下来,只保留固态硬盘,并把固态硬盘换了个硬盘插口,还是蓝屏。我仔细检查了蓝屏代码,发现是0x0000007B。于是我用手机搜索了如何解决电蓝屏代码为0X0000007B的问题。我发现在代码的前面有6个0,所以我搜索了相关内容。网上的解释
 mac插件在哪个文件夹?Feb 03, 2024 pm 07:06 PM
本文将介绍有关mac插件存放位置的相关内容,希望能对大家有所帮助。请继续阅读。macps怎么安装插件下载的压缩包解压后即为安装程序。双击打开安装程序,按照提示一直点击“下一步”即可完成安装。若使用Mac系统,打开“首选项”并选择“隐私”,在通用选项中点击底部的“仍要打开”。安装完成后,重启Ps,并通过菜单栏选择“窗口”-“扩展”来打开插件面板。2、MAC系统安装PS插件首先我们找到MAC系统PS的Plug-ins目录,它的位置在「应用程序–AdobePhotoshopcc…」的目录下。首先,解压
 win7怎么打开笔记本的摄像头Jan 31, 2024 pm 08:57 PM
win7系统如何调出摄像头(笔记本win7系统如何调出摄像头)运行QQ软件来打开摄像头。在系统设置中选择视频设置,选择好视频设备,就可以看到摄像头的预览画面了。下载AMcap来打开摄像头。方法打开开始菜单,右键“计算机”选择“管理”;在“计算机管理”窗口左边一栏,双击“设备管理器”。然后,从右边栏中找到“图像设备”,点开。方法一:首先右键点击“计算机”,选择“管理”。接着打开里面的“设备管理器”,在图像设备中找到自己的摄像头,右键选中,选择“属性”。首先在电脑中打开win7系统的开始--设置。然


Hot AI Tools

Undresser.AI Undress
AI-powered app for creating realistic nude photos

AI Clothes Remover
Online AI tool for removing clothes from photos.

Undress AI Tool
Undress images for free

Clothoff.io
AI clothes remover

AI Hentai Generator
Generate AI Hentai for free.

Hot Article
Hot Tools

ZendStudio 13.5.1 Mac
Powerful PHP integrated development environment

SAP NetWeaver Server Adapter for Eclipse
Integrate Eclipse with SAP NetWeaver application server.

EditPlus Chinese cracked version
Small size, syntax highlighting, does not support code prompt function

DVWA
Damn Vulnerable Web App (DVWA) is a PHP/MySQL web application that is very vulnerable. Its main goals are to be an aid for security professionals to test their skills and tools in a legal environment, to help web developers better understand the process of securing web applications, and to help teachers/students teach/learn in a classroom environment Web application security. The goal of DVWA is to practice some of the most common web vulnerabilities through a simple and straightforward interface, with varying degrees of difficulty. Please note that this software

Atom editor mac version download
The most popular open source editor

