

win7 local connection established

php editor Xigua is here to introduce you to a common operation - win7 local connection establishment. In our daily use of computers, we often need to connect to the local network for data transmission and resource sharing with other devices. The win7 operating system provides a simple method to establish a local connection. You only need to follow certain steps to set up a local network connection. Next, we will introduce you in detail the steps and precautions for establishing a local connection in win7 to help you quickly establish a stable local network connection.
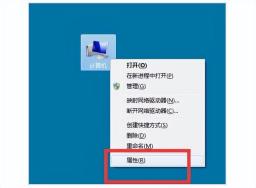
1. Enter the win7 system desktop, right-click the computer icon, and select Properties
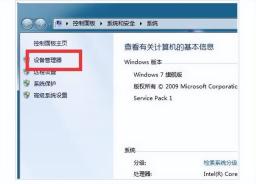
2. After the system settings page pops up, click Device Manager on the left
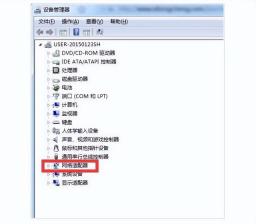
3. In the device manager interface, click to expand the network adapter
4. Then, right-click Realtek PCle GBE Family Controller. If it shows enabled, it means it is disabled. Just click to enable it again
5. However, if the local connection is not disabled, right-click and select Update Driver Software
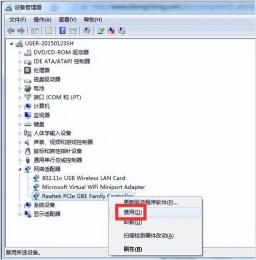
6. Next, the win7 system will automatically search for updated driver software. You follow Prompt operation to restore the local connection

#
The above is the detailed content of win7 local connection established. For more information, please follow other related articles on the PHP Chinese website!

 How to Use Roblox Quick Login on PC/Phone? Here Is a Full Guide! - MiniToolApr 28, 2025 am 12:50 AM
If you want to log in to your Roblox account on a new device without inputting the password, Roblox Quick Login can help you do that. This post from php.cn tells you how to use the Roblox quick login feature with full steps.
 PS5 vs Xbox Series vs PC: Which One Is Best for Hogwarts Legacy - MiniToolApr 28, 2025 am 12:49 AM
Hogwarts Legacy is out now on PS5, Xbox Series X/S, and PC. Which is best for Hogwarts Legacy? If you’re confused, don’t worry. In this post, php.cn provides a tutorial about Hogwarts Legacy PC vs PS5 vs Xbox Series X/S, and you can have a look.
 Download Realtek USB GbE Family Controller Drivers Windows 10/11 - MiniToolApr 28, 2025 am 12:48 AM
In this post, php.cn Software will show you some information about Realtek USB GbE Family Controller, including its definition, usage, and how to download the Realtek USB GbE Family Controller driver on your Windows 10/11 computer.
 Crucial T700 SSD Overview: It Has Record-Break Performance - MiniToolApr 28, 2025 am 12:47 AM
Crucial T700 PCIe Gen5 NVMe SSD has been released for a period. You can follow this post to learn the related information about this SSD that has record-break performance. In this post, we also introduce some php.cn software to help you manage the SS
 How to Download, Install, and Update RTX 4090 Drivers Win 10/11? - MiniToolApr 28, 2025 am 12:46 AM
If you have a GeForce RTX 4090 Ti in hand, it is important to download and install the corresponding driver in time to make it work properly. If you are confused about how to do that, follow this guide on php.cn Website to get a detailed tutorial.
 Notion Dark Mode: How to Turn on and off on Desktop & Mobile - MiniToolApr 28, 2025 am 12:45 AM
Most people think that it is more harmful to look at a screen in the dark. The sharp light easily makes your eyes damaged. Therefore, many people will pursue a dark mode to lower the damage. But is it really useful? Is the dark mode available on Noti
 How to Fix Valheim Stuck on Loading Screen? - MiniToolApr 28, 2025 am 12:44 AM
If you are complaining of Valheim stuck on loading screen and don’t know what to do. This guide on php.cn Website will help you to find suitable solutions. Try the solutions mentioned below one by one until your issue is gone.
 Power Tactics to Disable and Clear Run History on WindowsApr 28, 2025 am 12:43 AM
If you frequently use the Run window to directly open tools or documents, you will find the matching list gradually becomes longer and longer. Some people are searching for methods to clear Run history to make it look clean. This php.cn post might gi


Hot AI Tools

Undresser.AI Undress
AI-powered app for creating realistic nude photos

AI Clothes Remover
Online AI tool for removing clothes from photos.

Undress AI Tool
Undress images for free

Clothoff.io
AI clothes remover

Video Face Swap
Swap faces in any video effortlessly with our completely free AI face swap tool!

Hot Article
Hot Tools

SublimeText3 English version
Recommended: Win version, supports code prompts!

ZendStudio 13.5.1 Mac
Powerful PHP integrated development environment

Safe Exam Browser
Safe Exam Browser is a secure browser environment for taking online exams securely. This software turns any computer into a secure workstation. It controls access to any utility and prevents students from using unauthorized resources.

SublimeText3 Chinese version
Chinese version, very easy to use

EditPlus Chinese cracked version
Small size, syntax highlighting, does not support code prompt function

