
 Backend DevelopmentPython TutorialPyCharm's packaging function: a powerful tool to improve project packaging efficiency

A powerful tool for packaging projects: Analysis and practice of PyCharm’s packaging function
In Python development, packaging is a very important part. When we need to share our Python project with others, packaging can package our code and related dependencies into an independent executable file for the convenience of others. As a powerful Python development tool, PyCharm provides rich packaging functions. In this article, we will explore the packaging function of PyCharm and show how to use PyCharm for project packaging with examples.
PyCharm's packaging function mainly has two methods: generating an executable file through PyCharm's "Make Project" function, and packaging the entire project through PyCharm's "Deployment" function.
First, let's take a look at the process of generating an executable file through the "Make Project" function. Open PyCharm, open the project we want to package, then enter the "File" menu and select "Settings". In the pop-up "Settings" window, select "Project: xxx" and then select "Project Interpreter".
In "Project Interpreter", we can see a toolbox icon, click on this icon and select "Show All". Then in the pop-up window, select the project we want to package, click "Show paths for the selected interpreter" below to expand the path of the project.
Next, in the "Settings" window, click the "Build, Execution, Deployment" option on the left, select "Build Tools", and then click "Python Packaging" on the right. In this window, we can see a "Project setup" option and select "Create setup.py". Click "OK" to save the settings.
After completing the above steps, we need to write a setup.py file to specify the packaging information of the project. Open PyCharm's Terminal and enter the following command in the terminal:
cd <项目路径>
touch setup.py
Then, we edit the setup.py file and fill it in according to the following sample code:
from setuptools import setup

setup(
    name='project_name',
    version='1.0',
    packages=['package_name'],
    url='',
    license='',
    author='author_name',
    author_email='author_email',
    description='project_description',
    install_requires=[
        'package1',
        'package2'
    ],
    entry_points={
        'console_scripts': [
            'project_name=package_name.__main__:main'
        ]
    }
)
In the sample code, we need to replace some information. The name field represents the name of the project, the version field represents the version number of the project, the packages field represents the list of packages contained in the project, and the url, license, author, author_email and description fields represent the URL, license, author and author email of the project respectively. and project description. The install_requires field represents the packages that the project depends on, and the entry_points field represents the entry point of the project, which is the function we call when we run the project in the console.
After completing the editing of setup.py, we can open Terminal and use the following command to package the project:
python setup.py bdist_wheel
After executing the command, PyCharm will generate a dist folder in the project root directory. It contains the project's packaging files. We can share this folder with others, and others can install the projects in this folder through pip.
In addition to generating executable files through "Make Project", you can also package the entire project through PyCharm's "Deployment" function. The "Deployment" function can package the entire project into a compressed file for easy backup and transfer.
First, we need to configure the target path to store the project in PyCharm. Enter the "File" menu, select "Settings", then click the "Build, Execution, Deployment" option on the left, select "Deployment", and then click the " " button on the right to add a new deployment server.
In the "Connection" tab, we need to fill in the server's connection information, such as host name, port number, user name and password. In the "Mappings" tab, we can configure the mapping relationship between the project's local path and the server path.
After the configuration is completed, we can right-click the project root directory, select "Deployment", and then select "Upload to xxx" to upload the entire project to the server. If you need to package the entire project and export it as a compressed file, just select "Export to xxx".
Through PyCharm's packaging function, we can easily package our Python projects into executable files or compressed files to facilitate sharing and backup of our projects. I hope this article can help everyone understand and use PyCharm's packaging function.
The above is the detailed content of PyCharm's packaging function: a powerful tool to improve project packaging efficiency. For more information, please follow other related articles on the PHP Chinese website!

 如何解决pycharm找不到模块Dec 04, 2023 pm 01:31 PM
解决pycharm找不到模块的方法:1、检查python解释器;2、安装缺失的模块;3、检查项目结构;4、检查系统路径;5、使用虚拟环境;6、重启PyCharm或电脑。PyCharm找不到模块是一个常见的问题,但通常可以通过一些步骤来解决,这个问题可能由多种原因引起,比如Python解释器配置不正确、模块没有正确安装或者PyCharm的项目设置有问题。
 pycharm打不开怎么办Dec 07, 2023 pm 05:09 PM
pycharm打不开可以通过检查系统要求、重新启动计算机、检查防病毒软件和防火墙设置、检查日志文件、更新PyCharm、检查系统环境变量、重置PyCharm设置、检查日志文件和报错信息、卸载并重新安装PyCharm和向PyCharm官方支持寻求帮助来解决。详细介绍:1、检查系统要求,确保计算机满足PyCharm的最低系统要求;2、重新启动计算机等等。
 pycharm怎么批量替换Dec 07, 2023 pm 05:27 PM
pycharm可以通过使用搜索和替换功能、结合正则表达式进行高级替换、使用代码重构功能、使用Structural Search and Replace和导入外部工具进行批量替换来批量替换。详细介绍:1、使用搜索和替换功能,打开PyCharm,打开要进行批量替换的项目或文件夹等等。
 pycharm注释快捷键有哪些Dec 05, 2023 pm 02:14 PM
pycharm注释快捷键有:1、单行注释,使用“#”;2、多行注释,使用三引号“””;3、批量注释,选择要注释的文本行,背景变化后,同时按“Ctrl+/”;4、取消批量注释,选择已注释的文本行,背景变化后,同时按“Ctrl+/”;5、批量缩进,选择要缩进的文本行,背景变化后,按下“TAB”键;6、取消批量缩进,选择要缩进的文本行,背景变化后,按下“SHIFT+TAB”键。
 pycharm怎样改变背景颜色Dec 07, 2023 pm 04:58 PM
pycharm改变背景颜色的方法:1、使用主题设置,在PyCharm设置对话框中,选择 "Editor",选择喜欢的主题,点击 "Apply"即可;2、使用自定义背景颜色,在 "Editor"选项卡中,点击"Background",选择喜欢的颜色,确认即可;3、使用快捷键快速更改背景颜色,按下 "Ctrl+Alt+S" 组合键打开设置对话框,跟上面一样选择型号的颜色即可等等。
 pycharm和python有什么区别Dec 04, 2023 pm 04:26 PM
pycharm和python区别是:1、PyCharm是一款软件开发工具,而Python则是一种编程语言;2、PyCharm提供了丰富的功能和工具,而Python本身提供了各种库和模块;3、PyCharm主要用于编写、调试和运行Python代码,而Python语言可以应用于各种开发场景等等。
 pycharm如何切换python版本Dec 08, 2023 pm 02:14 PM
pycharm切换python版本的方法:1、通过项目配置,在“New Project”或“Open”对话框中,可以指定Python解释器的版本;2、使用虚拟环境,虚拟环境为每个项目提供了一个隔离的Python环境,可以在不影响其他项目的情况下更改和升级库和依赖项;3、使用系统环境变量,可以添加一个新的系统环境变量,指向使用的Python解释器的路径;4、使用第三方插件等等。
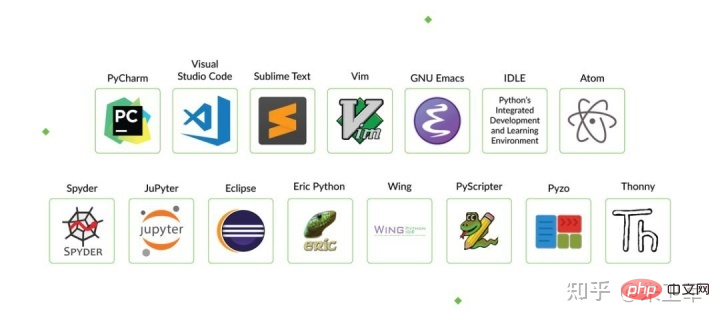 学习Python最好的IDE是PyCharm吗?Apr 14, 2023 pm 12:10 PM
这两年被Python初学小白问到最多的问题就是,该用什么代码编辑工具?说实话,我个人是用Jupyter Notebook最多,主要是经常做数据可视化,方便些。但对于初学者来说,PyCharm仍是不二的选择,甚至我建议你只用PyCharm.从当前所有主流Python IDE来看,PyCharm是最适合做Python开发的,特别对新手而言,可以节省很多不必要的时间成本。我也常用PyCharm写脚本,偶尔开发一些web应用,PyCharm的完善程度可以说没有一个IDE能达到。其他IDE相比,PyCha


Hot AI Tools

Undresser.AI Undress
AI-powered app for creating realistic nude photos

AI Clothes Remover
Online AI tool for removing clothes from photos.

Undress AI Tool
Undress images for free

Clothoff.io
AI clothes remover

AI Hentai Generator
Generate AI Hentai for free.

Hot Article
Hot Tools

Safe Exam Browser
Safe Exam Browser is a secure browser environment for taking online exams securely. This software turns any computer into a secure workstation. It controls access to any utility and prevents students from using unauthorized resources.

SublimeText3 Linux new version
SublimeText3 Linux latest version

VSCode Windows 64-bit Download
A free and powerful IDE editor launched by Microsoft

Atom editor mac version download
The most popular open source editor

SublimeText3 Mac version
God-level code editing software (SublimeText3)

