


php editor Xinyi will introduce to you how to connect the jumpers on the computer motherboard. The jumper on the computer motherboard is a small switch used to adjust hardware settings. By changing the connection method of the jumper, different functional adjustments can be achieved. The wiring operation needs to be done carefully. First, determine the position and function of the jumper, and then insert the jumper into the correct position according to the mark on the motherboard. After wiring, make sure the jumpers are firmly connected to avoid loosening and resulting in functional failure. Before wiring, be sure to turn off the computer power and use insulated tools to ensure safety.

How to connect the jumper on the computer motherboard?
1. First, get to know the jumpers on this chassis as follows, including the front USB jumper, front audio (HD AUDIO), power on/off button (POWER SW), and restart button ( RESET SW), power supply LED light (Power LED), and hard disk indicator light (HDD LED {one is missing in the picture below}), as shown in the picture below:
2. First plug in the USB3.0 The USB 3.0 interface on the motherboard is designed to be fool-proof, so it won’t work if it’s plugged in backwards.
3. Then insert the front USB interface and front audio interface. These interfaces are also designed to be fool-proof, so if you make a mistake, you cannot insert them. First plug in the USB interface. The interface marked by USB corresponds to the motherboard. on the USB logo interface.
4. The HD AUDIO front audio interface corresponds to the AUDIO logo on the motherboard. If this is not plugged in, there will be no sound from the headphone jack on the front of the chassis.
5. Okay, let’s start inserting the switch jumper. There are clear signs on the motherboard. Just insert according to the signs:
6. LED lights are divided into positive and negative poles, colored The wire is the positive pole, and the white wire is the negative pole, so be sure not to plug them in backwards, as the consequences will be disastrous.
7. The white jumper is the negative pole, plug it on the right, as shown in the figure below.
Motherboard jumper settings?
Jumpers generally have the following uses:
1: Restore BIOS (CMOS) information.
When you need to restore your computer motherboard information to factory values. BIOS jumper available. Specific jumper settings. It varies slightly depending on the motherboard. You can refer to your motherboard manual to set the jumpers;
2: Overclocking.
When the motherboard and CPU you purchased have overclocking capabilities. You can overclock via jumpers. This general motherboard will not have such instructions. Please go to the forum to find your motherboard's overclocking parameters.
How to connect the jumper on the computer motherboard?
Generally, the jumper connections on the corresponding chassis on the motherboard are as follows;
POWER SW=power on button, POWER LED=power on indicator light (with positive and negative polarity difference), RESET SW= Reset button, H.D.D LED=disk indicator light (with positive and negative polarity difference), HD AUDIO=high fidelity audio, USB (generally not specified, it refers to 2.0)
Normally, there are usually silk screen and The English corresponding to the chassis jumper can be directly connected; if there is no corresponding one, you can refer to the following:
Laptop motherboard jumper?
If you encounter the problem of notebook motherboard jumpers, you can refer to the following solutions:
First of all, you need to know where to start counting the jumpers, so that you can connect them correctly. Find both ends of the jumper on the motherboard. If you look carefully, you will find that there is a relatively thick printed frame on one end. Seeing this printed frame, you can basically determine that the jumpers are counted from here.
How to connect the motherboard switch jumper?
The motherboard switch jumper usually refers to the power switch and restart jumper on the motherboard. These jumpers are located on the edge of the motherboard and usually have four pins, two of which are for the power cable and two for the reset cable.
Typically, the two pins of the power switch jumper are labeled "POWER SW" or "PWR SW" and the two pins of the reset jumper are labeled "RESET SW" or "RST SW".
The following is the general connection method of the motherboard switch jumper:
1. Power switch jumper: Connect the two pins of the power switch jumper to the power cord pins on the motherboard. Typically, these pins are two wires labeled "POWER SW" or "PWR SW". If the power wire on your motherboard is labeled "PWR LED" or "POWER LED", you will need to connect the two pins of the jumper to the two pins of the LED wire.
2. Restart jumper: Connect the two pins of the restart jumper to the restart wire pins on the motherboard. Typically, these pins are two wires labeled "RESET SW" or "RST SW." If the reset wire on your motherboard is labeled "RESET LED" or "RST LED", you will need to connect the two pins of the jumper to the two pins of the LED wire.
It should be noted that different motherboards and different power supplies may have slightly different connection methods. It is recommended to carefully check the motherboard and power supply instructions before connecting jumpers, and follow the instructions in the instructions to make connections.
How to insert the jumper in the all-in-one machine?
How to connect the jumper on the computer motherboard:
1. Arrange all the cables together. According to the above markings, first clarify the definition of each cable: a. Power switch: POWER SW, possible names: POWER, POWER SWITCH, ON/OFF, POWER SETUP , PWR, etc., function definition: reset button on the front of the chassis. b. Reset/restart switch: RESETSW, possible names: RESET, Reset Swicth, Reset Setup, RST, etc. Function definition: power-on button on the front of the chassis. c. Power indicator light: /- Possible names: POWER LED, PLED, PWRLED, SYS LED, etc. d. Hard disk status indicator light: HDD LED, Possible name: HD LED e. Built-in small speaker (or alarm): SPEAKER, possible name: SPK, function definition: motherboard abnormality alarm. f. Audio connection cable: AUDIO, possible name: FP AUDIO, function definition: chassis front audio, generally a whole. g. The USB connection to the front interface is generally a whole.
2. Find the location of each pin on the motherboard.
3. After all connecting cables are plugged in, check whether all hardware is installed correctly and is solid. Also check that all connections are correct and secure.
4. After the inspection is completed, press the power button on the chassis and check whether all the indicators are normal.
5. After the indicator light is normal, use a USB flash drive and headphones to check whether the front USB and front audio are normal.
6. Check that everything is normal and then cover the chassis. The cable connection work is completed. Tip: Please perform all operations after the power is turned off.
How to jumper the computer when the motherboard is short-circuited
Short-circuit the copper post of the power switch on the motherboard. If it still doesn't work, unplug the power to the motherboard. The most direct and effective way is to remove the power switch on the motherboard. Remove the battery and put it back in after a few minutes. The motherboard can be restored.
Unplug the chassis switch and connect it to the connection port on the motherboard. There will be a mark next to the pin on the motherboard. Find the pw mark and short-circuit it with a screwdriver to power on the motherboard. It is risky. Please be careful.
How to insert the motherboard jumper?
How to connect the jumpers on the computer motherboard:
1. Arrange all the wires together. According to the above labels, first clarify the definition of each wire:
a. Power switch: POWER SW, possible names: POWER, POWER SWITCH, ON/OFF, POWER SETUP, PWR, etc. Function definition: reset button on the front of the chassis.
b. Reset/restart switch: RESETSW, possible names: RESET, Reset Swicth, Reset Setup, RST, etc. Function definition: power-on button on the front of the chassis.
c. Power indicator: /- Possible names: POWER LED, PLED, PWRLED, SYS LED, etc.
d. Hard drive status indicator: HDD LED, Possible names: HD LED
e. Built-in small speaker (or alarm): SPEAKER, possible name: SPK, function definition: motherboard abnormality alarm.
f. Audio connection cable: AUDIO, possible name: FP AUDIO, function definition: chassis front audio, generally a whole.
g, USB connection to the front interface is generally a whole.
2. Find the location of each pin on the motherboard.
3. After all connecting cables are plugged in, check whether all hardware is installed correctly and is firm. Also check that all connections are correct and secure.4. After the inspection is completed, press the power button on the chassis and check whether all the indicator lights are normal.
5. After the indicator light is normal, use a USB flash drive and headphones to check whether the front USB and front audio are normal.
6. Check that everything is normal and then cover the chassis. The cable connection work is completed.
Tips: Please perform all operations after the power is turned off.
The above is the detailed content of How to connect jumpers on computer motherboard?. For more information, please follow other related articles on the PHP Chinese website!

 9 settings to change on your MacMay 13, 2025 am 11:10 AM
You’ve unwrapped your new Mac desktop or laptop and you’re ready to dive in: Where should you start? Modern-day macOS is designed to be intuitive and straightforward, but it’s also stuffed with options and features you can tweak
 Black Boxes on Desktop Icons: Find Powerful Tips to RemoveMay 12, 2025 pm 08:07 PM
Encountering black squares instead of desktop icons in Windows 11/10? This comprehensive guide offers several straightforward solutions to restore your icons to their original appearance. Quick Navigation: Black Squares on Desktop Icons Solution 1:
 CapCut Project File Location: How to Find, Recover, and ShareMay 12, 2025 pm 08:06 PM
This MiniTool guide offers a complete walkthrough for managing CapCut projects, covering location, recovery, and sharing. Mastering these steps ensures efficient project handling. Quick Navigation: CapCut Project File Location on PC Backing Up CapC
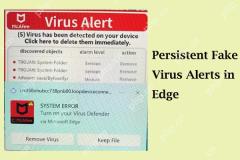 Persistent Fake Virus Alerts in Edge: How to Identify & AvoidMay 12, 2025 pm 08:05 PM
Edge browser fake virus warning: a guide to identifying, handling and prevention Many users report encountering fake virus warnings in Microsoft Edge browser. These warnings usually appear in the form of pop-ups, claiming that malware or viruses are detected, attempting to induce users to download malware or take harmful actions. This article will guide you on how to identify, deal with, and prevent such false warnings. How to identify fake virus warnings in Edge browser? False virus warnings usually have the following characteristics: Use emergency and panic language: Try to force users to act by creating panic. Use fake company logos: Imitate the logo of well-known security software or Microsoft. Regular companies will not issue warnings in this way. Request to dial
 Effective Ways to Fix EVERSPACE 2 Crashing/Not LaunchingMay 12, 2025 pm 08:03 PM
EVERSPACE 2 Crash Problem and Solutions Have you encountered a crash problem while playing EVERSPACE 2? If this problem bothers you, this MiniTool article will help you. This article will explain common causes and effective solutions to EVERSPACE 2 crashes. Quick navigation: EVERSPACE 2 Startup Crash How to fix EVERSPACE 2 crash Summarize EVERSPACE 2 Startup Crash The EVERSPACE 2 crash problem has always been the focus of players. Many players have reported different types of crashes, including crashes at startup, sudden exits during the game, and interactions with Unreal Engine
 Apex Integrity Error 0x8000001: 3 Useful Methods HereMay 12, 2025 pm 08:02 PM
Encountering the Apex Legends integrity error 0x8000001, causing game crashes? This guide provides effective solutions. Let's explore the fixes. Apex Integrity Error 0x8000001: A Crashing Problem Many Apex Legends players report encountering the &quo
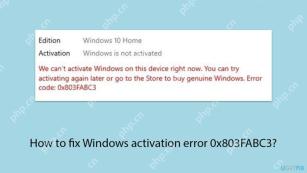 How to fix Windows activation error 0x803FABC3?May 12, 2025 pm 06:00 PM
Windows activation is a critical process in Windows 11 that verifies your operating system copy is genuine, enabling full functionality like personalization fea
 How to Use Copilot in Microsoft OneDrive? Everything You NeedMay 11, 2025 pm 08:02 PM
Unlock the Power of Microsoft OneDrive Copilot: Your AI-Powered File Assistant This MiniTool guide unveils the capabilities of Copilot in OneDrive, a revolutionary AI assistant designed to streamline your file management and boost productivity. Expl


Hot AI Tools

Undresser.AI Undress
AI-powered app for creating realistic nude photos

AI Clothes Remover
Online AI tool for removing clothes from photos.

Undress AI Tool
Undress images for free

Clothoff.io
AI clothes remover

Video Face Swap
Swap faces in any video effortlessly with our completely free AI face swap tool!

Hot Article
Hot Tools

Zend Studio 13.0.1
Powerful PHP integrated development environment

SublimeText3 Linux new version
SublimeText3 Linux latest version

DVWA
Damn Vulnerable Web App (DVWA) is a PHP/MySQL web application that is very vulnerable. Its main goals are to be an aid for security professionals to test their skills and tools in a legal environment, to help web developers better understand the process of securing web applications, and to help teachers/students teach/learn in a classroom environment Web application security. The goal of DVWA is to practice some of the most common web vulnerabilities through a simple and straightforward interface, with varying degrees of difficulty. Please note that this software

SAP NetWeaver Server Adapter for Eclipse
Integrate Eclipse with SAP NetWeaver application server.

SublimeText3 English version
Recommended: Win version, supports code prompts!

