
 Computer TutorialsComputer KnowledgeHow to open the DX diagnostic tool in Win11? Steps to open the DirectX Diagnostic Tool【Steps】
How to open the DX diagnostic tool in Win11? Steps to open the DirectX Diagnostic Tool【Steps】

php editor Banana will introduce you how to open the DX diagnostic tool under Win11 system. DX Diagnostic Tool is a tool used to detect and diagnose system hardware and software. It is very helpful for solving game or application running problems. In the Win11 system, there are many ways to open the DX diagnostic tool, including through the start menu, running commands, and shortcut keys. These opening methods will be introduced in detail below, allowing you to easily find the DX diagnostic tool and perform system diagnosis.
Detailed tutorial:
1. It is not difficult to install the DirectX diagnostic tool on Win11. First click on the Start menu to open Settings.
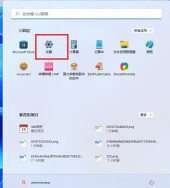
#2. In the settings panel, find the application and turn on the optional features.

3. On the optional functions page, select Add optional functions.
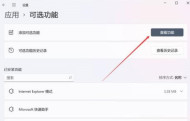
#4. Then find the graphics tool. After installation, Win11 can open the DirectX diagnostic tool.

5. It is very easy to open the DirectX diagnostic tool of Win11. You can directly enter [dxdiag] to run the command through the start menu or search tool.
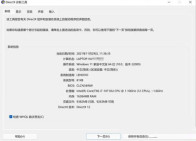
You can see that the DirectX version and BIOS version of this computer are clearly displayed.
The above is the detailed content of How to open the DX diagnostic tool in Win11? Steps to open the DirectX Diagnostic Tool【Steps】. For more information, please follow other related articles on the PHP Chinese website!

 How to Fix Attachment Not Showing in Outlook 365?Apr 19, 2025 am 12:50 AM
Do you have trouble downloading or sending attachments in Outlook 365? Sometimes, Outlook doesn’t show them for some unknown reason, so you are unable to see them. In this post on php.cn Website, we collect some use tips for attachments not showing.
 How to Fix V Rising Connection Timed out? Here Are 5 Solutions! - MiniToolApr 19, 2025 am 12:49 AM
When V Rising players try to join a server that is close to or already full, they may encounter the “V Rising connection timed out” issue. If you are one of them, you can refer to this post from php.cn to get solutions. Now, keep on your reading.
 How to Turn on/off Real-Time Protection in Windows Security? - MiniToolApr 19, 2025 am 12:48 AM
Windows supplies real-time protection via Windows Security. But this feature may prevent you from doing something it thinks are dangerous. In this situation, you may want to temporarily turn on real-time protection. This php.cn post will show you how
 Windows 11 24H2 or Windows 12? Does This Matter?Apr 19, 2025 am 12:47 AM
Microsoft has started working on next year’s Windows updates very early. Recent rumors state that the next update in 2024 might be Windows 11 24H2 rather than Windows 12. Everything is uncertain now. php.cn will now take you to see some related infor
 Fix: Unable to Perform Requested Operation – Error 0x80030001 - MiniToolApr 19, 2025 am 12:46 AM
The error 0x80030001 often happens when you are attempting to copy files. The error code will be accompanied by a message that tells “unable to perform requested operation”. If you are struggling with this error, you can read this article on php.cn W
 How to Download and Install Windows 11 KB5034765Apr 19, 2025 am 12:45 AM
On February 13, 2024, Microsoft released KB5034765 (OS builds 22621.3155 and 22631.3155) for Windows 11 22H2 and Windows 11 23H2. This security update brings you many new improvements and bug fixes. You can learn how to download and install Windows 1
 Power Management Tab Missing from Device Manager - Top GuideApr 19, 2025 am 12:44 AM
Device Manager is widely used when you need to fix some computer issues. You can check the problematic devices and decide to uninstall or update device drivers. Besides, you can also set Power Management settings in Device Manager. However, you may f
 2 Ways to Reset Windows Backup to Default in Windows 11/10Apr 19, 2025 am 12:43 AM
When Backup and Restore (Windows Backup) fails to work, you can choose to reset it to default. How to restore Windows Backup to default in Windows 11/10? php.cn will guide you to easily do this thing in 2 ways and let’s go to see them.


Hot AI Tools

Undresser.AI Undress
AI-powered app for creating realistic nude photos

AI Clothes Remover
Online AI tool for removing clothes from photos.

Undress AI Tool
Undress images for free

Clothoff.io
AI clothes remover

Video Face Swap
Swap faces in any video effortlessly with our completely free AI face swap tool!

Hot Article
Hot Tools

Atom editor mac version download
The most popular open source editor

SublimeText3 Linux new version
SublimeText3 Linux latest version

SublimeText3 Mac version
God-level code editing software (SublimeText3)

SublimeText3 English version
Recommended: Win version, supports code prompts!

SAP NetWeaver Server Adapter for Eclipse
Integrate Eclipse with SAP NetWeaver application server.

