


php editor Zimo will introduce to you how to change the computer name in Win10 system. In the process of using the computer, sometimes we need to modify the computer name to better identify and manage the device. Whether it's for personal preference or work needs, changing your computer's name is easy. In Win10 system, just follow the steps below to complete the settings of changing the computer name.
In computers using the Win10 system, the computer name is an important piece of information used to identify the device. Sometimes, we may need to change the computer name, for example to identify the device on the network or to personalize the device name. This article will introduce how to change the computer name in Win10 system.
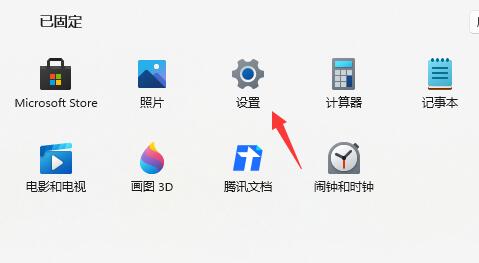
Step 1: Open the "Settings" app
First, tap the "Start" button in the lower left corner of the screen, and then tap the "Settings" icon. You can also use the shortcut key "Win I" to directly open the "Settings" app.
Step 2: Enter "System" settings
In the "Settings" application, click the "System" option.
Step 3: Select "About"
In the "System" settings, select the "About" option on the left.
Step 4: Change the computer name
In the "About" page, scroll down and find the "Computer name, domain and workgroup settings" column. Click "Change settings."
Step 5: Change the computer name
In the pop-up window, click the "Change" button next to "Computer Name".
Step 6: Enter the new computer name
In the pop-up window, enter the new computer name. Make sure the name conforms to the specifications for computer names, such as not containing special characters or spaces.
Step 7: Save changes
After entering the new computer name, click the "OK" button to save the changes.
Step 8: Restart the computer
After changing the computer name, the system will prompt you to restart the computer to apply the changes. Click the "Restart" button.
Step 9: Verify the change
After the computer restarts, you can verify whether the computer name was successfully changed by repeating steps one through three.
Through the above steps, we can easily change the computer name in Win10 system. Changing the computer name can help us identify the device on the network and can also personalize the device name. Please note that after changing your computer name, you may need to log back on to the network or other device to apply the changes.
The above is the detailed content of Teach you how to change the computer name in Win10 system. For more information, please follow other related articles on the PHP Chinese website!

 电脑鼠标左键失灵该如何解决Jan 29, 2024 pm 04:39 PM
电脑鼠标左键点击没反应是怎么回事呢?很多小伙伴在使用电脑的时候,有一个问题是关于鼠标的问题的。使用左键没反应,但是点击右键是可以操作的。那么遇到这种情况我们要怎么去解决呢?下面为大家带来详细的解决方法介绍,快一起来看看吧!电脑鼠标左键点击没反应怎么办软件问题1、检查更新鼠标驱动。同时按下win+x打开电脑系统的管理界面,键盘上下键选择其中的设备管理器打开。2、使用键盘上的方向键选中鼠标和其他指针设备,这时候按下方向键的向右箭头,可以打开下拉,下拉里面就是正在使用的鼠标。3、选中按下回车打开该鼠标
 win10系统如何设置管理员权限Jan 11, 2024 pm 09:00 PM
近来有不少网友询问win10系统怎么设置以管理员身份运行。大家都知道,超级管理员权限具有最高权限,如果我们没有开启管理员权限就会处处碰壁。接下来,我就给大家分享一下win10管理员权限的设置方法。跟多win10教程,尽在小白系统官网。win10系统是微软2015年发布的一款可以跨平台和设备的操作系统,随着win10系统的完善,很多小伙伴都将升级了win10系统,但是有些新手朋友对于win10系统设置管理员权限不怎么了解。下面,我们就来瞧瞧设置方法win10系统管理员权限设置的详细步骤1、win+
 如何将win10系统音量显示设置为垂直条Jan 29, 2024 pm 03:33 PM
win10系统如何设置音量显示条为竖条Win10系统默认的音量显示条是水平的,但是有些用户可能更喜欢将其设置为竖条,本文将介绍如何在Win10系统中设置音量显示条为竖条的方法。一、使用系统设置1.首先,点击任务栏右下角的音量图标,打开音量控制面板。2.在音量控制面板中,点击右下角的“音量选项”按钮,弹出更多选项。3.在弹出的选项中,找到“垂直音量控制”选项,并勾选上。4.点击“应用”按钮,保存设置。二、使用第三方软件如果系统自带的设置无法满足你的需求,你还可以使用第三方软件来实现音量显示条的竖条
 关闭win10系统的显卡节能模式的方法Jan 30, 2024 pm 07:15 PM
win10系统显卡节能模式如何关闭在使用Win10系统的过程中,有时候我们可能会遇到显卡节能模式的问题,这会导致电脑的性能下降,影响使用体验。那么,如何关闭Win10系统的显卡节能模式呢?下面将为大家详细介绍一下关闭方法。方法一:通过电源选项关闭显卡节能模式1.首先,点击桌面右下角的电池图标,选择“电源和睡眠设置”。2.在弹出的窗口中,点击“附加电源设置”。3.在新窗口中,找到“更改计划设置”选项,然后点击“更改高级电源设置”。4.在弹出的窗口中,找到“显卡”选项,展开后找到“节能模式”,将其设
 探索3.7GB大小的达人改造微软Win10系统,带给您完整的WinXP使用体验Dec 27, 2023 pm 05:15 PM
WinXP系统虽然早已停止支持,但在全球范围内依然有不少拥趸,近日推出了WindowsEXPERIENCEFreestyleUpdate更新,大小为3.7GB,基于Win10系统改造,让你重新体验WinXP系统。WindowsEXPERIENCEFreestyleUpdate系统并不是什么早期验证版本,而是一个功能完善、基于Win10系统的改造镜像,经过了长期的测试和优化,整个WinXP体验是比较完整的。虽然该镜像经过了多次的打磨,但是依然存在一些问题,IT之家汇总如下:主题从Luna更改为其它
 华为笔记本win11如何降级为win10系统?华为笔记本win11回退到win10的步骤Jan 30, 2024 am 08:33 AM
华为笔记本win11怎么回退到win10系统?不少的用户们在购买完华为笔记本后用不习惯win11系统就想着能不能更改为win10系统,其实是可以的,下面就让本站来为用户们来仔细的介绍一下华为笔记本win11改win10方法教程吧。华为笔记本win11改win10方法教程创建Windows10安装媒体的步骤如下:首先,你需要准备一个可引导的Windows10安装媒体。可以使用官方的Windows10安装媒体创建工具,也可以下载Windows10ISO镜像文件并制作USB安装盘。2、进入BIOS设置
 如何强制卸载Edge浏览器?Jan 29, 2024 pm 08:12 PM
edge浏览器怎么强制卸载?edge浏览器一般是Windows系统的默认浏览器软件,我们在上网的过程中,也会优先打开edge浏览器。但是有些小伙伴不喜欢使用edge浏览器,想要切换浏览器,却发现每次打开网页的首选浏览器都是edge浏览器,所以想将其强制性卸载掉,下面就由小编为大家带来edge浏览器强制卸载教程一览。edge浏览器怎么强制卸载1、右击左下角开始,点击“windowspowershell(管理员)”打开。2、进入命令界面,输入代码get-appxpackage*edge*,查找edg
 如何降级从Windows 11回到Windows 10?详细降级教程Jan 29, 2024 pm 07:30 PM
有些用户将自己的电脑升级到了Win11系统,但使用起来可能会遇到卡顿或者不习惯的问题。如果他们想将系统退回到Win10,可以通过Windows设置来进行操作。下面是具体的操作步骤:1.打开“开始”菜单,并点击“设置”图标。2.在设置窗口中,选择“更新和安全”选项。3.在左侧导航栏中,点击“恢复”选项。4.在恢复窗口中,找到“返回到Windows10”一栏,并点击“立即开始”按钮。5.系统会提示你备份重要文件,并提醒你可能会丢失在Win11上创建的一些设置和应用程序。确保你已经备份了重要文件后,点


Hot AI Tools

Undresser.AI Undress
AI-powered app for creating realistic nude photos

AI Clothes Remover
Online AI tool for removing clothes from photos.

Undress AI Tool
Undress images for free

Clothoff.io
AI clothes remover

AI Hentai Generator
Generate AI Hentai for free.

Hot Article
Hot Tools

Dreamweaver Mac version
Visual web development tools

MinGW - Minimalist GNU for Windows
This project is in the process of being migrated to osdn.net/projects/mingw, you can continue to follow us there. MinGW: A native Windows port of the GNU Compiler Collection (GCC), freely distributable import libraries and header files for building native Windows applications; includes extensions to the MSVC runtime to support C99 functionality. All MinGW software can run on 64-bit Windows platforms.

MantisBT
Mantis is an easy-to-deploy web-based defect tracking tool designed to aid in product defect tracking. It requires PHP, MySQL and a web server. Check out our demo and hosting services.

Atom editor mac version download
The most popular open source editor

Notepad++7.3.1
Easy-to-use and free code editor

