
Home >Computer Tutorials >Computer Knowledge >How to enable Win11's GPU hardware acceleration program?
How to enable Win11's GPU hardware acceleration program?

- 王林forward
- 2024-01-29 17:12:125131browse
Win11 hardware acceleration GPU program is a feature that can improve computer graphics performance, but many users do not know how to turn it on and off. In this article, PHP editor Banana will introduce to you how to enable the Win11 hardware acceleration GPU plan. With a few simple steps, you can enjoy a smoother, more efficient graphics processing experience. Next, let’s take a look at the specific steps!
How to open the Win11 hardware acceleration gpu plan tutorial
1. Win R shortcut key to start running, enter control to open, switch the viewing mode in the upper right corner to large icons, and find the Internet options.

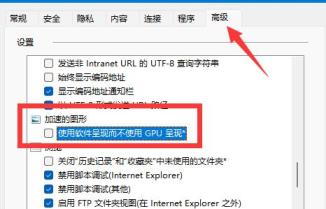
In the window that opens, click the Advanced tab at the top, uncheck Use software programs instead of GPU rendering at the bottom, and click OK to save.
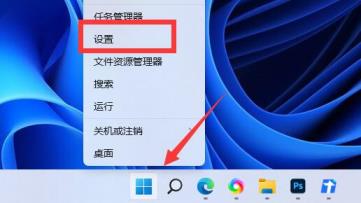
#3. Then right-click Start in the taskbar and select Settings from the menu option above to open it.
#4. Click the display option on the right side of the new interface.

#5. Then enter the graphics options and click the Change Default Graphics Settings option under Default Settings.

#6. Finally, find the hardware acceleration GPU plan and turn on the switch button below it.

The above is the detailed content of How to enable Win11's GPU hardware acceleration program?. For more information, please follow other related articles on the PHP Chinese website!